-
×InformationNeed Windows 11 help?Check documents on compatibility, FAQs, upgrade information and available fixes.
Windows 11 Support Center. -
-
×InformationNeed Windows 11 help?Check documents on compatibility, FAQs, upgrade information and available fixes.
Windows 11 Support Center. -
- HP Community
- Notebooks
- Notebook Hardware and Upgrade Questions
- 15-ay028ur RAM upgrade

Create an account on the HP Community to personalize your profile and ask a question
Your account also allows you to connect with HP support faster, access a personal dashboard to manage all of your devices in one place, view warranty information, case status and more.
Common problems for Battery
We would like to share some of the most frequently asked questions about: Battery Reports, Hold a charge, Test and Calibrating Battery . Check out this link: Is your notebook plugged in and not charging?

It has been a while since anyone has replied. Simply ask a new question if you would like to start the discussion again.
01-02-2017 01:32 AM
 HP Recommended
Product: HP 15-ay028ur
Operating System: Microsoft Windows 10 (32-bit)
I recently bought a laptop 15-ay028ur. The laptop was sold with 2GB of RAM. I want to increase memory up to 4 GB, but do not know how to disassemble the laptop. Can you help ? Maybe - there is some instruction?
Solved! Go to Solution.
1 ACCEPTED SOLUTION
Accepted Solutions
01-02-2017 02:04 AM
HP Recommended
Two non-customer-accessible/upgradable memory module slots (Intel Core processors)
DDR4-2133 dual channel support
Supports up to 16 GB of system RAM in the following conƭgurations
● 16384-MB total system memory (8192×2)[UMA models only]
● 12288-MB total system memory (8192×1) + (4096×1)
● 8192-MB total system memory (8192×1) or (4096×2)
● 6144-MB total system memory (4096×1) + (2048×1)
● 4096-MB total system memory (4096×1) or (2048×2)
Manual:http://h10032.www1.hp.com/ctg/Manual/c05087748
Memory module
PC3L, 12800, 1600-MHz
For use in models with 5th generation Intel Core processors, Intel Pentium processors, and Intel Celeron processors
● 8-GB 693374-005
● 4 GB 691740-005
● 2 GB 691739-005
PC4, 17000, 2133-MHz For use in models with 6th and 7th generation Intel Core processors
● 8-GB 820570-005
● 4 GB 820569-005
● 2 GB 851379-005
You can get the memories on this page:http: //partsurfer.hp.com/search.aspx, select your country and place the code that is highlighted in black to acquire them.
I am proudly Mexican, a Computer Systems Engineer and a community volunteer.
If you found the answer helpful and/or you want to say “thanks”? Click the “ Yes ” box belowDid I help solve the problem? don´t forget to click “ Accept as a solution”
, someone who has the same query may find this solution and be helped by it.

3 REPLIES 3
01-02-2017 01:40 AM - edited 01-02-2017 01:41 AM
HP Recommended
Hi.
Welcome to the forum serg_rc.
Installing memory
Most HP and Compaq notebook computers are designed so that additional memory can be added using a Phillips screwdriver. Use the following steps to install memory in your computer. After reviewing the steps, if you are not confident in performing the installation yourself, contact an HP authorized support provider for technical assistance.
NOTE:If someone other than HP installs or upgrades the memory, any damage caused by the memory and/or by a person trying to install or upgrade the memory is excluded from coverage under the product warranty. The customer assumes all risk and liability for damages for any such installation or upgrade.
NOTE:These steps will work for most notebook computer models. To find steps for your specific computer, enter your computer model number and replace memory into the search field at the top of this window. For example, if you have an HP Mini 210-3000, you would search for 210-3000 replace memory. If you cannot find a memory replacement procedure for your computer model, check the User Guides.
Step 1: Remove electrical power
To remove all power from the computer and prevent accidental damage to the electronic components, do the following:
- Turn off the computer by pressing and holding down the Power button for about 30 seconds.
- Unplug the AC adaptor from the notebook.
- Slide and hold the battery release latch to the unlock position.
- Use your finger to lift the battery up and out.
Step 2: Insert the memory
Follow these steps to insert the new memory:
- Turn the notebook over and place it on a firm surface.
- Use a Phillips screwdriver to remove the cover on the memory module compartment.Figure : Memory module cover (your cover might be different)
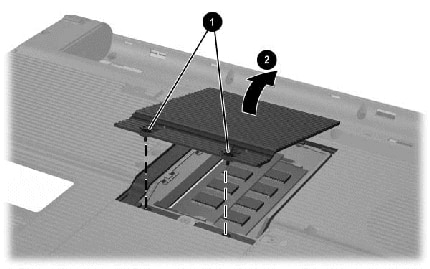
- Retention screws (2)
- Direction to remove compartment cover
- With the cover removed, and before you touch the memory, ground yourself to discharge any static electricity.
NOTE:
To ground yourself, and discharge any static electricity, place one hand on the case of the computer and touch the other hand to a metal surface or grounded object, such as the metal part of a lamp. - If you need to remove memory before installing the new memory, release the memory using a small wooden tool, or fingernail, to spread the clips holding the ends of the memory in place.Figure : Memory module removal
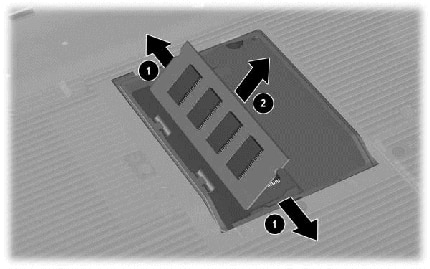
- Direction to pull retention clips
- Direction to remove the module
CAUTION:
To prevent damage to the memory module, grasp the memory module by the side edges. Do not touch the metal contacts. - Place any removed memory modules in an anti-static bag for protection.
- Remove the new memory from the protective anti-static bag and hold the memory by the side edges.
- Place the gold contacts into the connector (bracket) and gently, but firmly, press the memory into place. The clips will click when the memory is properly seated.Figure : Notch alignment and memory module insertion

- Notch alignment
- Direction to insert the module
- Direction to seat module
- Replace the cover and tighten the retention screws.Figure : Memory module cover replacement
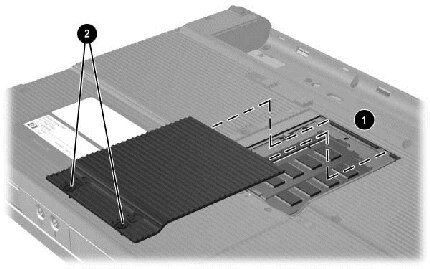
- Two slots in the opening
- Retaining screws
Step 3: Replace electrical power
Replace the power and turn on the computer using these steps:
- Plug the connection from the AC adapter into the notebook, and then connect the AC adapter to a working power supply.
- With the computer turned off, push the battery into the base enclosure until the retention clips click into position.
- Turn on the computer and allow it to reconfigure and recognize the additional memory and improve performance.
More info:http://support.hp.com/us-en/document/c00820047#AbT3
I am proudly Mexican, a Computer Systems Engineer and a community volunteer.
If you found the answer helpful and/or you want to say “thanks”? Click the “ Yes ” box below
01-02-2017 02:04 AM
HP Recommended
Two non-customer-accessible/upgradable memory module slots (Intel Core processors)
DDR4-2133 dual channel support
Supports up to 16 GB of system RAM in the following conƭgurations
● 16384-MB total system memory (8192×2)[UMA models only]
● 12288-MB total system memory (8192×1) + (4096×1)
● 8192-MB total system memory (8192×1) or (4096×2)
● 6144-MB total system memory (4096×1) + (2048×1)
● 4096-MB total system memory (4096×1) or (2048×2)
Manual:http://h10032.www1.hp.com/ctg/Manual/c05087748
Memory module
PC3L, 12800, 1600-MHz
For use in models with 5th generation Intel Core processors, Intel Pentium processors, and Intel Celeron processors
● 8-GB 693374-005
● 4 GB 691740-005
● 2 GB 691739-005
PC4, 17000, 2133-MHz For use in models with 6th and 7th generation Intel Core processors
● 8-GB 820570-005
● 4 GB 820569-005
● 2 GB 851379-005
You can get the memories on this page:http: //partsurfer.hp.com/search.aspx, select your country and place the code that is highlighted in black to acquire them.
I am proudly Mexican, a Computer Systems Engineer and a community volunteer.
If you found the answer helpful and/or you want to say “thanks”? Click the “ Yes ” box below
Be alert for scammers posting fake support phone numbers and/or email addresses on the community.
If you think you have received a fake HP Support message, please report it to us by clicking on "Flag Post".
† The opinions expressed above are the personal opinions of the authors, not of HP. By using this site, you accept the Terms of Use and Rules of Participation.


Didn't find what you were looking for?
Ask the community
† The opinions expressed above are the personal opinions of the authors, not of HP. By using this site, you accept the <a href="https://www8.hp.com/us/en/terms-of-use.html" class="udrlinesmall">Terms of Use</a> and <a href="/t5/custom/page/page-id/hp.rulespage" class="udrlinesmall"> Rules of Participation</a>.