• ×
    Information
    Need Windows 11 help?
    Check documents on compatibility, FAQs, upgrade information and available fixes.
    Windows 11 Support Center.
  • post a message
  • ×
    Information
    Need Windows 11 help?
    Check documents on compatibility, FAQs, upgrade information and available fixes.
    Windows 11 Support Center.
  • post a message
Guidelines
Are you having HotKey issues? Click here for tips and tricks.
Check out our WINDOWS 11 Support Center info about: OPTIMIZATION, KNOWN ISSUES, FAQs, VIDEOS AND MORE.
HP Recommended
G72-b60US Notebook PC
Microsoft Windows 10 (64-bit)

Anyone have success upgrading an older laptop/pc's OS to Win 10 x64?


I wanted to upgrade the RAM on this older laptop (circa 2011) past the 2.43GB usable limit x86 limit , so I created a Win 10 x64 boot media (using MS's boot media creation tool). Upon booting to the media, the Windows logo appears for a bit as if it's loading assets, then a progress spinner appears for a few seconds before crashing to blue screen of death. BSD Stop Code: System Thread Exception Not Handled. Get this with USB and DVD boot media. I upgraded the bios to the latest version (v 48 circa 2011). Install never gets to any menus or confirmations.

I have an SSD installed (not sure if that matters). Bios is also factory locked, so I can't try toggling legacy boot mode or anything like that.


1 ACCEPTED SOLUTION

Accepted Solutions
HP Recommended

@LikeABanshee If you had updated the BIOS, before doing the fresh installation, you should be able to access the BIOS and turn off the secure boot using the below steps to start using the SSD, also, if you haven't been using the HP Recovery Media, you may want to do that instead, as HP neither supports nor recommends using a retail copy of windows, that said, let's get started:

  1. Turn off the computer.

  2. Press the power button to turn on the computer, and then immediately press the Esc key repeatedly until the Startup Menu opens.

    Startup Menu

  3. Press F10 to open BIOS Setup.

  4. Use the right arrow key to select System Configuration, use the down arrow key to select Boot Options, and then press Enter.

    Boot Options selection in the System Configuration window

  5. Check for Legacy Support in the list.

    Boot options list including Legacy Support

    • If Legacy Support is not listed, continue to the next step.

    • If Legacy Support is listed and you are enabling Secure Boot, use the down arrow to select Legacy Support, press Enter, select Disabled, press Enter, and then continue to the next step.

    • If Legacy Support is listed and you are disabling Secure Boot, continue to the next step.

  6. Use the down arrow key to select Secure Boot, and then press Enter.

  7. Use the down arrow key to select Enabled or Disabled depending on your requirements.

    Enable Secure Boot

  8. Press Enter to save the change.

    • If you enabled Secure Boot, depending on your notebook, press F10 to save the changes and reboot, or use the left arrow key to select the File menu, use the down arrow key to select Save Changes and Exit, and then press Enter to select Yes to confirm the change.

    • If you disabled Secure Boot, continue to the next step.

  9. Use the arrow keys to select Legacy Support, press Enter to change the setting to Enable, press Enter, select Yes in the confirmation window, and then press Enter.

    Confirmation window for enabling Legacy Support

  10. Use the down arrow key to select a device in the Legacy Boot Order menu, and press F5 and F6 to move the device down or up.

    Change Legacy Boot Order

  11. Press F10 to accept the changes, use the left arrow key to select Yes, and then press Enter to Exit Saving Changes to restart the computer.

  12. If an Operating System Boot Mode Change message displays, type the code shown, and then press Enter to start Windows.

    NOTE: 

    Make sure you type the code correctly. There is no text field to see what you are typing. This is expected behavior.

    Example of the four-digit code indicating the boot mode change

  13. Turn off the computer, wait a few seconds, turn on the computer, and then immediately press Esc repeatedly until the Startup menu opens.

  14. When the Startup Menu displays, press F9 to open the Boot Device Options.

    Select Boot Device Options

  15. When the Boot Manager Window opens, use the down arrow key to select a boot device, and then press Enter to start the computer from the selected device.

    Select a boot device

P.S: Welcome to HP Community 😉


Keep us posted,

If you would like to thank us for our efforts to help you, 

Give us a virtual high-five by clicking the 'Thumbs Up' icon below, followed by clicking on the "Accept as solution" on this post, 

Have a great day!

Riddle_Decipher
I am an HP Employee


Learning is a journey, not a destination.
Let's keep asking questions and growing together.

View solution in original post

3 REPLIES 3
HP Recommended

@LikeABanshee If you had updated the BIOS, before doing the fresh installation, you should be able to access the BIOS and turn off the secure boot using the below steps to start using the SSD, also, if you haven't been using the HP Recovery Media, you may want to do that instead, as HP neither supports nor recommends using a retail copy of windows, that said, let's get started:

  1. Turn off the computer.

  2. Press the power button to turn on the computer, and then immediately press the Esc key repeatedly until the Startup Menu opens.

    Startup Menu

  3. Press F10 to open BIOS Setup.

  4. Use the right arrow key to select System Configuration, use the down arrow key to select Boot Options, and then press Enter.

    Boot Options selection in the System Configuration window

  5. Check for Legacy Support in the list.

    Boot options list including Legacy Support

    • If Legacy Support is not listed, continue to the next step.

    • If Legacy Support is listed and you are enabling Secure Boot, use the down arrow to select Legacy Support, press Enter, select Disabled, press Enter, and then continue to the next step.

    • If Legacy Support is listed and you are disabling Secure Boot, continue to the next step.

  6. Use the down arrow key to select Secure Boot, and then press Enter.

  7. Use the down arrow key to select Enabled or Disabled depending on your requirements.

    Enable Secure Boot

  8. Press Enter to save the change.

    • If you enabled Secure Boot, depending on your notebook, press F10 to save the changes and reboot, or use the left arrow key to select the File menu, use the down arrow key to select Save Changes and Exit, and then press Enter to select Yes to confirm the change.

    • If you disabled Secure Boot, continue to the next step.

  9. Use the arrow keys to select Legacy Support, press Enter to change the setting to Enable, press Enter, select Yes in the confirmation window, and then press Enter.

    Confirmation window for enabling Legacy Support

  10. Use the down arrow key to select a device in the Legacy Boot Order menu, and press F5 and F6 to move the device down or up.

    Change Legacy Boot Order

  11. Press F10 to accept the changes, use the left arrow key to select Yes, and then press Enter to Exit Saving Changes to restart the computer.

  12. If an Operating System Boot Mode Change message displays, type the code shown, and then press Enter to start Windows.

    NOTE: 

    Make sure you type the code correctly. There is no text field to see what you are typing. This is expected behavior.

    Example of the four-digit code indicating the boot mode change

  13. Turn off the computer, wait a few seconds, turn on the computer, and then immediately press Esc repeatedly until the Startup menu opens.

  14. When the Startup Menu displays, press F9 to open the Boot Device Options.

    Select Boot Device Options

  15. When the Boot Manager Window opens, use the down arrow key to select a boot device, and then press Enter to start the computer from the selected device.

    Select a boot device

P.S: Welcome to HP Community 😉


Keep us posted,

If you would like to thank us for our efforts to help you, 

Give us a virtual high-five by clicking the 'Thumbs Up' icon below, followed by clicking on the "Accept as solution" on this post, 

Have a great day!

Riddle_Decipher
I am an HP Employee


Learning is a journey, not a destination.
Let's keep asking questions and growing together.
HP Recommended

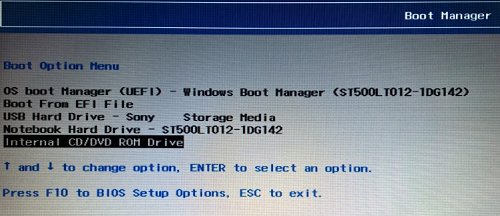
Thanks, but I don't have any of those options in the boot menu. See pic. Factory locked by HP?

IMG_20200323_194013783.jpg

HP Recommended

@LikeABanshee I suggest you install the latest BIOS updates using this link: click here to find and install the same,

If you've done that and yet the issue persists, I suggest you talk to HP support and discuss your options, follow the below steps to get started:


1) Click on this link - http://www.hp.com/contacthp/

2) Click on Sign-in or select the product using the below step:

3) Enter the serial of your device.

4) Select the country from the drop-down.

5) Click on "Show Options".

Fill the web-form, to populate a case number and phone number for yourself!


Also, if you are having trouble navigating through the above options, it's most likely because the device is out of warranty, if yes? please send me a private message with the region you are contacting us from, 

here's how private messages work: Click here for details.


If you wish to thank me for my efforts, you could click on "Accept as solution" on my post as the solution should help others too.

Riddle_Decipher
I am an HP Employee


Learning is a journey, not a destination.
Let's keep asking questions and growing together.
† The opinions expressed above are the personal opinions of the authors, not of HP. By using this site, you accept the <a href="https://www8.hp.com/us/en/terms-of-use.html" class="udrlinesmall">Terms of Use</a> and <a href="/t5/custom/page/page-id/hp.rulespage" class="udrlinesmall"> Rules of Participation</a>.