-
×InformationNeed Windows 11 help?Check documents on compatibility, FAQs, upgrade information and available fixes.
Windows 11 Support Center. -
-
×InformationNeed Windows 11 help?Check documents on compatibility, FAQs, upgrade information and available fixes.
Windows 11 Support Center. -
- HP Community
- Notebooks
- Notebook Operating System and Recovery
- Re: Settings Resetting

Create an account on the HP Community to personalize your profile and ask a question
02-13-2018 10:02 AM
The settings on this keep reseting to default like password requiered to never and the screen timeout to never !!! HELP !!!
Solved! Go to Solution.
Accepted Solutions
02-14-2018 03:38 PM
Thank you for posting on HP Forums, MKazi is at your service.
I understand that you have an HP ENVY x360 - m6-w101dx laptop. I read that the settings on the laptop keep resetting by themselves. I'll be glad to help you.
To provide an accurate resolution, I need a few more details:
- Is it the Windows login password?
- By screen timeout are you referring to the sleep mode settings on your HP laptop?
- Did any software changes or updates happen on the laptop?
While you respond to that, I recommend you to perform the following steps to isolate the issue and arrive at a fix:
- If this issue started recently then let us perform a Microsoft System Restore to rollback the laptop to an earlier date when everything worked fine. This will not delete your data.
Corrupt Windows system files can slow down the computer and cause other problems. System File Checker (SFC) is a utility in Windows that scans for corrupted system files. If SFC finds a problem, it tries to replace the problem files from a cached version on your computer.If System File Checker cannot replace the corrupt files, use the Deployment Image Service and Management Tool (DISM). DISM checks the corrupted files, then downloads and replaces the files through Windows Update. Use the following instructions to run System File Checker.
-
In Windows, search for Command Prompt. In the search results, right-click Command Prompt, select Run as administrator, then click Yes.
-
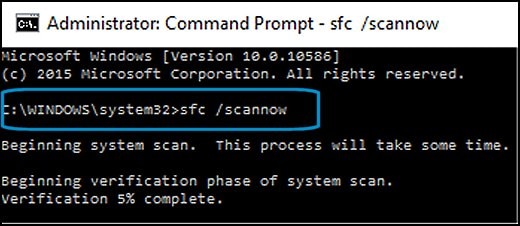
In Command Prompt, type sfc /scannow. Make sure to include the space between sfc and the forward slash /.
Figure : Running System File Checker
-
Press Enter, then wait while System File Checker scans for corrupted files.
When the scan completes, the results display on the screen.
-
If the file checker found and replaced any corrupted files, restart the computer, then check the performance.
-
If the file checker did not find any corrupted files or found corrupted files but could not replace them, then go to the next step.
-
If System File Checker finds corrupted files but cannot replace them, use the Deployment Image Servicing and Management (DISM) tool. DISM checks the corrupted files, then downloads and replaces the files using Windows Update. In Windows, open a web browser.
-
NOTE: You need to be connected to the Internet to use DISM.
-
In Windows, search for Command Prompt. In the search results, right-click Command Prompt, select Run as administrator, then click Yes.
-
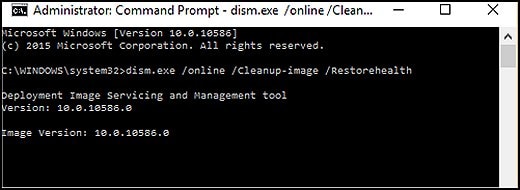
In Command Prompt, type dism.exe /Online /Cleanup-image /Restorehealth. Make sure to include the space before each forward slash / in the command line.
Press Enter, then wait while DISM works. This might take several minutes.
Figure : Running DISM
- If DISM finds corrupted files, it replaces them using Windows Update. If this occurs, after DISM is finished, restart your computer and see if the performance has improved.
If the issue still persists then run the Power troubleshooter to adjust the computer power settings. The Power troubleshooter checks things like the timeout settings, which determine how long the computer waits before turning off the monitor display or entering sleep mode. Adjusting these settings might resolve the issue.
-
In Windows, search for and open the Control Panel.
-
In the Control Panel Search field, type troubleshooting.
-
Click Troubleshooting.
Figure : Clicking Troubleshooting
-
In the System and Security area, click Improve power usage. If asked for an administrator password or confirmation, type the password or provide the confirmation information.
Figure : Clicking Improve power usage
-
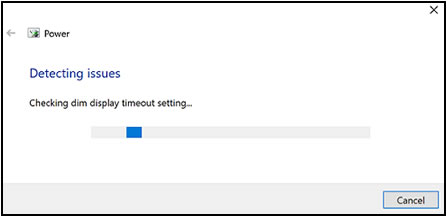
Click Next to run the troubleshooting tool. A Detecting Issues window displays while Windows detects and attempts to fix any issues.
Figure : Detecting issues window
- After troubleshooting is complete, close the troubleshooter.
I sincerely hope this fixes the issue. Feel free to let me know how it goes.
Good luck! 🙂