-
×InformationNeed Windows 11 help?Check documents on compatibility, FAQs, upgrade information and available fixes.
Windows 11 Support Center. -
-
×InformationNeed Windows 11 help?Check documents on compatibility, FAQs, upgrade information and available fixes.
Windows 11 Support Center. -
- HP Community
- Notebooks
- Notebook Video, Display and Touch
- Re: Hp Truevision HD webcam not working

Create an account on the HP Community to personalize your profile and ask a question
Your account also allows you to connect with HP support faster, access a personal dashboard to manage all of your devices in one place, view warranty information, case status and more.

It has been a while since anyone has replied. Simply ask a new question if you would like to start the discussion again.
02-24-2021 08:42 PM - edited 02-24-2021 08:50 PM
 HP Recommended
Product: HP Notebook - 14s-cr1005tu Pavilion 6530
Operating System: Microsoft Windows 10 (64-bit)
On my notebook there is preinstalled HP Truevision HD camera. But is not working.
Whenever i open my camera, flash starts, but camera doesn't. There's a black screen.
If i click on capture in camera app, then after 4-5 seconds, i get an error like below.

I have tested the same with other apps also. I have tried a lot of troubleshooting but nothing worked.
Also, the on running hp hardware testing, no error is coming.

Can someone help me out?
5 REPLIES 5
02-28-2021 09:32 AM
HP Recommended
Hi@shailender999, Welcome to the HP Support Community!
We reviewed your post and I understand that the webcam is not working
Don’t worry, I assure you I will try my best to get this sorted.
Request you to follow the below troubleshooting steps from the document fix :-
https://support.hp.com/in-en/document/c03430151
Please click “Accept as Solution” if you feel my post solved your issue, it will help others find the solution.
Click the “Kudos, Thumbs Up" on the bottom right to say “Thanks” for helping!
Have a great day!
02-28-2021 09:53 AM
HP Recommended
I recommend you follow the below steps and check if it helps.
Restart the computer to correct webcam problems
The webcam might be associated with another software program or not responding. Often, simply restarting the computer can correct the problem. Restart the computer, and then open your webcam software as soon as Windows finishes loading.
If restarting the computer does not correct this problem, continue troubleshooting.
Step 3: Update or change the webcam driver
Some software applications might require updated drivers for your webcam to display video or they might need a more basic driver. Use the following steps to change the driver for your webcam:
-
Go to the HP Customer Support - Software and Driver Downloads page.
-
If a Let's identify your product to get started page displays, click Laptop or Desktop.
-
Type the model name for your computer in the Or, enter your serial number field, and then click Submit. For example, type Pavilion HPE h8-1360t Desktop, and then click Submit.

-
If a Matching products web page opens, select your model number from the list.
-
The software results page for your computer displays with the default operating system selected. If you need to change the operating system, click Change, select your version, and then click Change.
NOTE:
If you cannot find the operating system you want in the list, HP does not have drivers for that operating system.

-
From the list of available software and driver categories, find the webcam driver.
-
If a webcam driver update is available from HP, download the file to your computer and install the software according to the instructions on the webpage. After updating, restart the computer, and then try using your software again. If the problem persists, continue using these steps to install a generic Windows USB video driver.
-
If a webcam driver is not available from HP or you cannot access the Internet, continue using these steps to install a generic Windows USB Video driver.
-
-
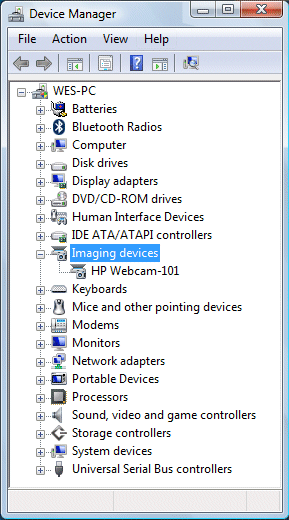
In Windows, search for and open Device Manager.
-
Double-click Imaging Devices to expand the list of webcam drivers.
-
If there is no imaging devices category listed in Device Manager, stop using these steps and see the section Webcam is not listed in Device Manager in this document.
-
If more than one webcam driver is listed, right-click the driver and select uninstall for any driver that is not the HP Webcam-101 or Microsoft USB Video Device driver. Once the other drivers have been removed, restart your computer and open your software. If problems persist, continue using these steps.
-
-
Right-click the name of the webcam in the Images Devices category (HP Webcam-101 or Microsoft USB Video Device), and select Update Driver Software.
-
Click Browse the computer to select a specific USB Video Device driver.
Double-click Imaging Devices to expand the list of webcam drivers, right-click the webcam driver, and then select Properties.

Make a note of the existing name of the webcam driver (Example: HP Webcam), as it might change after the update.
-
On the Webcam Properties window, select Update Driver....
-
Select to Browse the computer for the desired driver.
-
Click Let me pick from a list of device drivers on my computer.
-
Remove the selection from Show compatible hardware.
-
Select Microsoft in the Manufacturer field, and select USB Video Device in the Model field.
-
Click Next to install the webcam driver.
-
Allow the installation of the USB Video Device, and then click Close.
-
After the device has been updated to USB Video Device in Device Manager, restart your computer and open your software.
02-28-2021 10:16 AM
HP Recommended
hi@shailender999,
try with the last steps system reset
- Turn off your HP laptop.
- Disconnect all external devices (printers, USB drives, etc.) from your computer.
- Remove all recently added internal hardware.
- Press the Power button to switch your HP laptop on.
- Once your unit starts booting, immediately press the F11 key. Repeatedly press it until you see the Choose an Option screen.
- Select Troubleshoot.
- Choose Reset this PC.
- You can either opt to keep your files or to remove everything.
- Select Keep My Files when you want to retain your data. Once you click Reset, your operating system will be reinstalled. The process may take a while.
- Choose Remove Everything when you want to remove all your personal files.
- You can opt to remove everything solely on the drive where your operating system is installed. On the other hand, you can click All Drives when you do not want to retain any data.
- You can also fully clean the drive you selected or just remove your files.
- Click Reset.
Hope this helps! Keep me posted.
Be alert for scammers posting fake support phone numbers and/or email addresses on the community.
If you think you have received a fake HP Support message, please report it to us by clicking on "Flag Post".
† The opinions expressed above are the personal opinions of the authors, not of HP. By using this site, you accept the Terms of Use and Rules of Participation.


Didn't find what you were looking for?
Ask the community
† The opinions expressed above are the personal opinions of the authors, not of HP. By using this site, you accept the <a href="https://www8.hp.com/us/en/terms-of-use.html" class="udrlinesmall">Terms of Use</a> and <a href="/t5/custom/page/page-id/hp.rulespage" class="udrlinesmall"> Rules of Participation</a>.