-
×InformationNeed Windows 11 help?Check documents on compatibility, FAQs, upgrade information and available fixes.
Windows 11 Support Center. -
-
×InformationNeed Windows 11 help?Check documents on compatibility, FAQs, upgrade information and available fixes.
Windows 11 Support Center. -
- HP Community
- Archived Topics
- Notebooks Archive
- How to eject the speaker cover (beats audio) for cleaning

Create an account on the HP Community to personalize your profile and ask a question
11-26-2014 12:18 PM - edited 11-26-2014 01:07 PM
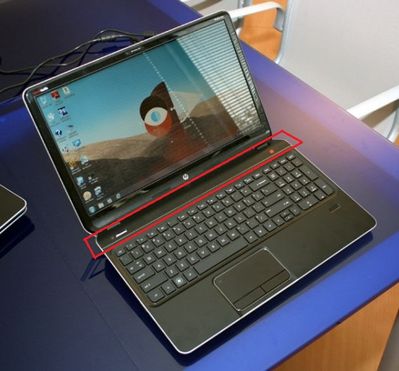
My laptop is hp (dv6-7180se) and i want to clean the Perforated cover that exists on beats audio speakers .. look the image :
can i open it without open screws in back side?
please i need some details to eject it safely
Solved! Go to Solution.
Accepted Solutions
11-28-2014 01:17 PM
Hello @Fantastico,
I have read your post on how you are looking to clean the speaker-surface of your notebook computer, and I would be happy to assist you in this matter!
As indicated in the Maintenance and Service Guide for your notebook, the only way to remove the top cover where the speakers are located is to:
- Turn the computer off
- Disconnect the power from the notebook by unplugging the power cord
- Disconnect the battery (see Battery on page 46), and then remove the following components:
- Hard drive (see Hard drive on page 47)
- Optical drive (see Optical drive on page 54)
- Keyboard (see Keyboard on page 57)
Unfortunately, some screw removal will be necessary to eject the Top Cover and Speakers. The steps below should help to safely remove the Top Cover so as to clean underneath:
1. Remove the seven Phillips PM2.5×8.5 screws that secure the top cover to the computer
2. Remove the three Phillips PM2.5×5.5 screws that secure the top cover to the computer.
3. Remove the nine Phillips PM2.5×3.5 screws that secure the top cover to the computer.
4. Turn the computer right side up, with the front toward you.
5. Open the computer.
6. Release the corresponding ZIF connectors, and then disconnect the following cables from
the system board:
(1) Power button board cable
(2) TouchPad button board cable
(3) Fingerprint reader board cable
(4) Top speakers cable
7. Remove the three Phillips PM2.5×5.5 screws that secure the top cover to the computer.
8. Lift the rear edge of the top cover (1) until the left and right sides have disengaged from
the base enclosure.
9. Remove the top cover (2). Be careful not to damage the thin section of the base enclosure (3) around
the optical drive bay when removing the top cover.
10. Reverse this procedure to install the top cover once again.
reference: http://h10032.www1.hp.com/ctg/Manual/c03582006.pdf
Please re-post with the results of your troubleshooting, and I look forward to your reply!
Regards 🙂
I work on behalf of HP
Please click “Accept as Solution ” if you feel my post solved your issue, it will help others find the solution.
Click the “Kudos, Thumbs Up" on the right to say “Thanks” for helping!
01-07-2015 02:04 PM
I thank you for help !
I tried to open my PC with cataloge you gave me and i succeeded in the try . But i faced some annoying problems like keyboard openning and the cover of speakers .
Keyboard openning was very very difficult and i was imminent of break it , also the uper plastic cover of keyboard stripped and can't return .
ِAnd i want to complain from a perforated section that is very thin and it's nippers breaked one after one with all caution .
no other problems ! Thanks! . 🙂


