-
×InformationNeed Windows 11 help?Check documents on compatibility, FAQs, upgrade information and available fixes.
Windows 11 Support Center. -
-
×InformationNeed Windows 11 help?Check documents on compatibility, FAQs, upgrade information and available fixes.
Windows 11 Support Center. -
- HP Community
- Printers
- Printer Paper Jams & Feed Issues
- False message paper tray empty Windows 8.1

Create an account on the HP Community to personalize your profile and ask a question
Your account also allows you to connect with HP support faster, access a personal dashboard to manage all of your devices in one place, view warranty information, case status and more.

It has been a while since anyone has replied. Simply ask a new question if you would like to start the discussion again.
07-12-2021 12:58 PM
 HP Recommended
Product: HP Photosmart all-in-one C410
Operating System: Microsoft Windows 8.1 (64-bit)
I have a false message "paper tray empty. load paper" when I try to print. I have a HP Photosmart Premium all-in-one C410 series and am using Windows 8.1. I've looked online for additional drivers and there are none. Please help.
1 REPLY 1
07-15-2021 09:03 AM - edited 07-15-2021 09:04 AM
HP Recommended
Hi @ariI71,
I'd like to help!
I understand you are receiving a "paper tray empty" error.
Follow the below suggestions to resolve the error-
Solution one: Perform a reset
Sometimes, restarting the product can clear a paper feed issue. Follow these steps to perform a reset.
Step one: Reset the product
Press the Power button (
 ) to turn on the product.
With the product turned on, disconnect the power cord from the rear of the product.
Unplug the power cord from the wall outlet.
Wait at least 15 seconds.
Plug the power cord back into the wall outlet.
Reconnect the power cord to the rear of the product.
If the product does not turn on by itself, press the Power button (
) to turn it on.
Step two: Print a printer status report
Print a printer status report. See the section on how to use these solutions at the beginning of this document.
If the paper status report prints, try printing the original document again. If the issue is resolved, there is no need to continue troubleshooting.
If the issue persists, continue with the next solution.
If the paper status report does not print, continue with the next solution.
Solution two: Check the condition of the paper, and then reload it
Paper feed issues might result from dusty, torn, wrinkled, wet, or folded paper in the tray. The quality of the paper can also make a difference. Use only good quality paper that meets product specifications. Follow these steps to check the condition of the paper.
Step one: Check the condition of the paper
Remove the stack of paper from the tray.
Check for obstructions inside the tray. Use a flashlight to view the mechanism inside the tray to make sure that nothing blocks the paper from engaging with the rollers. Even small pieces of paper can cause paper feed issues.
NOTE:
If you find obstructions in the paper path, skip to the section on cleaning the rollers.
Examine the condition of the paper, and then replace any ripped, dusty, curled, wrinkled, or bent paper.
Make sure that all the paper in the stack is the same size and type. Never load mixed types of paper in the tray. The product can only process one type of paper at a time.
Tap the stack of paper on a flat surface to align the edges.
Make sure that the stack of paper contains no fewer than 10 sheets and no more than 25 sheets of paper.
NOTE:
You need to use 10 to 25 sheets of paper only for purposes of these troubleshooting steps. When the issue is resolved, you can resume loading paper according to the paper tray capacity specifications for your product.
Step two: Reload the paper
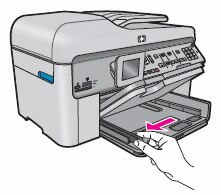
Raise the output tray, and then slide the paper-width guide outwards.
Figure : Lift the output tray and slide the paper-width guide outwards
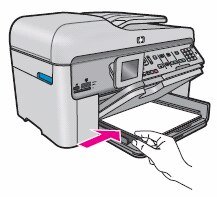
Insert 10 to 25 sheets of paper into main tray with the short edge forward and the print side down. Make sure that the stack of paper is not higher than the paper stack line on the paper width guide.
Slide the stack of paper forward until it stops.
Figure : Slide the stack of paper forward in the tray.

Slide the paper guide inward until it stops at the edge of the paper. Do not push the guides in so tightly that they bind against the paper.
Figure : Slide the paper-width guide inward
Lower the output tray, and then pull the tray extender outwards as far as it will go. Flip the paper catch at the end of the tray extender.
Figure : Lower the output tray and pull out the tray extender

Step three: Print a printer status report
Print a printer status report. See the section on how to use these solutions at the beginning of this document.
If the paper status report prints, try printing the original document again. If the issue is resolved, there is no need to continue troubleshooting.
If the issue persists, continue with the next solution.
If the paper status report does not print, continue with the next solution.
Solution three: Clean the rollers, and then print a printer status report
Dust, paper fiber, and other debris might accumulate on the paper feed and pick rollers and cause paper jams and paper feed issues. Follow these steps to clean the paper feed rollers, and then print a printer status report to check that the hardware functions correctly.
NOTE:The graphics in the following steps might not look exactly like your product, but the steps are the same.
Step one: Clean the rubber paper feed and pick rollers
Gather the following materials:
A clean, lint-free cloth, or any cloth that will not come apart or leave fibers
Distilled, filtered, or bottled water (tap water might damage the product)
A clean, lint-free cotton swab
Press the Power button (
) to turn off the product.Turn the product so that you can access the rear side.
Disconnect the power cord from the rear of the product.
Push the right side of the duplexer to the left, and then pull out the duplexer. Set the duplexer aside.
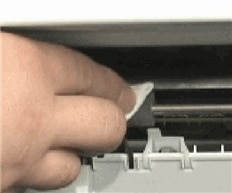
Lightly dampen a clean, lint-free cloth with bottled or distilled water, and then squeeze any excess liquid from the cloth.
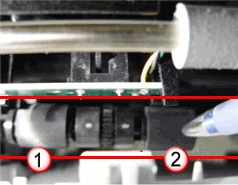
Press the cloth against the rollers in the product, and then rotate them upwards with your fingers. Apply a moderate amount of pressure to remove any dust or dirt buildup.
Figure : Clean the rollers in the product
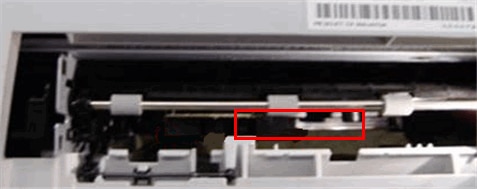
Look inside the rear access area of the product to find the pick rollers. They are near the center of the product behind the paper feed rollers.
Figure : Location of the pick rollers
NOTE:
You might need to use a flashlight to illuminate the pick rollers.
Lightly dampen a clean, lint-free cotton swab, and then use it to clean the pick rollers.
Figure : The pick rollers
Allow the rollers to dry for 10 or 15 minutes.
Step two: Clean the rollers in the duplexer
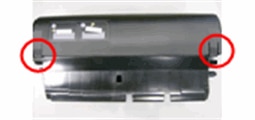
Hold the duplexer in front of you, and then press both tabs on both sides of the duplexer to open it.
Figure : Location of the tabs on the duplexer
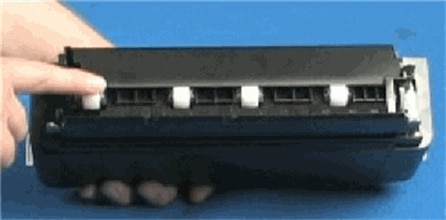
Check the paper feed rollers in the duplexer to make sure that they are clean, free of paper bits, and rotate freely.
Figure : Check the rollers in the duplexer
Clean the rollers of the duplexer the same way you cleaned the rollers inside the product.
Allow the rollers of the duplexer to dry for 10 or 15 minutes.
Insert the two pegs on the left side of the duplexer into the left side of the product, and then gently push the duplexer in. Make sure that the duplexer is firmly in place
Reconnect the power cord to the rear of the product.
Press the Power button (
) to turn on the product.
Step three: Print a printer status report
Print a printer status report. See the section on how to use these solutions at the beginning of this document.
If the paper status report prints, try printing the original document again. If the issue is resolved, there is no need to continue troubleshooting.
If the issue persists, continue with the next solution.
If the paper status report does not print, continue with the next solution.
Solution four: Adjust the paper settings in the print driver
The product might not pick up paper if the paper size and type in the paper tray do not match the size and type settings in the print driver. This feature of the product helps to avoid wasting ink and paper if the paper is not what you expected.
Return to the document you were trying to print when the issue occurred.
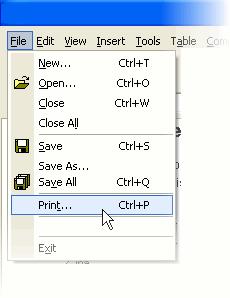
Click File, and then click Print. The Print window opens.
Figure : Click File, and then click Print
Click the button that opens the Properties dialog box. Depending on the software program, the button might be Properties, Options, Printer Setup, Printer, or Preferences.
Click the Paper Quality or Features tab.
NOTE:
The exact names of some of the settings in your program might be slightly different than those described here.
From the Paper type drop-down list, select the paper type that matches the paper in the product.
From the Size drop-down list, select the paper size that matches the paper in the product.
For example, if you have 101.6 x 152.4 mm (4 x 6 inch) photo paper loaded in the paper tray, select 4x6in. or 4x6in. (tab).
If the required paper size is not in the drop-down list, follow these steps to create a custom paper size.
Select Custom from the Size drop-down list, or the Custom tab.
In the Name dialog box, type a name for the new custom size.
In the Width and Length boxes, type the dimensions.
Select the unit of measurement, and then click Save.
Click OK to close the Custom Paper Size dialog box, and then click OK again to close the Properties dialog box.
NOTE:
You must exit the Properties dialog box to apply your changes.
Open the Properties dialog box again, and then select the new custom size from the Size drop-down list.
Click OK, and then click OK again to print the document.
If the document prints, the issue is resolved, and there is no need to continue troubleshooting.
If the document prints on plain white paper, but not a special paper type, there is no need to continue troubleshooting. The problem is probably related to the paper that you were trying to print on, or possibly a connectivity problem. Review the Cause and Prevention sections at the end of this document to check other possibilities.
If the document does not print, continue with the next solution.
You may refer to - 'Out of Paper' Error Message and the Printer Does Not Pick Up or Feed Paper
If the issue persists, I'd suggest you contact HP in your region regarding the service options for your printer
Hope this helps! Keep me posted.
And, Welcome to the HP Support Community.
Please click “Accept as Solution” if you feel my post solved your issue, it will help others find the solution.
Click the “Kudos, Thumbs Up" on the bottom right to say “Thanks” for helping
Be alert for scammers posting fake support phone numbers and/or email addresses on the community.
If you think you have received a fake HP Support message, please report it to us by clicking on "Flag Post".
† The opinions expressed above are the personal opinions of the authors, not of HP. By using this site, you accept the Terms of Use and Rules of Participation.


Didn't find what you were looking for?
Ask the community
† The opinions expressed above are the personal opinions of the authors, not of HP. By using this site, you accept the <a href="https://www8.hp.com/us/en/terms-of-use.html" class="udrlinesmall">Terms of Use</a> and <a href="/t5/custom/page/page-id/hp.rulespage" class="udrlinesmall"> Rules of Participation</a>.