-
×InformationNeed Windows 11 help?Check documents on compatibility, FAQs, upgrade information and available fixes.
Windows 11 Support Center. -
-
×InformationNeed Windows 11 help?Check documents on compatibility, FAQs, upgrade information and available fixes.
Windows 11 Support Center. -
- HP Community
- Printers
- Printer Paper Jams & Feed Issues
- My Deskjet 3752 is erroring on premium photo paper.

Create an account on the HP Community to personalize your profile and ask a question
06-07-2023 05:02 PM
I am trying to print on 5x7 premium matte photo paper. I have the printer slide over to 5x7 and once I press print it begins to feed in and the screen on the printer comes up with an E. I have tried looking to see if there is a way to change paper settings on my MacBook so it can tell the deskjet it is premium paper but I am not having any luck.
Any solutions?
06-10-2023 07:43 PM
Hi @bethybarry,
Welcome to the HP Support Community
I understand you are facing an issue with your HP DeskJet 3752 All-in-One Printer. Not to worry I will help you to get a resolution to resolve the issue.
Let's perform a power drain:
- With the printer turned on, disconnect the power cord from the rear of the printer and also unplug the power cord from the wall outlet.
- Remove USB cable, if present.
- Wait for 2-3 minutes, press and hold the power button on your printer for about 30 seconds to remove any additional charge.
- Now plug back the power cable straight to a wall outlet without any surge protector or an extension cord (This is important) and then plug back the power cord to the printer.
- Turn on the printer and wait till warm-up period finishes and the printer is idle
Update the printer firmware
- Click here to download and install the latest printer firmware from your product
- Click here to know different methods of updating printer firmware.
If the issue persists, then please follow the steps mentioned in this document:
Step 1: Clear all paper from the input tray
Remove all loose and jammed paper from the input tray area.
CAUTION:
Remove all paper or objects from the input tray before removing paper or objects from any other areas of the printer. Damage to the printer can occur if the input tray is not cleared first.
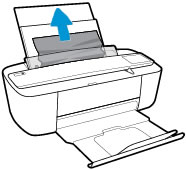
Remove all paper from the input tray, including both loose and jammed paper.
Check for any jammed paper or objects in the input tray area, and then remove any jammed paper or objects you find.
To avoid tearing any whole sheets of paper, pull the paper with both hands.
NOTE:
The input tray shield prevents foreign debris from falling into the paper path and causing paper jams. Do not remove the input tray shield.
Press the Cancel button .
The printer tries to clear the jam automatically.
After removing all paper or objects from the input tray area, continue to the next step to remove any additional jammed paper from the output tray.
Step 2: Clear jammed paper from the output tray
Remove any loose or jammed paper that is accessible from the output tray.
Check for any jammed paper or objects in the output tray area, and then remove any jammed paper or objects you find.
To avoid tearing any whole sheets of paper, pull the paper with both hands.
After removing jammed paper or objects from the output tray, continue to the next step to remove jammed paper from the ink cartridge access area.
Step 3: Clear jammed paper from the ink cartridge access area
Remove any loose or jammed paper that is accessible from the ink cartridge access area, and then make sure the carriage moves freely.
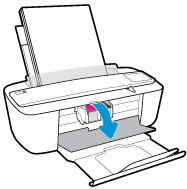
Open the ink cartridge access door.
Wait until the carriage is idle and silent before you continue.
With the printer turned on, disconnect the power cord and any other cables from the rear of the printer.
WARNING:
You must unplug the power cord to move the carriage by hand and reset the paper feed mechanism without the risk of electrical shock.
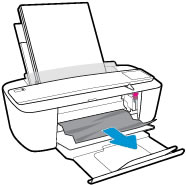
Check for any paper or objects in the ink cartridge access area, and then remove any paper or objects you find.
To avoid tearing any whole sheets of paper, pull the paper with both hands.
Firmly push the carriage to the right, and then remove any paper or objects blocking the carriage path.
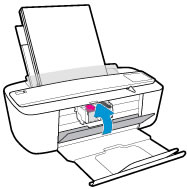
Close the ink cartridge access door.
Reconnect the power cord and any other cables, and then turn on the printer.
Try to print. If the issue persists, continue to the next step.
Step 4: Reset the printer
Sometimes, the printer can display an error message even after the issue has been resolved. Reset the printer to clear the error.
Turn on the printer, if it is not already on.
Wait until the printer is idle and silent before you continue.
With the printer turned on, disconnect the power cord from the rear of the printer.
Wait at least 10 seconds.
Reconnect the power cord to the rear of the printer.
Turn on the printer, if it does not automatically turn on.
The printer might go through a warm-up period. The printer lights might flash, and the carriage might move.
Wait until the warm-up period finishes and your printer is idle and silent before you continue.
Try to print. If the error persists, continue to the next step.
Step 5: Manually clean the paper feed rollers
Dust, paper fiber, and other debris might accumulate on the paper feed rollers and cause paper jams and paper feed issues. Clean the rollers inside the printer, and then try to print again.
Turn off the printer, and then disconnect the power cord and any other cables.
WARNING:
You must unplug the power cord to move the carriage by hand and reset the paper feed mechanism without the risk of electrical shock.
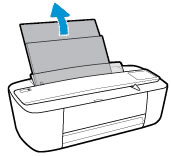
Raise the input tray and the input tray extender.
Lift and hold the input tray shield.
NOTE:
Do not remove the input tray shield. The input tray shield prevents foreign debris from falling into the paper path and causing paper jams.
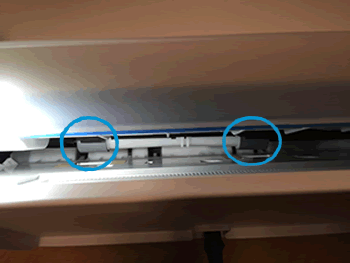
Look down through the open input tray and find the gray paper pick rollers. You might need a flashlight to illuminate the area.
Lightly dampen the cotton swab with water, and then squeeze any excess liquid from the swab.
Press the swab against the rollers, and then rotate them upward with your fingers. Apply a moderate amount of pressure to remove dust or dirt buildup.
Release the input tray shield.
Allow the rollers to dry completely (approximately 10 minutes).
Reconnect the power cord and any other cables, and then turn on the printer.
Try to print. If the error persists, continue to the next step.
Hope this helps! Keep me posted.
Please click “Accepted Solution” if you feel my post solved your issue, it will help others find the solution. Click the “Kudos/Thumbs Up" on the bottom right to say “Thanks” for helping!
A_Gayathri
HP Support Community Administrator.