-
×InformationNeed Windows 11 help?Check documents on compatibility, FAQs, upgrade information and available fixes.
Windows 11 Support Center. -
-
×InformationNeed Windows 11 help?Check documents on compatibility, FAQs, upgrade information and available fixes.
Windows 11 Support Center. -
- HP Community
- Printers
- Printer Paper Jams & Feed Issues
- Paper jam with laser color 179 fnw

Create an account on the HP Community to personalize your profile and ask a question
08-05-2021 07:33 AM
Hello everyone,
I would like to know how to remove jammed paper from the back of the printer apart from the usual procedure (open the back cover and lower the transfer roller ...)? Thank you !
08-08-2021 10:29 AM - edited 08-08-2021 10:30 AM
Hi @Beniby,
I'd like to help!
I understand you would like to know how to remove the paper jams.
Try the below suggestions-
Step 1: Look for jammed paper
Paper jams can occur in multiple areas of the printer. If you cannot find the paper jam in one area, continue to the instructions for the next area until you locate the jam.
Clear jammed paper from the exit area
Remove any loose or jammed paper that is accessible from the exit area.
Lift the scan unit.

Open the rear door.
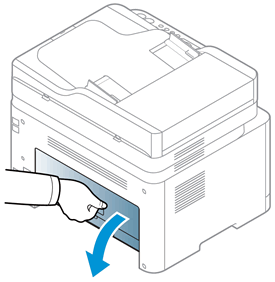
Pinch the latch to release the transfer roller, and then lower the roller to access the inside of the printer.

Use both hands to remove any jammed paper or objects from the exit area.

Close the scan unit.
Raise the transfer roller until it snaps into its original position, and then close the rear door.
Reconnect the power cord to the wall outlet or power strip, and then turn on the printer.
If the error persists, check for jammed paper in another area of the printer.
Clear jammed paper from the input tray
Remove any loose or jammed paper that is accessible from the input tray.
Pull out the input tray.
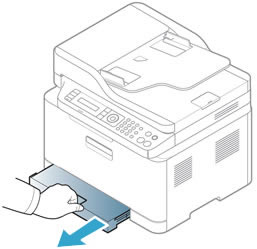
Use both hands to remove any jammed paper from the input tray.

Push in the input tray.
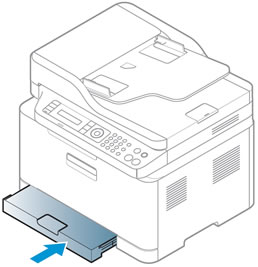
Open the toner cartridge access door, and then close it to clear the error message.

If the error persists, check for jammed paper in another area of the printer.
Clear jammed paper from inside the printer
Remove any loose or jammed paper that is accessible from inside the printer.
Turn off the printer, and then disconnect the power cord from the wall socket or power strip.
WARNING:
You must disconnect the power cord before reaching inside the printer to avoid risk of injuries or electric shock.
Lift the scan unit.

Open the rear door.

Pinch the latch to release the transfer roller, and then lower the roller to access the inside of the printer.

Use both hands to remove any jammed paper or objects from inside the printer.
WARNING:
The fuser is located above the rear door, and it is hot. Do not attempt to reach into the area above the rear door until the fuser is cool.
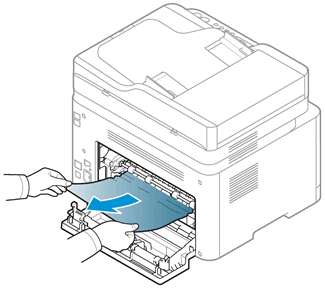
Raise the transfer roller until it snaps into its original position, and then close the rear door.
Close the scan unit.
Reconnect the power cord to the wall outlet or power strip, and then turn on the printer.
If the error persists, check for jammed paper in another area of the printer.
Clear jammed paper from the ADF (HP Color Laser MFP 179fnw, 179fwg printers)
Remove any loose or jammed paper that is accessible from the automatic document feeder (ADF).
Open the document feeder cover.

Use both hands to remove any jammed paper from the ADF input tray area.
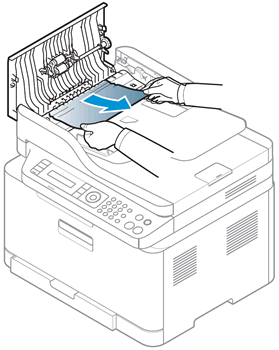
Close the document feeder cover.
Raise the ADF input tray to access to the document feeder output tray, and then use both hands to remove any jammed paper from the ADF output tray area.

Lower the document feeder input tray, and then open the scanner lid.
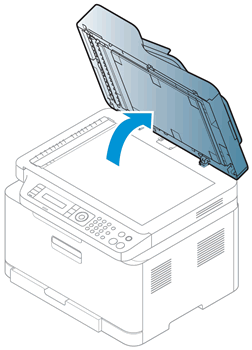
Use both hands to gently pull out any jammed paper behind the white plastic backing.

Close the scanner lid.
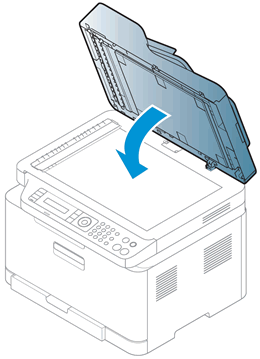
Reconnect the power cord to the wall outlet or power strip, and then turn on the printer.
Step 2: Reset the printer
Sometimes a paper jam error persists even though there is no jammed paper (false paper jam).
With the printer turned on, disconnect the power cord from the printer.
Unplug the power cord from the power source.
Wait 60 seconds.
Reconnect the power cord to a wall outlet and to the printer.
NOTE:
HP recommends plugging the printer directly into a wall outlet.
You may refer to -Paper Jam Error
If the issue persists, I'd suggest you contact HP in your region regarding the service options for your printer
Hope this helps! Keep me posted.
And, Welcome to the HP Support Community.
Please click “Accept as Solution” if you feel my post solved your issue, it will help others find the solution.
Click the “Kudos, Thumbs Up" on the bottom right to say “Thanks” for helping
