-
×InformationNeed Windows 11 help?Check documents on compatibility, FAQs, upgrade information and available fixes.
Windows 11 Support Center. -
-
×InformationNeed Windows 11 help?Check documents on compatibility, FAQs, upgrade information and available fixes.
Windows 11 Support Center. -
- HP Community
- Printers
- Printer Paper Jams & Feed Issues
- PhotoSmart B8550 Indicates Paper Jam, but, No Paper Jam

Create an account on the HP Community to personalize your profile and ask a question
09-30-2022 04:40 PM
I have had my HP PhotoSmart B8550 inkjet photo printer for years, but lately I have not been able to use it because it reports that there is a paper jam when there clearly is not a paper jam. Has anyone else experienced anything similar? Any way to resolve this issue?
10-04-2022 06:49 AM
Hi @johnrsal
Welcome to the HP Support Community.
I understand that you are facing issues with a paper jam. I'd like to help!
Please follow the steps mentioned below
Step one: Remove any loose paper
CAUTION:
Do not remove jammed paper at this stage. Remove only the loose paper.
Turn off the product and unplug the power cord from the back of the product.
Remove all loose paper from the main input tray.
After the paper is removed, make sure that no scraps of paper are stuck in the main input tray.
Step two: Clear the jam from the back of the printer
NOTE:
This video is provided as a supplement to the instructions in this document. For best quality on dial-up connections, wait until the video has fully loaded before viewing.
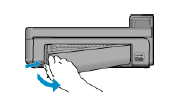
Press the tab on the left side of the rear door and pull the left side of the rear door away from the product.
Figure: Open the rear door

Gently pull any jammed paper out of the rollers.
CAUTION:
If the paper tears when it is removed from the rollers, check the rollers and wheels for pieces of torn paper and remove any torn paper. If all the paper is not removed from the product, more paper jams are likely to occur.
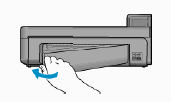
Replace the rear door. Gently push the door forward until it snaps into place.
Figure: Replace the rear door

Replace the paper in the input tray. For document print jobs, make sure that only plain, unused, white paper is loaded in the input tray. For photo print jobs, HP recommends using HP Advanced Photo Paper.
Step three: Open the top cover and clear the jam
Raise the ink cartridge access door until it snaps into place.

Gently remove any jammed paper from the product.
CAUTION:
If the paper tears when it is removed from the product, check for pieces of torn paper and remove any torn paper. If all the paper is not removed from the product, more paper jams are likely to occur.
Step four: Reload paper and test the printer
Plug the power cord into the back of the product and use the power button ( ) to turn on the product.
Load plain, unused, white paper into the main input tray.
Press OK to continue the current print job.
If the current job does not print or there is no print job to be completed, follow these steps to print a printer status report.
Press the cancel button ( ) on the product control panel to clear any remaining print jobs.
Press the setup button ( ), use the right arrow button
  ) to highlight Tools, and then press OK.
Use the right arrow button  ) to highlight Printer Status Report and press OK. The printer status page prints.
If the printer status page does not print, continue with the next step.
Step five: Service the product
Service or replace your HP product if the issue persists after completing all the preceding steps.
Go to Contact HP Customer Support to schedule a product repair or replacement. If you are in the Asia Pacific, you will be directed to a local service center in your area.
To confirm your warranty status, go to HP Product Warranty Check. Repair fees might apply for out-of-warranty products.
Hope this helps! Keep me posted.
Please click “Accept as Solution” if you feel my post solved your issue, it will help others find the solution. Click the “Yes" on the bottom right to say “Thanks” for helping
Nal_NR-Moderator
I am an HP Employee
