-
×InformationNeed Windows 11 help?Check documents on compatibility, FAQs, upgrade information and available fixes.
Windows 11 Support Center. -
-
×InformationNeed Windows 11 help?Check documents on compatibility, FAQs, upgrade information and available fixes.
Windows 11 Support Center. -
- HP Community
- Printers
- Printer Setup, Software & Drivers
- Re: Default to double sided printing on Envy 5030

Create an account on the HP Community to personalize your profile and ask a question
Your account also allows you to connect with HP support faster, access a personal dashboard to manage all of your devices in one place, view warranty information, case status and more.
Check some of the most frequent questions about Instant Ink: HP INSTANT INK, HP+ PLANS: INK AND TONER.
Check out our WINDOWS 11 Support Center info about: OPTIMIZATION, KNOWN ISSUES, FAQs AND MORE.

It has been a while since anyone has replied. Simply ask a new question if you would like to start the discussion again.
10-14-2019
08:02 AM
- last edited on
10-17-2019
11:37 AM
by
![]() Jacky-D
Jacky-D
 HP Recommended
Hi - Same problem that I can set 2 sided printing up on a job by job basis, and create a profile for 2 sided printing/different print qualities, but I can't get it to set the profile i want to default. It automatically defaults to high paper and high ink consumption modes 😞
The cynic in me thinks this might be a deliberate loss of functionality so ink sales are maximised - but delighted to be proven wrong about that!
Current response doesn't answer the question re: a default setting.
5 REPLIES 5
10-16-2019 03:34 PM
HP Recommended
@Envy5030Qs, Welcome to the HP Support Community!
Let us follow these steps to set print settings as default:
-
Open a document, photo, or webpage, click File, and then click Print to open the print dialog.
-
If a Show Details button displays at the bottom of the dialog, click it to reveal all available menu options. The button changes to Hide Details when clicked.

-
Select your printer in the Printer menu.
-
Select an option in the Presets menu that applies to your print job or paper type.
-
Click the unnamed print options menu at the separator bar to display more settings options.
-
Change any print job settings.
-
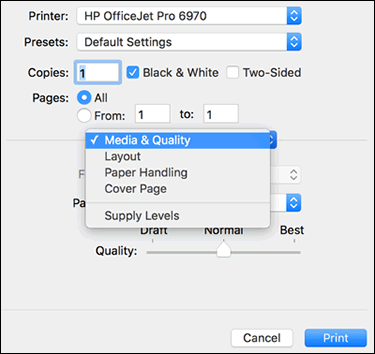
Print in color or black and white: Select or de-select Black & White on the main dialog. The Presets menu also includes color and black and white options.
-
Paper type (photo, plain, specialty): Selecting the paper type ensures the printer properly applies the ink to the paper you loaded in the printer. Click Media & Quality, and then click the Paper Type menu.
-
Paper size: Select the paper from the Paper Size menu on the main dialog, if present. Or, click Paper Handling, select Scale to fit paper size, and then select the paper in the Destination Paper Size menu.
-
Create a custom paper size: Click Manage Custom Sizes in the Paper Size menu, if available. The feature might also be available from the app File menu in Page Setup. Go to Creating Custom Paper Sizes for more information.
-
Adjust print quality: Click Media & Quality, and then move the Quality slider to the desired setting.
-
Two-sided printing (duplexing): Select Two-Sided on the main dialog, select Layout from the print options menu and then select a binding option in the Two-Sided menu. Go to Printing on Both Sides of the Paper (Mac) for detailed steps on how to load and flip the paper for your printer type.
-
Add or remove a border: Click Layout, and then click the Border menu to select a border width or select None for borderless prints.
-
Mirror printing: Reverse an image or document for printing iron-on transfers. Click Layout, and then select the Flip horizontally option.
-
-
To save your settings for future print jobs, click the Presets menu, and then select Save Current Settings as Preset. You may name it as desired.
Let me know how this goes.
If you feel my post solved your issue, please click “Accept as Solution”, it will help others find the solution. Click the “Kudos/Thumbs Up" on the bottom right to say “Thanks” for helping!
KUMAR0307
I am an HP Employee
10-16-2019 04:47 PM
HP Recommended
Thanks for trying but not quite what I'm after.
I have a different driver but the principal is I guess the same...
I'm able to set this up these "printing shortcuts" but not to make them the default so that when open my machine and hit print, it prints using that profile.

I currently still have to go file>print>print properties, select the "shortcut">OK>Print. Which is many clicks more than seems necessary.
So in short my query is about setting the profile I've created as a reliable default - not setting up the profile.
Thanks again!
10-17-2019 11:49 AM
HP Recommended
I see that you are using a Windows OS. The steps I provided was for a MAC as the original post was regarding a MAC. Apologies for the misunderstanding.
Let us follow these steps:
Access the settings window in Devices and Printers to select settings that apply to all your print jobs.
-
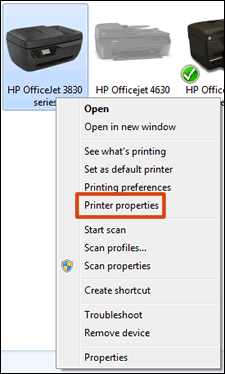
Search Windows for 'printers', then click Devices and Printers in the search results.
-
Right-click the icon for your printer, then click Printer properties.
-
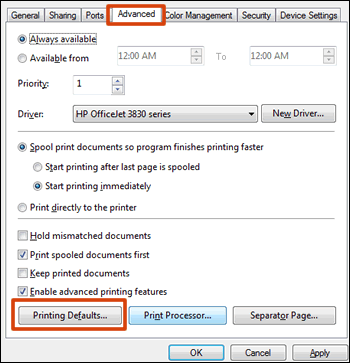
Click the Advanced tab, then click Printing Defaults.
-
Change any settings you want as defaults in the Printing Defaults window, then click OK.
Let me know how this goes.
If you feel my post solved your issue, please click “Accept as Solution”, it will help others find the solution. Click the “Kudos/Thumbs Up" on the bottom right to say “Thanks” for helping!
KUMAR0307
I am an HP Employee
10-18-2019 01:36 AM
HP Recommended
Thanks for trying but that just takes me back to the same dialogue that lets me set up profile but doesn't allow me to make one default. So I still have to I manually select that profile each time I want to print (or at least each session) otherwise when I hit print, its still printing using the "everyday defaults" profile.
Its not looking promising...
10-18-2019 03:26 PM
HP Recommended
I suggest you uninstall the printer driver from root level and download the full feature software
Then set the printing preferences again and check if it maintain the settings
1.) In Windows, search for and open Programs and features
2.) Select your HP Printer
3.) Select Uninstall
4.) In Windows, search for and open Devices and printers
5.) In the Devices and Printers windows look for your HP printer. If you see it listed right-click on it and choose ‘Delete’ or ‘Remove Device’
6.) Open up the run command with the “Windows key + R” key combo.
7.) Type printui.exe /s and click Ok. (Note: there is a space in between “printui.exe” and “/s”)
8.) Click on the “Drivers” tab
9.) Look for HP Printer driver. If you see it Click on it and click Remove at the bottom
10.) Select Ok
11.) Select Apply and Ok on the Print Server Properties windows
12.) Close Devices and Printers
13.) Restart the computer and download the Full Feature Software from Here and follow the onscreen Instructions
Keep me posted
If the information I've provided was helpful, give us some reinforcement by clicking the "Solution Accepted" on this Post and it will also help other community members with similar issue.
KrazyToad
I Am An HP Employee
Be alert for scammers posting fake support phone numbers and/or email addresses on the community.
If you think you have received a fake HP Support message, please report it to us by clicking on "Flag Post".
† The opinions expressed above are the personal opinions of the authors, not of HP. By using this site, you accept the Terms of Use and Rules of Participation.


Didn't find what you were looking for?
Ask the community
† The opinions expressed above are the personal opinions of the authors, not of HP. By using this site, you accept the <a href="https://www8.hp.com/us/en/terms-of-use.html" class="udrlinesmall">Terms of Use</a> and <a href="/t5/custom/page/page-id/hp.rulespage" class="udrlinesmall"> Rules of Participation</a>.