• ×
    Information
    Need Windows 11 help?
    Check documents on compatibility, FAQs, upgrade information and available fixes.
    Windows 11 Support Center.
  • post a message
  • ×
    Information
    Need Windows 11 help?
    Check documents on compatibility, FAQs, upgrade information and available fixes.
    Windows 11 Support Center.
  • post a message
Guidelines
Join the HP Community Solve‑a‑thon | Help Others & Share Your Solutions | Live on Zoom | 2:30 PM to 2:30 AM IST | Every Wednesday Click here to know more
Check some of the most frequent questions about Instant Ink: HP INSTANT INK, HP+ PLANS: INK AND TONER.


Check out our WINDOWS 11 Support Center info about: OPTIMIZATION, KNOWN ISSUES, FAQs AND MORE.
HP Recommended
HP Ink Tank Wireless 415
macOS 10.15 Catalina

When I print anything the left hand margin is much narrower than the right hand margin.  Sometimes the print is right at the edge of the left hand.  Any idea how I can fix this so that my margins are equal on both sides.  Thank you. 

1 ACCEPTED SOLUTION

Accepted Solutions
HP Recommended

Hi @AMN4,


I'd like to help!


1) Does the copy print out the same way? 

2) What's the application you are trying to print from? Have you tried printing from a different application or devices? 


Meanwhile, try the steps below -


Create a custom paper size using the Print option on the File menu of your application, and then select the new custom size for the print job.

  1. Load the custom-size paper into the paper input tray.

  2. Open the item you want to print.

  3. Click File, and then select Print.

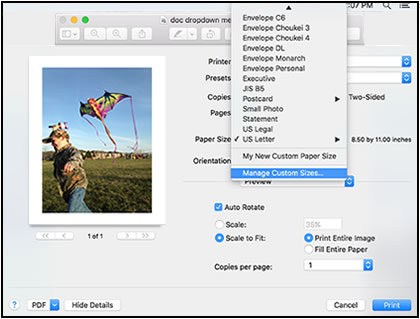
  4. In Paper Size, select Manage Custom Sizes.

    The Custom Paper Sizes window displays.

    Selecting Manage Custom Sizes

  5. In the Custom Paper Sizes window, click the plus sign  to create a new paper size, double-click the default untitled name, and then type a new name for the custom paper size.
    NOTE: 

    Use a different, unique name for the new custom paper size. Do not use an existing paper size name for any new custom paper size names because it overrides the existing preset. For example, if a custom paper size is named A4, then the existing A4 paper size is no longer available as a choice.

    Paper Size Name

  6. In the Paper Size section, type the dimensions of the custom paper in the Width and Height text boxes, and then set the margins, ifdesired.

    1. Paper Size

    2. Margins

  7. Click OK.

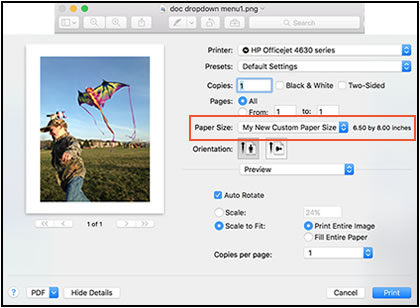
  8. In the print preview window, select the new custom paper size.

    Example of the print preview window with the custom paper size selected

  9. Change print settings, if desired, and then click OK or Print to print the document.

You can refer to -Creating Custom Paper Sizes


Hope this helps! Keep me posted. 


And, Welcome to the HP Support Community. 


Please click “Accept as Solution” if you feel my post solved your issue, it will help others find the solution.

Click the “Kudos, Thumbs Up" on the bottom right to say “Thanks” for helping

View solution in original post

1 REPLY 1
HP Recommended

Hi @AMN4,


I'd like to help!


1) Does the copy print out the same way? 

2) What's the application you are trying to print from? Have you tried printing from a different application or devices? 


Meanwhile, try the steps below -


Create a custom paper size using the Print option on the File menu of your application, and then select the new custom size for the print job.

  1. Load the custom-size paper into the paper input tray.

  2. Open the item you want to print.

  3. Click File, and then select Print.

  4. In Paper Size, select Manage Custom Sizes.

    The Custom Paper Sizes window displays.

    Selecting Manage Custom Sizes

  5. In the Custom Paper Sizes window, click the plus sign  to create a new paper size, double-click the default untitled name, and then type a new name for the custom paper size.

    NOTE: 

    Use a different, unique name for the new custom paper size. Do not use an existing paper size name for any new custom paper size names because it overrides the existing preset. For example, if a custom paper size is named A4, then the existing A4 paper size is no longer available as a choice.

    Paper Size Name

  6. In the Paper Size section, type the dimensions of the custom paper in the Width and Height text boxes, and then set the margins, ifdesired.

    1. Paper Size

    2. Margins

  7. Click OK.

  8. In the print preview window, select the new custom paper size.

    Example of the print preview window with the custom paper size selected

  9. Change print settings, if desired, and then click OK or Print to print the document.

You can refer to -Creating Custom Paper Sizes


Hope this helps! Keep me posted. 


And, Welcome to the HP Support Community. 


Please click “Accept as Solution” if you feel my post solved your issue, it will help others find the solution.

Click the “Kudos, Thumbs Up" on the bottom right to say “Thanks” for helping

† The opinions expressed above are the personal opinions of the authors, not of HP. By using this site, you accept the <a href="https://www8.hp.com/us/en/terms-of-use.html" class="udrlinesmall">Terms of Use</a> and <a href="/t5/custom/page/page-id/hp.rulespage" class="udrlinesmall"> Rules of Participation</a>.