
-
×InformationNeed Windows 11 help?Check documents on compatibility, FAQs, upgrade information and available fixes.
Windows 11 Support Center. -
-
×InformationNeed Windows 11 help?Check documents on compatibility, FAQs, upgrade information and available fixes.
Windows 11 Support Center. -
- HP Community
- Printers
- Printer Setup, Software & Drivers
- HP Smart Tank 7602 cannot connect to Web Services to check f...

Create an account on the HP Community to personalize your profile and ask a question
Your account also allows you to connect with HP support faster, access a personal dashboard to manage all of your devices in one place, view warranty information, case status and more.
Check some of the most frequent questions about Instant Ink: HP INSTANT INK, HP+ PLANS: INK AND TONER.
Check out our WINDOWS 11 Support Center info about: OPTIMIZATION, KNOWN ISSUES, FAQs AND MORE.

It has been a while since anyone has replied. Simply ask a new question if you would like to start the discussion again.

05-04-2026 08:53 PM
 HP Recommended
I have an HP Smart Tank 7602 All-in-one printer. It will not check for firmware updates. Instead it always gives an error of "The printer could not connect to Web Services. Web Services might be busy or temporarily unavailable. Try again later." I have tried from the printer control panel, the EWS, the HP app and none of them work. It shows the following for the currently installed firmware:
| Firmware Version | SAYAPPPP1N003.2551B.00 |
| Built Date | 2025-12-18 |
Does anyone know what is going wrong?
P.S. We only have Chromebooks, no Macs, no Windows PCs.
4 REPLIES 4


05-06-2026 12:47 PM
HP Recommended
Hello @KerryMWG, Welcome to the HP Support Community.
Thanks for reaching out about your query regarding the HP Smart Tank 7602.
We appreciate the opportunity to assist you and are glad we could help work toward a resolution. We hope our support has been valuable.
As you're facing an issue with the web services, the first and most important step would be to ensure that your printer is connected to a stable network and has internet access. If yes, then please proceed with the below steps:
Turn on Web Services from the printer EWS
Use the HP app or an internet browser to open the printer Embedded Web Server (EWS) and then turn on Web Services.
Open the HP printer Embedded Web Server (EWS) using the printer IP address.
From the EWS home page, click the Web Services tab.
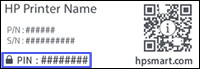
If you are prompted to log in or enter the printer PIN, enter admin for the username (HP LaserJet's only), enter the PIN from the printer label, and then click Submit or OK. This label is typically located inside the cartridge access area or printer door.
For most printers released before 2020, an information page prints with the HP ePrint email address and Printer Claim Code.
Clicking Continue on the Web Services tab (most HP printers)
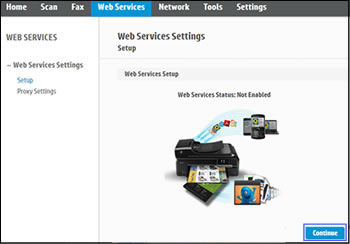
If enabling Web Services fails, go to Can't connect an HP printer to Web Services.
From the Web Services Setup page, click Continue or Enable, and then follow the instructions to turn it on.
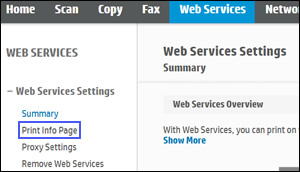
If the information page does not print, click Print Info Page or Print Information Sheet under Settings. If the issue persists, continue to the next step for alternative methods to get the code.
Take care and have an amazing day!
I'm an HP Employee.
If this reply helped resolve your issue, please select the Accept as Solution as it helps others in the community quickly find the answer they’re looking for.
And if you found this reply helpful, clicking Yes below is a great way to let us know we’re providing the support you need, as it encourages us to keep improving and sharing helpful guidance.
05-06-2026 12:48 PM
HP Recommended
Use a manual DNS server for your printer connection
Use the HP app or an internet browser to open the printer Embedded Web Server (EWS) and add a manual DNS address to improve the response time from the DNS server.
Open the HP printer Embedded Web Server (EWS) using the printer IP address.
From the EWS home page, click the Network or Networking tab.
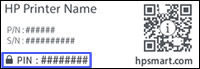
If you are prompted to log in or enter the printer PIN, enter admin for the username (HP LaserJets only), enter the PIN from the printer label, and then click Submit or OK. This label is typically located inside the cartridge access area or printer door.
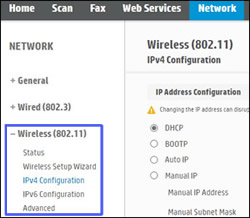
- For most HP printers, select the IPv4 option under Wireless (802.11) for Wi-Fi connections or Wired (802.3) for Ethernet connections.
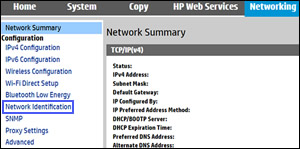
- For HP LaserJet printers, click Network Identification under Configuration.
Open the DNS Server settings for your connection type.
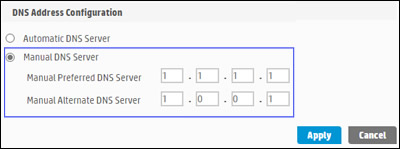
- For most HP printers, select Manual DNS Server under DNS Address Configuration, enter 1.1.1.1 for Manual Preferred DNS Server, and then 1.0.0.1 for Manual Alternate DNS Server.
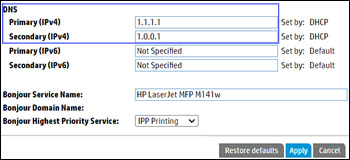
- For HP LaserJet printers, enter 1.1.1.1 for the Primary (IPv4), and then 1.0.0.1 for the Secondary (IPv4) in the DNS section.
Enter the primary and secondary manual DNS addresses.
- Click Apply to save the changes, and then restart the printer to reset the internet connection.
- After the printer restarts, return to the EWS home page. You might need to wait a few minutes for the printer to reconnect to your network before the EWS can open.
- Click the Web Services tab, click Continue or Enable, and the follow the instructions to turn Web Services on.
- If turning on Web Services is successful, you are done troubleshooting.
- If turning on Web Services fails, continue with these steps.
- Repeat the previous steps to change the DNS Server addresses to 8.8.8.8 and 8.8.4.4, and then click Apply.
- Restart the printer again and then turn on Web Services from the EWS.
I'm an HP Employee.
If this reply helped resolve your issue, please select the Accept as Solution as it helps others in the community quickly find the answer they’re looking for.
And if you found this reply helpful, clicking Yes below is a great way to let us know we’re providing the support you need, as it encourages us to keep improving and sharing helpful guidance.
05-06-2026 12:51 PM
HP Recommended
As you're facing an issue with the web services, the first and most important step would be to ensure that your printer is connected to a stable network and has internet access. If yes, then please proceed with the below steps:
Turn on Web Services from the printer EWS
Use the HP app or an internet browser to open the printer Embedded Web Server (EWS), and then turn on Web Services.
Open the HP printer Embedded Web Server (EWS) using the printer IP address.
From the EWS home page, click the Web Services tab.
If you are prompted to log in or enter the printer PIN, enter admin for the username (HP LaserJets only), enter the PIN from the printer label, and then click Submit or OK. This label is typically located inside the cartridge access area or printer door.
For most printers released before 2020, an information page prints with the HP ePrint email address and Printer Claim Code.
Clicking Continue on the Web Services tab (most HP printers)
If enabling Web Services fails, go to Can't connect an HP printer to Web Services.
From the Web Services Setup page, click Continue or Enable, and then follow the instructions to turn it on.
If the information page does not print, click Print Info Page or Print Information Sheet under Settings. If the issue persists, continue to the next step for alternative methods to get the code.
Use a manual DNS server for your printer connection
Use the HP app or an internet browser to open the printer Embedded Web Server (EWS) and add a manual DNS address to improve the response time from the DNS server.
Open the HP printer Embedded Web Server (EWS) using the printer IP address.
From the EWS home page, click the Network or Networking tab.
If you are prompted to log in or enter the printer PIN, enter admin for the username (HP LaserJets only), enter the PIN from the printer label, and then click Submit or OK. This label is typically located inside the cartridge access area or printer door.
- For most HP printers, select the IPv4 option under Wireless (802.11) for Wi-Fi connections or Wired (802.3) for Ethernet connections.
- For HP LaserJet printers, click Network Identification under Configuration.
Open the DNS Server settings for your connection type.
- For most HP printers, select Manual DNS Server under DNS Address Configuration, enter 1.1.1.1 for Manual Preferred DNS Server, and then 1.0.0.1 for Manual Alternate DNS Server.
- For HP LaserJet printers, enter 1.1.1.1 for the Primary (IPv4), and then 1.0.0.1 for the Secondary (IPv4) in the DNS section.
Enter the primary and secondary manual DNS addresses.
- Click Apply to save the changes, and then restart the printer to reset the internet connection.
- After the printer restarts, return to the EWS home page. You might need to wait a few minutes for the printer to reconnect to your network before the EWS can open.
- Click the Web Services tab, click Continue or Enable, and the follow the instructions to turn Web Services on.
- If turning on Web Services is successful, you are done troubleshooting.
- If turning on Web Services fails, continue with these steps.
- Repeat the previous steps to change the DNS Server addresses to 8.8.8.8 and 8.8.4.4, and then click Apply.
- Restart the printer again, and then turn on Web Services from the EWS.
I'm an HP Employee.
If this reply helped resolve your issue, please select the Accept as Solution as it helps others in the community quickly find the answer they’re looking for.
And if you found this reply helpful, clicking Yes below is a great way to let us know we’re providing the support you need, as it encourages us to keep improving and sharing helpful guidance.
05-06-2026 12:51 PM
HP Recommended
Check internet proxy settings (Windows, macOS)
Determine if your network uses a proxy server and then update the Web Services proxy settings from the printer Embedded Web Server (EWS). These steps do not work for mobile devices.
- Windows: Search for and open Internet Options, and then click the Connections tab.
- macOS: Open System Preferences or System Settings, and then click Network.
Open the network menu.
- Windows: Click Settings.
- macOS: Click Details or Advanced, and then click the Proxies tab.
Select your network from the list and then open the network settings.
- If your network does not use a proxy server, this is not the issue. Continue troubleshooting.
- If your network uses a proxy server, write down the Address/Server and Port values, and then continue with these steps.
Determine if a proxy server is enabled for your network.
Open the HP printer Embedded Web Server (EWS) using the printer IP address.
From the EWS home page, click the Web Services tab.
- If you are prompted to log in or enter the printer PIN, enter admin for the username (HP LaserJet's only), enter the PIN from the printer label, and then click Submit or OK. This label is typically located inside the cartridge access area or printer door.
- Under Web Services Settings, click Proxy Settings.
Location of the Proxy Settings for most HP printers (left) and HP LaserJet printers (right)
- Click Manual (if necessary), and then enter the Proxy Server and Proxy Port values.
- Click Apply to save the changes.
- Restart the printer to reset the internet connection. You might need to wait a few minutes for the printer to reconnect to your network.
HP regularly releases new firmware versions with printer enhancements or issue fixes. Update firmware regularly to make sure you are getting the most out of your printer.
CAUTION:
Do not turn off the printer during a firmware update. This can permanently damage your printer.
- From the HP website: Go to HP Software and Driver Downloads, follow the prompts to open the downloads page for your printer. Click Download next to any updates listed under Firmware, and then open and follow the HP Printer Update prompts to update the firmware.
- From the HP app: Click the image of your printer, click Advanced Settings, or scroll to Printer Settings, click View all, and then click Advanced Settings. In Advanced Settings, click the Printer Update tile or click Printer Updates under Manage, enter the printer PIN if prompted, and then click Check Now. Any new updates install automatically.
For example, touch the Setup icon, touch Printer Maintenance, touch Update Printer, and then touch
- Check Now. Any new updates install automatically.
- From the printer control panel (network printers only): Many HP printers with control panel menus can install updates directly from HP. Updating the firmware from the control panel varies by printer model.
I'm an HP Employee.
If this reply helped resolve your issue, please select the Accept as Solution as it helps others in the community quickly find the answer they’re looking for.
And if you found this reply helpful, clicking Yes below is a great way to let us know we’re providing the support you need, as it encourages us to keep improving and sharing helpful guidance.

Be alert for scammers posting fake support phone numbers and/or email addresses on the community.
If you think you have received a fake HP Support message, please report it to us by clicking on "Flag Post".
† The opinions expressed above are the personal opinions of the authors, not of HP. By using this site, you accept the Terms of Use and Rules of Participation.


Didn't find what you were looking for?
Ask the community
† The opinions expressed above are the personal opinions of the authors, not of HP. By using this site, you accept the <a href="https://www8.hp.com/us/en/terms-of-use.html" class="udrlinesmall">Terms of Use</a> and <a href="/t5/custom/page/page-id/hp.rulespage" class="udrlinesmall"> Rules of Participation</a>.