• ×
    Information
    Need Windows 11 help?
    Check documents on compatibility, FAQs, upgrade information and available fixes.
    Windows 11 Support Center.
  • post a message
  • ×
    Information
    Need Windows 11 help?
    Check documents on compatibility, FAQs, upgrade information and available fixes.
    Windows 11 Support Center.
  • post a message
Guidelines
We have new content about printers, Click here to check it out!
Check some of the most frequent questions about Instant Ink: HP INSTANT INK, HP+ PLANS: INK AND TONER.


Check out our WINDOWS 11 Support Center info about: OPTIMIZATION, KNOWN ISSUES, FAQs AND MORE.
HP Recommended
HP Officejet 6600

Hello,

I watched the youtube videos and took apart my Printer Inkhead. I checked all the attachments, and then I reattached them. Now, it says that the printer carriage is not moving correctly.

Can you help me?

Thank you in advance.

1 REPLY 1
HP Recommended

Hi @jbunt915


Welcome to the HP Support Community. I'd be happy to assist you with the  "Carriage Cannot move" issue. 


Try the steps below to resolve the issue :


Step 1: Check for obstructions in the carriage path


Make sure the carriage path is not blocked.

  1. With the printer on, disconnect the power cord from the rear of the printer.

  2. If your printer has a battery, remove the battery.

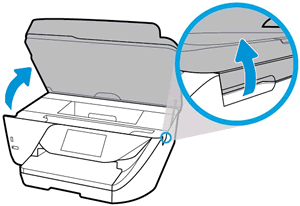
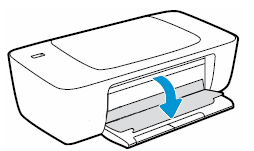
  3. Open the door to access the carriage inside of the printer.

    Examples of carriage access doors

    Opening an access door on top of the printerOpening an access door on the front of the printer

  4. Look in the carriage path for debris such as crumpled paper or dislodged labels, and then remove any that you find.

    Example of a printer with debris in the carriage path

    View inside a printer showing crumpled paper in the carriage path causing a carriage jam

  5. If the carriage on your printer has a latch, make sure it is closed.

       CAUTION: 

    Ink tank printers: If the latch is closed, do not press down on it.


    If the printhead latch is closed, do not press down on it

  6. Use your hand to move the carriage to each side, making sure it moves freely. If the carriage is stalled or docked to one side of the printer and you cannot move it, continue with these steps.

  7. Close the carriage access door.

  8. Reconnect the power cord to the rear of the printer, and then turn the printer on.

If the error persists, continue to the next step.


Step 2: Reset the printer


An error might continue to display after the jam is cleared. To clear the error state, reset the printer, connecting the power cord directly to a wall outlet to make sure the power source is stable and prevent more carriage jams.

  1. With the printer turned on, disconnect the power cord from the printer.

  2. Unplug the power cord from the power source.

  3. Wait 60 seconds.

  4. Reconnect the power cord to a wall outlet and to the printer.

    NOTE: 

    HP recommends plugging the printer directly into a wall outlet.

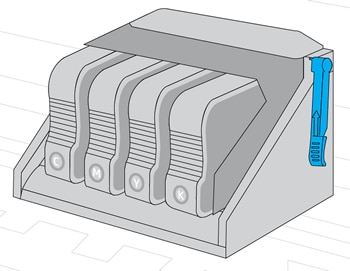
Step 3: Check the carriage for a printhead latch


Open the door to access to the ink cartridges, and then determine if the carriage inside the printer has a printhead latch.

Example of a carriage with a latch

Image of carriage with a printhead latch

  • If your carriage has a printhead latch, continue to the next step.

  • If your carriage does not have a printhead latch, skip to Service the printer.

Step 4: Reseat the printhead 

To clear the error message, you might need to reseat the printhead up to three times.

  1. Open the door to access to the ink cartridges.

  2. Wait until the carriage stops moving before you continue.

  3. Unplug the power cord from the rear of the printer.

       WARNING: 

    You must disconnect the power cord before reaching inside the printer.

  4. Lift the carriage latch, slightly lift the printhead, lower the printhead back into the carriage, wiggle the printhead left and right, and then lower the carriage latch to lock the printhead into place.

    Animation showing how to reseat the printhead in the carriage

  5. Close the ink cartridge access door.

  6. Reconnect the power cord to the rear of the printer, and then check the control panel for the error message.

Hope this helps! Keep me posted. 


Please click “Accept as Solution” if you feel my post solved your issue, it will help others find the solution.

Click the “Kudos, Thumbs Up" on the bottom right to say “Thanks” for helping!


Have a great day! 

† The opinions expressed above are the personal opinions of the authors, not of HP. By using this site, you accept the <a href="https://www8.hp.com/us/en/terms-of-use.html" class="udrlinesmall">Terms of Use</a> and <a href="/t5/custom/page/page-id/hp.rulespage" class="udrlinesmall"> Rules of Participation</a>.