-
×InformationNeed Windows 11 help?Check documents on compatibility, FAQs, upgrade information and available fixes.
Windows 11 Support Center. -
-
×InformationNeed Windows 11 help?Check documents on compatibility, FAQs, upgrade information and available fixes.
Windows 11 Support Center. -
- HP Community
- Printers
- Printer Setup, Software & Drivers
- Officejet 6700 Premium Software & Drivers

Create an account on the HP Community to personalize your profile and ask a question
Your account also allows you to connect with HP support faster, access a personal dashboard to manage all of your devices in one place, view warranty information, case status and more.
Check some of the most frequent questions about Instant Ink: HP INSTANT INK, HP+ PLANS: INK AND TONER.
Check out our WINDOWS 11 Support Center info about: OPTIMIZATION, KNOWN ISSUES, FAQs AND MORE.

It has been a while since anyone has replied. Simply ask a new question if you would like to start the discussion again.
08-08-2018 01:54 PM
 HP Recommended
Product: Officejet 6700 Premium
Operating System: macOS 10.13 High Sierra
I've had the HP 6700 Premium (Print, Fax, Scan, Copy, Web) for several years. Purchased from Costco and use on iMac. I had problems printing so I attempted to reset the printer to restore to factory settings. Turns out the dialogue box no longer gives me the option to scan. My MAC preferences reflect an Officejet 6700 but when I attempt to use it to scan only the print option is available. Went to HP website to download software/drivers and it tells me they aren't available. Wondering how I'm supposed to get the scan option again without downloading drivers/software? Is the fact that the HP website says the software/drivers aren't available because the printer is no longer supported/obsolete?
Solved! Go to Solution.
1 ACCEPTED SOLUTION
Accepted Solutions
08-09-2018 06:05 PM
HP Recommended
Thank you for posting on HP Forums, MKazi is at your service.
I understand that you have an HP Officejet 6700 Premium e-All-in-One Printer. I read that after restoring the printer to factory defaults, the scan dialogue fox for scan no longer appears. Not to worry, I'll be glad to assist you with this case.
To assist you with accurate information I would require more information regarding this:
- Since the initial problem was with printing, is the printing working fine now?
- Are you attempting to scan from the Mac computer through the software or are you trying to scan from the printer's front panel menu?
If the issue is with scanning through the software then suggest you to remove and add the printer as Airprint.
Step 1: Reset the printer
Resetting power to the printer forces the printer to reset stored values in the firmware. A power reset can help when the printer is not accepting communication from the Mac.
-
Make sure the printer is idle, not making any sounds, before continuing.
-
With the printer turned on, disconnect the power cord from the rear of the printer.
-
Unplug the power cord from the wall outlet.
-
Wait at least 60 seconds.
-
Plug the power cord back into the wall outlet.
-
Reconnect the power cord to the rear of the printer.
-
If the printer does not turn on by itself, press the Power button
 to turn it on.
 -
Try printing again and note what happens.
-
If the printer prints, you can stop troubleshooting.
-
If the print job becomes stuck again, continue to the next step.
-
Step 2: Remove multiple printers from the printer list
Check for multiple devices in the Printers list, and then remove any extra entries other than one in idle status.
-
Search the Mac for Print, and then click Print & Fax, Print & Scan, or Printers & Scanners in the list of results.
-
Find the printer names that match your printer from the list of devices.
Figure : Printers and Scanner window with multiple names of a printer in the list

-
If you see multiple printer queues for the same printer, remove all extra printers by selecting them one at a time, and then clicking the minus button
 at the bottom of the list. Leave one 'idle' printer in the list that matches your printer if available and use this printer as the Default printer.
 -
Try printing again.
-
If the printer prints, you can stop troubleshooting.
-
If the printer remains offline or displays an error, continue to the next step.
-
Step 3: Delete the existing print queue and add the printer
Remove the printer queue from the list of printers, and then add it again. Doing so creates a new printing session.
-
Make sure your Mac is connected to the Internet.
-
In the Printers list, click your HP printer, and then click the Minus button
to delete it. -
Click the Add button
 .
. -
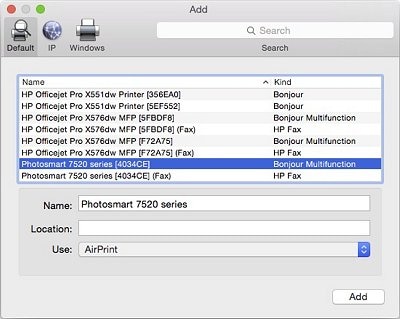
Find and select the name of your printer from the Printer list, and then click Add to add your printer. Do not select an HP Fax driver.
NOTE: If your printer does not display in the list, make sure the printer is connected, turned on, has power, and is ready to print.
Figure : Example of the printer selection list
-
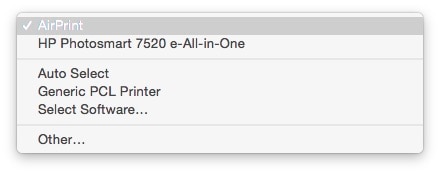
Click Print Using or Use.
-
Select AirPrint.
Figure : Menu showing AirPrint selected
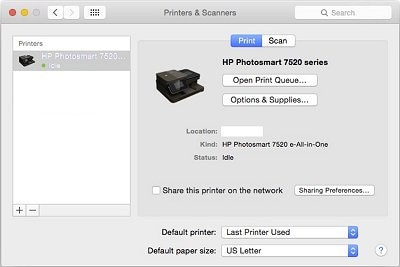
Your new printer queue displays in the Printers list in an Idle status
 .
.Figure : Example of a newly added printer in the Printers & Scanners list
-
Try to print and scan again.
Start scans from the Print & Scan or Printers and Scanners window or from Image Capture when using AirPrint.
-
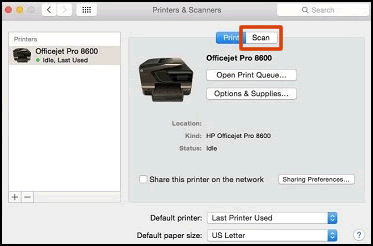
Click the Apple menu, click System Preferences, and then click Print & Scan or Printers & Scanners.
-
Click Scan, and then click Open Scanner. If the Scan button is not available, open Image Capture from the list of Applications, which also supports scanning.
Figure : Click Scan in the Printers & Scanners window
-
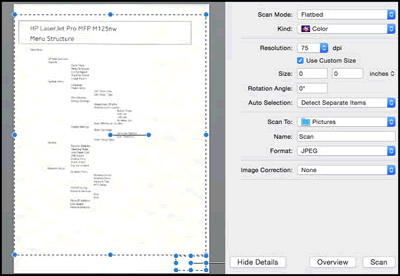
In the Scanner window, click Show Details.
-
After the overview scan completes, change any settings, and then click Scan.
Figure : Scanner window with Show Details setting on
I sincerely hope this fixes the issue. Keep me posted for further assistance.
All the best!
3 REPLIES 3
08-09-2018 06:05 PM
HP Recommended
Thank you for posting on HP Forums, MKazi is at your service.
I understand that you have an HP Officejet 6700 Premium e-All-in-One Printer. I read that after restoring the printer to factory defaults, the scan dialogue fox for scan no longer appears. Not to worry, I'll be glad to assist you with this case.
To assist you with accurate information I would require more information regarding this:
- Since the initial problem was with printing, is the printing working fine now?
- Are you attempting to scan from the Mac computer through the software or are you trying to scan from the printer's front panel menu?
If the issue is with scanning through the software then suggest you to remove and add the printer as Airprint.
Step 1: Reset the printer
Resetting power to the printer forces the printer to reset stored values in the firmware. A power reset can help when the printer is not accepting communication from the Mac.
-
Make sure the printer is idle, not making any sounds, before continuing.
-
With the printer turned on, disconnect the power cord from the rear of the printer.
-
Unplug the power cord from the wall outlet.
-
Wait at least 60 seconds.
-
Plug the power cord back into the wall outlet.
-
Reconnect the power cord to the rear of the printer.
-
If the printer does not turn on by itself, press the Power button
to turn it on. -
Try printing again and note what happens.
-
If the printer prints, you can stop troubleshooting.
-
If the print job becomes stuck again, continue to the next step.
-
Step 2: Remove multiple printers from the printer list
Check for multiple devices in the Printers list, and then remove any extra entries other than one in idle status.
-
Search the Mac for Print, and then click Print & Fax, Print & Scan, or Printers & Scanners in the list of results.
-
Find the printer names that match your printer from the list of devices.
Figure : Printers and Scanner window with multiple names of a printer in the list
-
If you see multiple printer queues for the same printer, remove all extra printers by selecting them one at a time, and then clicking the minus button
at the bottom of the list. Leave one 'idle' printer in the list that matches your printer if available and use this printer as the Default printer. -
Try printing again.
-
If the printer prints, you can stop troubleshooting.
-
If the printer remains offline or displays an error, continue to the next step.
-
Step 3: Delete the existing print queue and add the printer
Remove the printer queue from the list of printers, and then add it again. Doing so creates a new printing session.
-
Make sure your Mac is connected to the Internet.
-
In the Printers list, click your HP printer, and then click the Minus button
to delete it. -
Click the Add button
. -
Find and select the name of your printer from the Printer list, and then click Add to add your printer. Do not select an HP Fax driver.
NOTE: If your printer does not display in the list, make sure the printer is connected, turned on, has power, and is ready to print.
Figure : Example of the printer selection list
-
Click Print Using or Use.
-
Select AirPrint.
Figure : Menu showing AirPrint selected
Your new printer queue displays in the Printers list in an Idle status
.Figure : Example of a newly added printer in the Printers & Scanners list
-
Try to print and scan again.
Start scans from the Print & Scan or Printers and Scanners window or from Image Capture when using AirPrint.
-
Click the Apple menu, click System Preferences, and then click Print & Scan or Printers & Scanners.
-
Click Scan, and then click Open Scanner. If the Scan button is not available, open Image Capture from the list of Applications, which also supports scanning.
Figure : Click Scan in the Printers & Scanners window
-
In the Scanner window, click Show Details.
-
After the overview scan completes, change any settings, and then click Scan.
Figure : Scanner window with Show Details setting on
I sincerely hope this fixes the issue. Keep me posted for further assistance.
All the best!
08-11-2018 10:01 AM
HP Recommended
I unplugged the printer, waited 60 seconds, plugged the printer back in, removed the printer and added it back again in the dialog box (using the - and +) for printers/scanners. The scanner option now shows up in Printer/Scanner Preferences. Thank you.
08-11-2018 08:51 PM
HP Recommended
@N3P,
I reviewed the post. Thanks for the update and glad to know that the issue is resolved. As @MKazi is out for the day, I am responding on his behalf.
Please mark his post as an accepted solution for several others with the same issue to benefit,
Thanks and have a great week ahead.
DavidSMP
I am an HP Employee
Be alert for scammers posting fake support phone numbers and/or email addresses on the community.
If you think you have received a fake HP Support message, please report it to us by clicking on "Flag Post".
† The opinions expressed above are the personal opinions of the authors, not of HP. By using this site, you accept the Terms of Use and Rules of Participation.


Didn't find what you were looking for?
Ask the community
† The opinions expressed above are the personal opinions of the authors, not of HP. By using this site, you accept the <a href="https://www8.hp.com/us/en/terms-of-use.html" class="udrlinesmall">Terms of Use</a> and <a href="/t5/custom/page/page-id/hp.rulespage" class="udrlinesmall"> Rules of Participation</a>.