• ×
    Information
    Windows update impacting certain printer icons and names. Microsoft is working on a solution.
    Click here to learn more
    Information
    Need Windows 11 help?
    Check documents on compatibility, FAQs, upgrade information and available fixes.
    Windows 11 Support Center.
  • post a message
  • ×
    Information
    Windows update impacting certain printer icons and names. Microsoft is working on a solution.
    Click here to learn more
    Information
    Need Windows 11 help?
    Check documents on compatibility, FAQs, upgrade information and available fixes.
    Windows 11 Support Center.
  • post a message
Guidelines
Do you need the WPS PIN to connect your printer? Click here for tips and tricks!
Check some of the most frequent questions about Instant Ink: HP INSTANT INK, HP+ PLANS: INK AND TONER.


Check out our WINDOWS 11 Support Center info about: OPTIMIZATION, KNOWN ISSUES, FAQs AND MORE.
HP Recommended
OfficeJet 5258
Microsoft Windows 8.1 (64-bit)

For the last week, my printer has had this screen that says "Service Station Stalled" and I followed directions from another post but the printer isn't from the same series as mine so maybe that is why it didn't work. What would you suggest I do to fix this problem on an OfficeJet 5200 series?

3 REPLIES 3
HP Recommended

@Rohun5 Welcome to HP Community!


I understand that you are getting Service Station Stalled message.


However, I will need a few details to provide an accurate solution,

When did this issue start?

Did you do any hardware or software changes?

How is the printer connected to computer, wired or wireless?


Meanwhile


Remove and reinstall the ink cartridges


  1. Turn on the printer, if it is not on already.

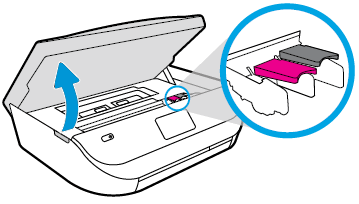
  2. Gently grasp the handles on either side of the printer, then raise the ink cartridge access door until it locks into place.

    The carriage moves to the center of the printer.

    Figure : Opening the ink cartridge access door

    Image: Opening the ink cartridge access door.
  3. Wait until the carriage is idle and silent before you proceed.

  4. To release the ink cartridge, lift the lid on the ink cartridge slot, then gently push the lid back until it stops.

  5. Pull up on the ink cartridge to remove it from the slot.

    Figure : Removing the ink cartridge

    1. Lift the lid

    2. Gently push the lid back

    3. Pull up on the ink cartridge

  6. Inspect the contacts for any protective tape that still might be on the nozzles.

       CAUTION:

    Do not touch the copper-colored contacts or the ink nozzles. Touching these parts can result in clogs, ink failure, and bad electrical connections.

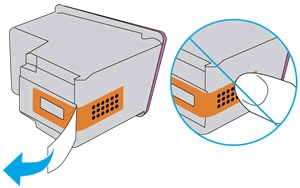
  7. Remove the protective tape from the contacts, if necessary.

       CAUTION:

    Do not try to remove the copper electrical strip.

    Figure : Removing the plastic tape

    Image: Removing the plastic tape
  8. Hold the ink cartridge by its sides with the nozzles toward the printer, then slide the ink cartridge forward into the slot.

  9. Close the lid on the ink cartridge slot to secure the ink cartridge into place.

    Figure : Inserting the ink cartridges

    1. Insert the ink cartridge

    2. Close the lid

    3. The color ink cartridge is on the left, and the black ink cartridge is on the right

  10. Repeat the previous steps to remove, inspect, and reseat the other ink cartridge, if necessary.

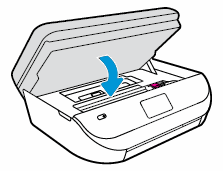
  11. Close the ink cartridge access door.

    Figure : Closing the ink cartridge access door.

    Image: Closing the ink cartridge access door.

Try to print.


Plug the printer directly into a wall outlet

  1. Disconnect the power cord from the rear of the printer.

  2. Unplug the power cord from any power strips or surge suppressors.

  3. Plug the power cord directly into an electrical outlet.

  4. Reconnect the power cord to the rear of the printer.

  5. Turn on the printer.

Reset the printer

  1. Turn the printer on, if it is not already on.

  2. Wait until the printer is idle and silent before you continue.

  3. With the printer turned on, disconnect the power cord from the rear of the printer.

  4. Unplug the power cord from the wall outlet.

  5. Wait at least 60 seconds.

  6. Plug the power cord back into the wall outlet.

       NOTE:

    HP recommends connecting the printer power cord directly to the wall outlet.

  7. Reconnect the power cord to the rear of the printer.

  8. Turn on the printer, if it does not automatically turn on.

    The printer might go through a warm-up period. The printer lights might flash, and the carriage might move.

  9. Wait until the warm-up period finishes and your printer is idle and silent before you proceed.

Try to print.


Keep us posted,

If you would like to thank us for our efforts to help you, 


Give us a virtual high-five by clicking the 'Thumbs Up' icon below, followed by clicking on the "Accept as solution" on this post, 


Have a great day!

HP Recommended

Sorry for such a late reply, but I tried all the steps and it still gives the Service Station Stalled screen.

Anything else I can try?

HP Recommended

@Rohun5


Thank you for the update.


In that case, You have to conatct or phone support and check for the support option. They will help you.


Here is how you can get in touch with phone support.


1)Click on this link - www.hp.com/contacthp/


2)Select the product type.


3)Enter the serial number of your device or select let HP detect your product option.


4)Select the country from the drop-down.


5)You should see the HP phone support number or Chat option listed.


We are experiencing longer than expected wait times to reach an agent due to the CoViD-19 impact and there might have been issues in you getting the expected resolution on the issue. 


Have a nice day!!

† The opinions expressed above are the personal opinions of the authors, not of HP. By using this site, you accept the <a href="https://www8.hp.com/us/en/terms-of-use.html" class="udrlinesmall">Terms of Use</a> and <a href="/t5/custom/page/page-id/hp.rulespage" class="udrlinesmall"> Rules of Participation</a>.