-
×InformationNeed Windows 11 help?Check documents on compatibility, FAQs, upgrade information and available fixes.
Windows 11 Support Center. -
-
×InformationNeed Windows 11 help?Check documents on compatibility, FAQs, upgrade information and available fixes.
Windows 11 Support Center. -
- HP Community
- Printers
- Printer Setup, Software & Drivers
- how to select printing from tray 1 or 2

Create an account on the HP Community to personalize your profile and ask a question
03-12-2020 02:55 PM
Hello,
today i get a officejet pro 7740 with 2 trays, connected tot my macbook pro with wifi.
i put address labels in tray 1 and plain 80gr white copupaper in tray 2
then i selcted tray 2 as standerd and this works fine when i print something.
But how can i select tray 1 if i want to print the labels for my pakkage service?
greetz Hans
03-15-2020 09:47 AM
Hi @Hans010
Welcome to the HP Support Community. I'd be happy to assist you on "How to change the tray settings"
Refer to the printer specifications to know the supported paper size and type for your printer.
To know how to change the paper tray settings, follow the steps below:
-
Open a document, photo, or webpage, click File, and then click Print to open the print dialog.
-
If a Show Details button displays at the bottom of the dialog, click it to reveal all available menu options. The button changes to Hide Details when clicked.
-
Select your printer in the Printer menu.
-
Select an option in the Presets menu that applies to your print job or paper type.
-
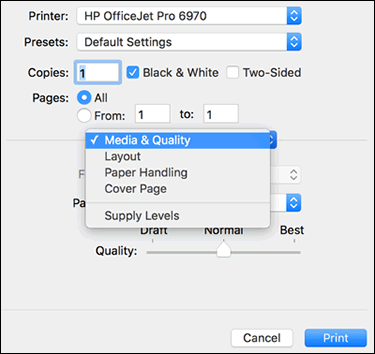
Click the unnamed print options menu at the separator bar to display more settings options.
-
Change any print job settings.
-
Print in color or black and white: Select or de-select Black & White on the main dialog. The Presets menu also includes color and black and white options.
-
Paper type (photo, plain, specialty): Selecting the paper type ensures the printer properly applies the ink to the paper you loaded in the printer. Click Media & Quality, and then click the Paper Type menu.
-
Paper size: Select the paper from the Paper Size menu on the main dialog, if present. Or, click Paper Handling, select Scale to fit paper size, and then select the paper in the Destination Paper Size menu.
-
Create a custom paper size: Click Manage Custom Sizes in the Paper Size menu, if available. The feature might also be available from the app File menu in Page Setup. Go to Creating Custom Paper Sizes for more information.
-
Adjust print quality: Click Media & Quality, and then move the Quality slider to the desired setting.
-
Two-sided printing (duplexing): Select Two-Sided on the main dialog, select Layout from the print options menu and then select a binding option in the Two-Sided menu. Go to Printing on Both Sides of the Paper (Mac) for detailed steps on how to load and flip the paper for your printer type.
-
Add or remove a border: Click Layout, and then click the Border menu to select a border width or select None for borderless prints.
-
Mirror printing: Reverse an image or document for printing iron-on transfers. Click Layout, and then select the Flip horizontally option.
-
-
To save your settings for future print jobs, click the Presets menu, and then select Save Current Settings as Preset.
Refer to the document for additional information: Print Settings
If you would like to thank us for our efforts to help you, go to the public post & give us a virtual high-five by clicking the "Thumbs Up" icon below, followed by clicking on the "Accept as solution" on my public post.
Have a great day ahead!
03-17-2020 12:01 PM
We reached out but never heard back. Do you still need assistance?
Let me know if I can help.
If you would like to thank us for our efforts to help you, go to the public post & give us a virtual high-five by clicking the "Thumbs Up" icon below, followed by clicking on the "Accept as solution" on my public post.
Have a great day ahead!