-
×InformationNeed Windows 11 help?Check documents on compatibility, FAQs, upgrade information and available fixes.
Windows 11 Support Center. -
-
×InformationNeed Windows 11 help?Check documents on compatibility, FAQs, upgrade information and available fixes.
Windows 11 Support Center. -
- HP Community
- Archived Topics
- Printers Archive
- 5740 prints blank pages after cartridge change

Create an account on the HP Community to personalize your profile and ask a question

10-04-2015 11:17 PM
Ran out of black ink on this printer. Bought a replacement cartridge. Installed cartridge and printer continued to say the ink level was low. No alignment page either. It was as if the printer did not recognize the new cartridge. It would feed pages through to copy or print but they all came out blank.
I did the troubleshooting. Uninstalled software. Reinstalled software. thought the cartridge might be defective. Bought another cartridge (HP 62 black, genuine). Installed that one. Same thing.
Help!
This printer is only a few months old.
10-06-2015 10:44 AM
Hi @bv11,
Welcome to the HP Forums!
I noticed that your HP Officejet 5740 printer is printing blank pages, after changing your black ink cartridge. And, I am happy to look into this for you!
Are any of your other cartridges low or empty?
In the meantime, please try the following steps:
- Go to the HP SureSupply website.
- Scroll to the bottom of the page, and then make sure the country/region location is correct.
- Follow the on-screen instructions to order new ink cartridges or check ink cartridge compatibility with your printer.


NOTE:Ink level warnings and indicators provide estimates for planning purposes only. When an indicator shows low-ink levels, consider having a replacement ink cartridge available to avoid possible printing delays. You do not need to replace ink cartridges until print quality becomes unacceptable.
- If none of the cartridges are low on ink, you do not need to replace them yet. Continue to the next solution.
- If any of the cartridges are low on ink, continue to the next step to replace them.
- Press the Power button to turn on the printer, if it is not already on.
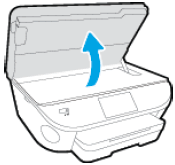
- Open the cartridge access door by placing two fingers under one or both of the small handles on the sides of the cartridge access door and then lifting it up.Figure : Open the cartridge access doorThe Door Open screen displays on the printer control panel with the message, 'The cover or door must be closed to print. Check that it is completely closed.' A Change Ink option also displays on the bottom right corner of the touchscreen.
- Touch Change Ink to watch a video on the touchscreen about replacing the cartridges (optional).
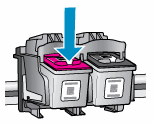
- Lightly press down on the low or empty cartridge to release it.Figure : Press down on the cartridge
- Remove the cartridge from the slot on the left to replace the tri-color cartridge.
- Remove the cartridge from the slot on the right to replace the black cartridge.
- Pull the cartridge toward you out of its slot, and then set it aside for recycling.
NOTE:
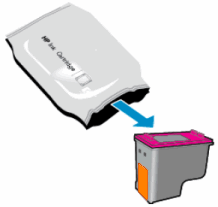
Recycle any low or empty cartridges. The HP Inkjet Supplies Recycling Program is available in many countries/regions, and it is free of charge. - Remove the new cartridge from its package. Be careful to touch only the black plastic on the cartridge.Figure : Remove the cartridge from its package
- Pull the orange tab to remove the protective tape from the cartridge.
CAUTION:
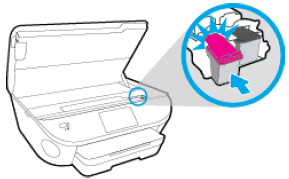
Do not touch the copper-colored contacts or the ink nozzles. Do not replace the protective tape on the contacts. Handling these parts can result in clogs, ink failure, and bad electrical connections.Figure : Remove the tape and avoid touching the cartridge contacts or ink nozzles - Slide the new cartridge at a slight upward angle into the empty slot, and then gently push up on the cartridge until it snaps into place.
- Insert the tri-color cartridge into the left slot.
- Insert the black cartridge into the right slot.
Figure : Insert the new cartridge - Repeat these steps to replace the other cartridge, if necessary.
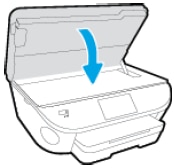
- Close the cartridge access door. When the door is completely closed, the Door Open screen with the message, 'The cover or door must be closed to print. Check that it is completely closed.' disappears, and the printer returns to the Home screen.Figure : Close the cartridge access door
- Touch OK.
- Wait for the printer to calibrate and align the cartridges. After the alignment is complete, the printer prints an alignment page.
- Touch OK, and then discard or recycle the alignment page.
NOTE:To avoid issues that require cleaning, always turn the printer off with the Power button.
- Load U.S. Letter or A4 size, unused, plain white paper into the input tray.
- On the printer control panel, swipe the display to the left, and then touch Setup (
). The Setup menu displays.
- Swipe the display up, and then touch Printer Maintenance.
- Touch Clean Cartridges. A Print Quality Diagnostic report prints.
- Examine the Print Quality Diagnostic report.
- If the print quality is unacceptable, touch Proceed when prompted to continue the next level of cleaning. Repeat these steps for the third cleaning stage, if necessary.
NOTE:
If the printhead is badly clogged, it might require another cleaning cycle. If so, wait 30 minutes before you perform all three levels of cleaning again. - If the print quality is acceptable, touch Done when prompted to continue the next level of cleaning. You do not need to continue troubleshooting.
- Examine the print quality on the Print Diagnostic report.
NOTE:You might need to clean the ink cartridges several times for optimal print quality.
- In the program you are trying to print from, click File, and then click Print.The Print window opens.
- Click the button that opens the Properties dialog box. Depending on the software program you are using, the button might be Printer Properties, Options, Printer Setup, Printer, or Preferences.
- Click the Paper/Quality tab.
- From the Media drop-down menu, select the paper type that matches the paper loaded in the input tray and then select the desired print quality.
- Check the Printer Features section of the Advanced Properties menu for the Print in Grayscale setting.
- If you are trying to print in color, make sure the Print in Grayscale setting from the drop-down menu is Off.
- If you are to print with black ink only, select High Quality Grayscale to fix streaking in black areas.
- Click OK to apply the settings, and then click Print.
Solution five: Identify, and then replace the problem ink cartridge
- Review the test page you printed in the previous solution.
- Check the text and color blocks on the test page.
- If you identify any defects with the black text on the page, the black cartridge is the problem.
- If you identify any defects with the colored blocks on the page, the tri-color cartridge is the problem.
- Press the Power button to turn on the printer, if it is not already on.
- Open the cartridge access door by placing two fingers under one or both of the small handles on the sides of the cartridge access door and then lifting it up.Figure : Open the cartridge access doorThe Door Open screen displays on the printer control panel with the message, 'The cover or door must be closed to print. Check that it is completely closed.' A Change Ink option also displays on the bottom right corner of the touchscreen.
- Touch Change Ink to watch a video on the touchscreen about replacing the cartridges (optional).
- Lightly press down on the low or empty cartridge to release it.Figure : Press down on the cartridge
- Remove the cartridge from the slot on the left to replace the tri-color cartridge.
- Remove the cartridge from the slot on the right to replace the black cartridge.
- Pull the cartridge toward you out of its slot, and then set it aside for recycling.
NOTE:
Recycle any low or empty cartridges. The HP Inkjet Supplies Recycling Program is available in many countries/regions, and it is free of charge. - Remove the new cartridge from its package. Be careful to touch only the black plastic on the cartridge.Figure : Remove the cartridge from its package
- Pull the orange tab to remove the protective tape from the cartridge.
CAUTION:
Do not touch the copper-colored contacts or the ink nozzles. Do not replace the protective tape on the contacts. Handling these parts can result in clogs, ink failure, and bad electrical connections.Figure : Remove the tape and avoid touching the cartridge contacts or ink nozzles - Slide the new cartridge at a slight upward angle into the empty slot, and then gently push up on the cartridge until it snaps into place.
- Insert the tri-color cartridge into the left slot.
- Insert the black cartridge into the right slot.
Figure : Insert the new cartridge - Repeat these steps to replace the other cartridge, if necessary.
- Close the cartridge access door. When the door is completely closed, the Door Open screen with the message, 'The cover or door must be closed to print. Check that it is completely closed.' disappears, and the printer returns to the Home screen.Figure : Close the cartridge access door
- Touch OK.
- Wait for the printer to calibrate and align the cartridges. After the alignment is complete, the printer prints an alignment page.
- Touch OK, and then discard or recycle the alignment page.
Source: Printer Does Not Print Black Ink or Color Ink or Prints Blank Pages.
Hope this resolves your issue, and have a nice day!
“Please click the Thumbs up icon below to thank me for responding.”
I work on behalf of HP
Please click “Accept as Solution ” if you feel my post solved your issue, it will help others find the solution.
Click the “Kudos Thumbs Up" to say “Thanks” for helping!