-
×InformationNeed Windows 11 help?Check documents on compatibility, FAQs, upgrade information and available fixes.
Windows 11 Support Center. -
-
×InformationNeed Windows 11 help?Check documents on compatibility, FAQs, upgrade information and available fixes.
Windows 11 Support Center. -
- HP Community
- Archived Topics
- Printers Archive
- Can't install new driver for HP P1006

Create an account on the HP Community to personalize your profile and ask a question
Your account also allows you to connect with HP support faster, access a personal dashboard to manage all of your devices in one place, view warranty information, case status and more.
05-04-2016 01:46 PM
 HP Recommended
Product: HP P1006
Operating System: Microsoft Windows 10 (32-bit)
Updated my Dell Vostro 220 computer to Windows 10, now the printer won't work. Tried following the directions online, but no go. I can't even uninstall my present driver. Had I known abuot this hassle, would have just kept Windows 7. It worked fine! Maybe I should go back.
Any suggestions appreciated.
5 REPLIES 5
05-05-2016 09:25 AM
HP Recommended
Hi @areswhy,
Welcome to the HP Forums!
I saw your post on how you cannot install the new driver for your HP Laserjet p1006, on Windows 10. And, I am happy to help!
Please try the steps within this guide, 'Device setup failed to complete' or 'Unknown device' Message Displays in Windows during USB Install..., and let me know the results!
If you are able to reach some resolution, please click on Accept Solution. If you appreciate my help, please click on the thumbs up icon. Both icons are below this post.
Hope this guide helps! 🙂
RnRMusicMan
I work on behalf of HP
Please click “Accept as Solution ” if you feel my post solved your issue, it will help others find the solution.
Click the “Kudos Thumbs Up" to say “Thanks” for helping!
I work on behalf of HP
Please click “Accept as Solution ” if you feel my post solved your issue, it will help others find the solution.
Click the “Kudos Thumbs Up" to say “Thanks” for helping!
05-06-2016 07:17 AM
HP Recommended
Hi areswhy,
Thank you for your reply!
Follow these steps to check the USB cable and connection.
Step one: Make sure the USB cable is HP compatible
HP supports USB cables less than 3 meters (9 feet 10 inches) in length. If the USB cable is longer than 3 meters (9 feet 10 inches), replace it with a supported cable.
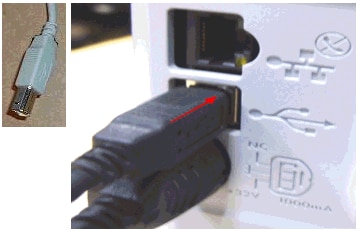
Step two: Make sure that the USB cable correctly connects to the product
The small end of the product USB cable connects to the product in only one direction. The icon on the USB cable ( ) usually faces up when you connect the cable.
Insert the small end of the USB cable completely into the USB port on the back of the product. The USB icon (
) designates the USB port on the product.CAUTION:
Do not force the USB cable into the USB port. If the cable does not seem to fit, turn over the small end of the cable, and then reinsert it into the port.
Figure : Connect the USB cable to the back of the product
If necessary, disconnect the USB cable, and then reconnect it correctly. The Plug and Play installation should start automatically.
If these steps resolved the issue, there is no need to continue troubleshooting.
If the issue persists, see the next step.
Step three: Make sure that the USB cable correctly connects to the computer
The long, flat end of the USB cable connects to the USB port on the computer in only one direction.
Completely insert the long, flat end of the USB cable into the USB port on the computer marked with the USB icon (
).CAUTION:
Do not force the USB cable into the USB port. If the USB cable does not seem to fit, turn over the long, flat end of the cable, and then reinsert it into the port.
Figure : Connect the USB cable to the computer

If necessary, disconnect the USB cable, and then correctly reconnect it. The Plug and Play installation should start automatically.
If these steps resolved the issue, there is no need to continue troubleshooting.
If the issue persists, see the next step.
Step four: Test the USB port
If the USB cable connection is correct, the issue might be with the USB port, the USB hub, or the laptop docking station. Use the following steps to check the port, hub, or docking station.
If the USB cable connects directly to the computer, use Option one to test the USB port on the computer.
If the USB cable connects to a USB hub or a laptop docking station, use Option two.
Option one: The USB cable connects to the computer
Connect the cable to another available USB port on the computer. For example, if the USB cable plugs in to the front port of the computer, disconnect the cable, and then plug it in to a port on the back of the computer.
If these steps resolved the issue, there is no need to continue troubleshooting.
If the issue persists, see the next step.
Option two: The USB cable connects to a pass-through device
If the USB cable connects to a USB hub or a docking station, disconnect the USB cable, and then connect it directly to the computer. The Plug and Play installation should start automatically.
If the Plug and Play installation does not start automatically, continue with the next step.
If the Plug and Play installation starts automatically, allow the installation to continue. When the installation is complete, print a document from the computer, and then follow these steps to continue troubleshooting.
Reconnect the USB cable to the pass-through device.
Try printing a document from the computer.
If the print job is successful, there is no need to continue troubleshooting.
If the print job is not successful, there might be a problem with the USB hub or docking station. Contact the manufacturer of the USB hub or docking station.
Step five: Try a different USB cable
If another USB cable is available, use it to try the installation again. If no alternate cable is available, skip this step.
If these steps resolved the issue, there is no need to continue troubleshooting.
If the issue persists, see the next step.
Step six: Check for conflicting USB devices
Disconnect all USB devices from the computer except for the keyboard, the mouse, and the product.
If the Plug and Play installation does not start automatically, continue with the next step.
If the Plug and Play installation starts automatically, allow the installation to continue. When the installation is complete, follow these steps to continue troubleshooting.
Reconnect all USB devices to the computer, including the product.
Try printing a document from the computer.
If the product prints after reconnecting the other USB devices, there is no need to continue troubleshooting.
If the product does not print with the other USB devices connected, the computer might not have enough power for multiple USB devices. Try using a powered USB hub to connect multiple USB devices.
Step seven: Reset the product
Disconnect the USB cable from the product.
Without turning the product off, disconnect the power cord from the back of the product.
Wait 10 seconds, and then reconnect the power cord to the back of the product.
If the product does not turn on automatically, press the Power button (
 ) to turn on the product.
Reconnect the USB cable to the product.
If this helps, please consider clicking on 'accept as solution.' And, please click on the thumbs up icon. Both icons are below this post.
Hope this helps! 🙂
RnRMusicMan
I work on behalf of HP
Please click “Accept as Solution ” if you feel my post solved your issue, it will help others find the solution.
Click the “Kudos Thumbs Up" to say “Thanks” for helping!
I work on behalf of HP
Please click “Accept as Solution ” if you feel my post solved your issue, it will help others find the solution.
Click the “Kudos Thumbs Up" to say “Thanks” for helping!
05-06-2016 08:51 AM
HP Recommended
Hi,
The cable and ports are not the problem. The printer worked fine until I switched to Windows 10. Now, nothing. I tried unplugging then plugging in cables, but that didn't change anything. Tried two solutions suggested on the HP website, but no luck. Am I going to have to buy an new laser printer?!#@ This is very frustrating.
I appreciate your suggestions.
Robert
05-06-2016 09:00 AM
HP Recommended
Hi areswhy,
Thank you for your response!
If you have tried all the steps in the guide I had provided, and it did not resolve the issue. The printer will need to be serviced/or replaced. Please contact HP phone support for further assistance. (After you fill out the information, you will be given a phone number.) If you live outside the US/Canada Region, please click the link below to get the support number for your region. Country-language selector.
If you are able to reach some resolution, please click on Accept Solution. If you appreciate my help, please click on the thumbs up icon. Both icons are below this post.
Best regards! 🙂
RnRMusicMan
I work on behalf of HP
Please click “Accept as Solution ” if you feel my post solved your issue, it will help others find the solution.
Click the “Kudos Thumbs Up" to say “Thanks” for helping!
I work on behalf of HP
Please click “Accept as Solution ” if you feel my post solved your issue, it will help others find the solution.
Click the “Kudos Thumbs Up" to say “Thanks” for helping!
† The opinions expressed above are the personal opinions of the authors, not of HP. By using this site, you accept the Terms of Use and Rules of Participation.


Didn't find what you were looking for?
Ask the community
† The opinions expressed above are the personal opinions of the authors, not of HP. By using this site, you accept the <a href="https://www8.hp.com/us/en/terms-of-use.html" class="udrlinesmall">Terms of Use</a> and <a href="/t5/custom/page/page-id/hp.rulespage" class="udrlinesmall"> Rules of Participation</a>.