-
×InformationNeed Windows 11 help?Check documents on compatibility, FAQs, upgrade information and available fixes.
Windows 11 Support Center. -
-
×InformationNeed Windows 11 help?Check documents on compatibility, FAQs, upgrade information and available fixes.
Windows 11 Support Center. -
- HP Community
- Archived Topics
- Printers Archive
- Custom paper size after Windows 10

Create an account on the HP Community to personalize your profile and ask a question
10-21-2015 12:20 PM
I'm trying to add a custom size to my printer. I know how to do this & did it several times before the Wnidows 10 upgrade. Now, I can't access any of the custom sizes that I've tried to make since the upgrade. I just updated my drivers. Are there any other things I should try?
Thanks!
10-22-2015 01:05 PM
Hey @JAMatthews,
Welcome to the HP Support Forum. :robothappy:
I see that you're looking to setup a custom paper size in Windows 10 using your HP ENVY 5530 e-All-in-One Printer. I would like to assist you with this. I have some suggestions that might help.
Any custom printing presets created would have been wiped from your system when you upgraded to Windows 10. Updating the printer drivers was a step in the right direction though. All that's needed now is to recreate your custom sizes.
You can use these steps as a guideline (it may look slightly different in Windows 10):
- Navigate to the Control Panel, and open Devices and Printers, Printers, or Printers and Faxes.
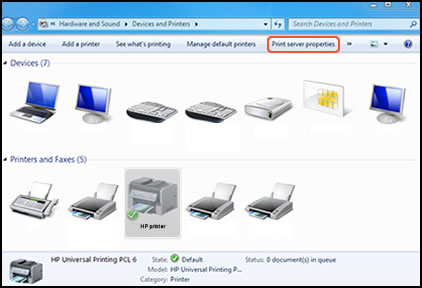
- Click the icon for your printer, then click Print server properties.Figure : Location of Print server properties

NOTE:
If Print server properties does not display, right-click an empty area in the Printers window, select Run as administrator from the drop-down menu, and then select Server Properties. - If the User Account Control window displays, click Continue.
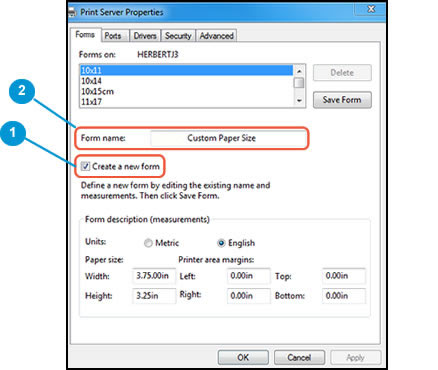
- On the Forms tab, select the Create a new form check box, and then type a name for the new paper size in Form name.Figure : Forms tab in Print Server Properties

- Create a new form
- Form name
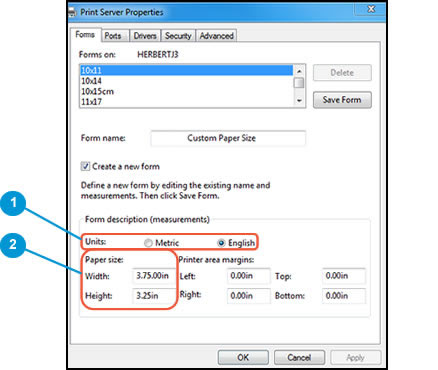
- Select Metric or English, then type the dimensions of your custom paper in the Width and Height text boxes.Figure : Forms tab in Print Server Properties

- Metric or English
- Width and Height
NOTE:
Leave the Printer area margins set at 0.00. - Click Save Form, then click OK or Close.
NOTE:Supported paper sizes vary by printer. If you input custom dimensions that your printer does not support, the new custom paper size does not display when you attempt to print. Check the printer specifications for your printer for more information on supported paper sizes.
- In the Devices and Printers window you opened in the previous step, right-click the icon for your printer, and then select Printing Preferences.
- On the Paper/Quality tab, click Advanced.
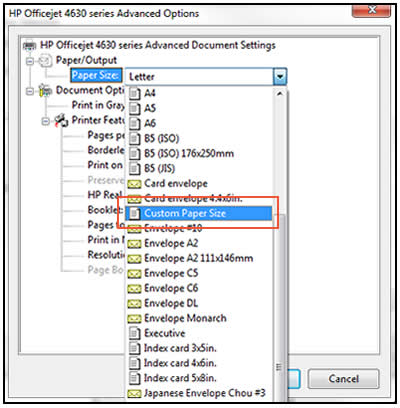
- In Paper Size, select the name of the new custom paper size.Figure : Paper Size with new custom paper size selected

- Click OK.The custom paper size is now the default paper size for all printing on your computer. You can change the default paper size by returning to Printing Preferences and selecting the desired size.
Let me know if these instructions help you restore your custom sizes. If I have helped you resolve the issue and you liked this post, feel free to express your thanks by clicking on the 'Thumbs Up' icon below and clicking 'Accept as Solution' (this will help others find the solution).
Thank you for posting in the HP Support Forum.
Have a great day!
E-roq
I work on behalf of HP
If you found this post helpful, you can let others know by clicking the “Accept as Solution” button. You can also show your appreciation, with a kudos, by clicking the “thumbs up" button!
10-29-2015 07:28 AM
Thank you for the response. I tried all of the steps you listed and it still isn't working. The funny thing is, all of the forms I created before updating to Windows 10 are still there and active. I just can't add any new ones. Is there a way to find out the maximum paper dimensions my printer supports, just in case I do get custom printing to work again? Thanks again!
10-29-2015 11:52 AM
At the very least I can help you access the 5530's specifications - click here to review. In the meantime you could try the following steps to re-do your printer setup and ideally regain your ability to create more custom sizes without issue:
Uninstall your printer
- Press the Windows key +r
- Type control panel and press Enter
- Click on Programs and Features
- Select your printer's driver from the list and click to uninstall.
Remove temp files from your PC:
- Press Windows key + r
- Type %temp% and press Enter
- Press Ctrl + a to select all files
- Press Delete
- Note that some files may not allow for deletion - not to worry, this is normal. Just click skip as prompted.
- Empty your Recycle Bin upon completion.
Download the Printer Install Wizard
Click here to install the HP Printer Install Wizard (instead of directly using the printer's driver). When you run it, this utility will facilitate what I'm hoping is a smoother and more effective printer setup.
Let me know if this helps.
Regards,
E-roq
I work on behalf of HP
If you found this post helpful, you can let others know by clicking the “Accept as Solution” button. You can also show your appreciation, with a kudos, by clicking the “thumbs up" button!
