-
×InformationNeed Windows 11 help?Check documents on compatibility, FAQs, upgrade information and available fixes.
Windows 11 Support Center. -
-
×InformationNeed Windows 11 help?Check documents on compatibility, FAQs, upgrade information and available fixes.
Windows 11 Support Center. -
- HP Community
- Archived Topics
- Printers Archive
- Re: HP OfficeJet Pro 6978 Error 0x6100004a: workaround foun...

Create an account on the HP Community to personalize your profile and ask a question

03-22-2018 09:43 AM
I have been trying to clear the error 0x6100004a on my HP OfficeJet Pro for the past day with no success. I have rebooted the printer a dozen times, both by powering down and back and unplugging the printer all together. This error does not go away and it has rendered the entire piece of equipment useless. I cannot print, scan or copy. This device is relatively new, maybe a year or so old. How do I correct this problem and if I cannot, will HP ship me a new device?
03-23-2018 08:38 AM
Thanks for taking an interest in the HP Support Forums After reading your post I see that you are getting 0x6100004a error message. I will be a delight to assist you here.
Superb analysis and brilliant diagnosis of the issue before posting. 🙂 Kudos to you on that score.:)
For better clarity and to assist you better I would require more information regarding this:
- When did this issue start?
- Did you do any changes to the printer?
- Which operating system is installed on the computer?
Meanwhile
Clean the ink cartridge vents and contacts
-
Gather the following materials:
-
A pin to clean any clogged vents
-
A clean, lint-free cloth
-
A clean, dry cotton swab
-
Distilled or bottled water
CAUTION:
Do not use tap water because it might contain contaminants that can damage the printhead.
-
-
Turn on the printer.
-
Open the ink cartridge access door.
-
To remove the ink cartridge, press the tab on the front of the ink cartridge to release it, and then remove it.
Figure : Example of removing an ink cartridge from the printhead
-
Place the ink cartridges on a clean piece of paper with the ink opening pointing up.
CAUTION:
Do not leave the ink cartridges outside the printer longer than 30 minutes. Doing so can result in damage to both the printer and the ink cartridges.
-
If an orange tab is attached to any ink cartridge, remove it.
Figure : Example of the orange tab
- Examine the vent area located on top of the ink cartridge, next to the HP logo.
Figure : Example of the vent area
-
If any of the ink cartridges have clogged vents, use a pin to clean the vents.
Figure : Example of a clogged vent
Figure : Example of a clean vent
-
Use a fresh, lightly dampened, lint-free cloth to wipe any accumulated ink and debris on the copper-colored contact on the ink cartridge.
Figure : Example of the copper-colored contact on the ink cartridge
-
Carefully reinsert one of the ink cartridges into its slot, and then push the ink cartridge down and forward until it snaps into place.
Make sure each colored dot on the ink cartridge label matches the colored dot on the carriage.
Figure : Reinserting the ink cartridge into the correct slot
Figure : Example of snapping the ink cartridge into place
-
Run your finger along the top of the ink cartridges to make sure none of them protrude.
If any ink cartridges protrude, press down firmly until each ink cartridge snaps into place.
-
Close the ink cartridge access door.
-
Check the printer control panel display for the error message.
Manually clean the printhead
-
Gather the following materials:
-
A clean, lint-free cloth
-
A clean, dry cotton swab
-
Distilled or bottled water
CAUTION:
Do not use tap water because it might contain contaminants that can damage the printhead.
-
-
Open the ink cartridge access door.
-
To remove the ink cartridge, press the tab on the front of the ink cartridge to release it, and then remove it.
Figure : Example of removing an ink cartridge from the printhead
-
Place the ink cartridges on a clean piece of paper with the ink opening pointing up.
CAUTION:
Do not leave the ink cartridges outside the printer longer than 30 minutes. Doing so can result in damage to both the printer and the ink cartridges.
-
Lift the latch handle on the ink carriage until it stops.
Figure : Lifting the ink carriage latch handle
-
Lift up to remove the printhead from the ink carriage.
Figure : Removing the printhead
-
Review the three areas of the printhead that need to be cleaned.
Figure : Example of the three areas to clean on the printhead
-
Plastic ramp on the side of the ink nozzles
-
Edge between nozzles and contacts
-
Electrical contacts
CAUTION:
Do not touch the nozzles or the electrical contacts with your fingers. Touch the electrical contact areas only with the cleaning materials.
-
-
Use a fresh, lightly dampened, lint-free cloth to wipe the electrical contact area from the bottom to the top until no new ink shows on the cloth.
Use as many fresh, lightly dampened, lint-free cloths as necessary.
Figure : Cleaning the electrical contacts
-
Use a fresh, lightly dampened, lint-free cloth to wipe any accumulated ink and debris from the edge between the nozzles and the contacts.
Figure : Cleaning the edge of the printhead
-
Use a fresh, lightly dampened, lint-free cloth to wipe the plastic ramps on both sides, away from the nozzles.
Figure : Cleaning the printhead ramps
-
Wipe the previously cleaned areas dry with a dry, lint-free cloth.
-
Use a fresh, lightly dampened, lint-free cloth to wipe the electrical contact area inside the printer from bottom to the top until no new ink shows on the cloth.
Use as many fresh, lightly dampened, lint-free cloths as necessary.
Figure : Cleaning the electrical contacts inside the printer
-
Wipe the electrical contact area dry with a dry, lint-free cloth.
-
Make sure the ink carriage latch handle is up, then reinstall the printhead.
Figure : Reinstalling the printhead
-
Carefully lower the ink carriage latch handle.
Figure : Lowering the ink carriage latch handle
-
Reinsert the ink cartridge into the matching letter and colored dot slot, then push the ink cartridge down and forward until it snaps into place.
Figure : Example of sliding the ink cartridge into the correct slot
Figure : Example of snapping the ink cartridge into place
-
Run your finger along the top of the ink cartridges to make sure none of them protrude.
If any ink cartridges protrude, then press down firmly until each ink cartridge snaps into place.
-
Close the ink cartridge access door.
-
Check the printer control panel display for the error message.
You can refer this HP Document for more assistance: http://hp.care/2D0diVa
Let me know how it goes.
Cheers.
Sandytechy20
I am an HP Employee
03-24-2018 01:28 PM - edited 03-24-2018 01:34 PM
It looks like you were interacting with sandytechy20, but he is out for the day & I'll be glad to help you out.
I'm Raj1788 & I'm at your service.
Align the printhead using the printer control panel.
On the printer control panel, swipe down to open the Dashboard, and then touch the Setup icon
.
Swipe up on the display, and then touch Printer Maintenance.
Touch Clean Printhead, and then touch Continue.
A test page prints.
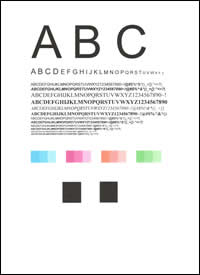
Figure : Example of the printhead cleaning test page
Examine the test page.
If the print quality is unacceptable, touch Clean Again to continue the next level of cleaning. Repeat these steps for the third cleaning stage, if necessary.
NOTE:
If the printhead is badly clogged, it might require another cleaning cycle. If so, wait 30 minutes before you perform all three levels of cleaning again.
If the print quality is acceptable, touch Done.
Try to print.
If the issue persists, I would personally suggest you contact our HP phone support for one on one interaction.
If your product is out of warranty, then remember to choose the paid options to get the tech support number.
They might have multiple options to help you on this.
Please use the following link to create yourself a case number, then call and it may help speed up the call process:
Step 1. Open link: www.hp.com/contacthp
Step 2. Sign in / sign in as a guest
Step 3. Enter the product number or select to auto detect
Step 4. Scroll down to "Still need help? Complete the form to select your contact options"
Step 5. Scroll down and click: HP contact options - click on Get phone number and phone number appear.
Keep me posted on further assistance. Hope that helps!
Have a great day ahead!
Raj1788
I am an HP Employee
03-25-2018 01:48 PM
I am extremely disatisfied with HP and this printer. It is only 1 1/2 years old and doesnt get a lot of use. Yet it is completely inoperable and I am told out of warranty. I request you send me a new printer otherwise, my plan is to never buy HP again and to thoroughly pan the company and the printer in online reviews.
03-25-2018 03:35 PM
I have escalated your concern to HP’s Support Team in your region to have it reviewed for available options, if any. You should be contacted within 4 business days (Excluding holidays & Weekends).
Response times may vary by region. Please send a Private Message, if you aren’t contacted within 4-5 business days.
04-10-2018 09:04 AM
Hi Christopher_M, I bought the 6978 on January 2 of this year to print a few things after chucking my HP OfficeJet Pro 8600 out a second story window. The 6978 was on sale pretty cheap, so I thought (like an idiot), ah what the heck, we'll try HP again. I've printed a few pages over the last 3.5 months, but not a lot. Today I needed to print an itinerary for my flight this afternoon. I needed to print it right now, not in a few weeks when HP decides to replace my printer. So, I redirected the print job to my 14 year old Lexmark inkjet printer. I now have a copy of my itinerary, at least.
Anyway, I think I've found the perfect solution for our problem!
Unfortunately, it involved a couple of 12ga slugs, a trip out to my back field, and then a trip to the local computer shop to pick up another Lexmark inkjet. I was just looking at what's left of the 6978 and I'm quite happy with it now!
05-23-2018 09:37 AM
I also have the same issue with my 6978. The priter toner was low, so I replced the ink - $78 for color and black. Now I'm getting the error. Did the reset, nothing. The printer maintenance functions do not work.
This is frustrating as this printer is only about 1.5 years old and not used all the time, but it is used at least monthly a few times.
What do I do?
03-20-2019 01:30 PM
I have the same Officejet 6978 and it is 6 months old and has the same problem. It has turned into a brick. As an HP customer and shareholder, I am disappointed and upset that the company is selling a piece of garbage like this. I bought this to replace an 8 year old Officejet that had served well and had worn out a paper feed drive gear. Now I am stuck with a brand new set of HP ink cartridges that probably wont fit a new Officejet. Time to change brands.