• ×
    Information
    Need Windows 11 help?
    Check documents on compatibility, FAQs, upgrade information and available fixes.
    Windows 11 Support Center.
  • post a message
  • ×
    Information
    Need Windows 11 help?
    Check documents on compatibility, FAQs, upgrade information and available fixes.
    Windows 11 Support Center.
  • post a message
Guidelines
The HP Community is where owners of HP products, like you, volunteer to help each other find solutions.
Archived This topic has been archived. Information and links in this thread may no longer be available or relevant. If you have a question create a new topic by clicking here and select the appropriate board.
HP Recommended
Officejet 6600
Microsoft Windows 7 (64-bit)

I tried selecting statement size paper, which is 5.5x8.5.  Even with the selection, the printer seems to think it has 8.5x11 paper and prints several inches offset.  I printed the same thing on 4x6 paper and it worked fine, but would not fit properly so I need to use the 5.5x7.5 paper.

Help! These are menus for my daughter's wedding next week!

1 REPLY 1
HP Recommended

Hey @CMT1


Welcome to the HP Support Forum. :robothappy:


I see that you're having an issue 


According to your printer's specifications, the 6600 can handle U.S. Statement: 140 x 216 mm (5.5 x 8.5 inches).  I'm not positive you can get away with printing on 5.5 X 7.5" paper. Having said that, you might have more success if you create a custom paper size. 


You can use these steps as a guideline: 


Step 1: Create the new custom paper size
To set up the new custom paper size, create the new size in the printer software.
  1. Navigate to the Control Panel, and open Devices and Printers, Printers, orPrinters and Faxes.
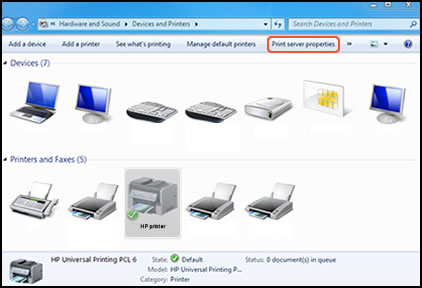
  2. Click the icon for your printer, then click Print server properties.
    Figure : Location of Print server properties
    Image: Location of Print server properties
     NOTE:
    If Print server properties does not display, right-click an empty area in the Printers window, select Run as administrator from the drop-down menu, and then selectServer Properties.
  3. If the User Account Control window displays, click Continue.
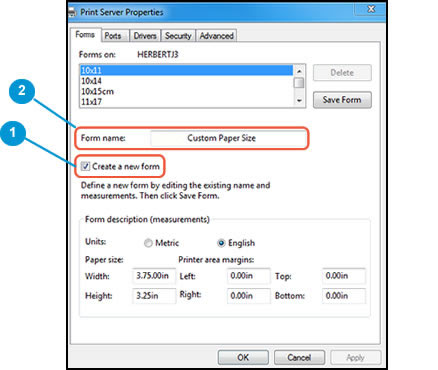
  4. On the Forms tab, select the Create a new form check box, and then type a name for the new paper size in Form name.
    Figure : Forms tab in Print Server Properties
    Image: Forms tab in Print Server Properties
    1. Create a new form
    2. Form name
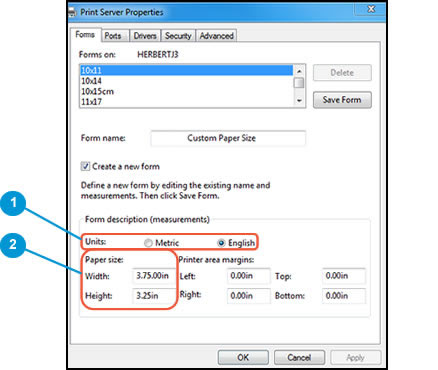
  5. Select Metric or English, then type the dimensions of your custom paper in the Width and Height text boxes.
    Figure : Forms tab in Print Server Properties
    Image: Forms tab in Print Server Properties
    1. Metric or English
    2. Width and Height
     NOTE:
    Leave the Printer area margins set at 0.00.
  6. Click Save Form, then click OK or Close.
 NOTE:
Supported paper sizes vary by printer. If you input custom dimensions that your printer does not support, the new custom paper size does not display when you attempt to print. Check the printer specifications for your printer for more information on supported paper sizes.
Step 2: Select the new custom paper size in the printer software
To begin printing on the custom paper size, select the new size in the printer software.
  1. In the Devices and Printers window you opened in the previous step, right-click the icon for your printer, and then select Printing Preferences.
  2. On the Paper/Quality tab, click Advanced.
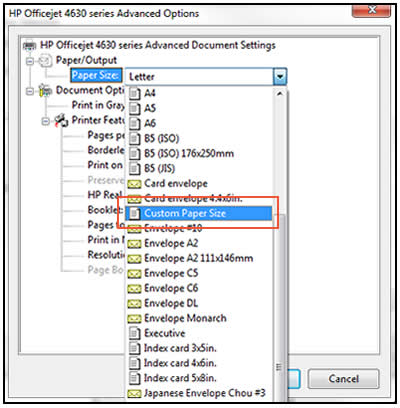
  3. In Paper Size, select the name of the new custom paper size.
    Figure : Paper Size with new custom paper size selected
    Image: Paper Size with new custom paper size selected
  4. Click OK.
    The custom paper size is now the default paper size for all printing on your computer. You can change the default paper size by returning to Printing Preferences and selecting the desired size.

Source


Let me know if you have any luck with the above-noted preset creation method. If I have helped you resolve the issue and you liked this post, feel free to express your thanks by clicking on the 'Thumbs Up' icon below and clicking 'Accept as Solution' (this will help others find the solution).


Thanks for being a part of the HP community.


Have a great day!

E-roq
I work on behalf of HP

If you found this post helpful, you can let others know by clicking the Accept as Solution button. You can also show your appreciation, with a kudos, by clicking the thumbs up" button!

Archived This topic has been archived. Information and links in this thread may no longer be available or relevant. If you have a question create a new topic by clicking here and select the appropriate board.
† The opinions expressed above are the personal opinions of the authors, not of HP. By using this site, you accept the <a href="https://www8.hp.com/us/en/terms-of-use.html" class="udrlinesmall">Terms of Use</a> and <a href="/t5/custom/page/page-id/hp.rulespage" class="udrlinesmall"> Rules of Participation</a>.