-
×InformationNeed Windows 11 help?Check documents on compatibility, FAQs, upgrade information and available fixes.
Windows 11 Support Center. -
-
×InformationNeed Windows 11 help?Check documents on compatibility, FAQs, upgrade information and available fixes.
Windows 11 Support Center. -
- HP Community
- Archived Topics
- Printers Archive
- I regularly receive a fax, but the printer does not print

Create an account on the HP Community to personalize your profile and ask a question
Your account also allows you to connect with HP support faster, access a personal dashboard to manage all of your devices in one place, view warranty information, case status and more.
11-19-2015 07:52 AM
 HP Recommended
Product: officejet pro 8610
Operating System: Microsoft Windows 10 (64-bit)
although I do not think this is the cause, I have recently upgraded your operating system from Windows 8.1 to Windows 10. as well as, since last Sunday I reinstalled all the software update of the HP Officejet Pro 8610 directly from HP. everything was unsuccessful. at least, so I thought. Instead, this morning, I had to receive faxes directly to your printer, ie, without using any resources of computer. Unfortunately, I realized that, despite everything functions, the printer, try to connect with the classic sound of a fax connection but, after a few seconds, do not complete the operation.
could you tell me what to do?
6 REPLIES 6
11-20-2015 01:54 PM - edited 11-20-2015 01:55 PM
HP Recommended
Hi @PaoloC2,
Welcome to the HP Support Forums!
I understand that your HP Officejet Pro 8610 Printer will not print out faxes. I would be happy to help and please remember to return to this thread and mark 'Accept as Solution', if I have successfully helped you resolve the issue. If you wish to say 'thanks' for my effort to help, click the 'thumbs up' to give me a Kudos.
I see how important it is to get faxing working with your printer again and the printer acts as though it is receiving a fax, but nothing happens.
Are you able to print other documents?
What is the error message you're receiving?
I would start by printing out a fax test report and evaluate the findings.
Print a fax test report
Run a fax test report to determine the faxing status on the printer and whether or not it is configured correctly to send and receive faxes.
- On the printer control panel, swipe the display to scroll to Setup, and then touch the Setup icon (
 ).
). - Touch Fax Setup, swipe the display to scroll to Fax Tools, and then touch Fax Tools.
- Touch Run Fax Test. The printer prints a fax test report.
- Review the report.
- If the fax test indicates that it does not detect a phone line or dial tone, continue to the next solution.
Please use the steps within this guide to help resolve faxing issues: HP Officejet Printers - Cannot Send or Receive Faxes.
Please respond to this post with the result of your troubleshooting. I look forward to hearing from you. Good Luck! 🙂
Drakster
I work on behalf of HP
If you found this post helpful, you can let others know by clicking the “Accept as Solution” button. You can also show your appreciation, with a kudos, by clicking the “thumbs up" button!
11-25-2015 09:54 AM
HP Recommended
friendly thanks for responding quickly to my question. but, although he made several attempts to link connecting me recommended, are not I achieved my goal. I also followed your suggestion to reconfigure the printer by printing directly and i runnig the testing page but the result is always the same: ... to incoming fax, the printer starts the procedure of receiving but does not complete the operation.
question:...It may depend on the last update I downloaded from HP and I installed just days before?
I just want to fix it. I do not consider it correct to input HP updates without the necessary certainty of valid operation.
Even the same "link" to which you, promptly, I have suggested to connect it worked.
Best regards!!!
11-25-2015 11:52 AM - edited 11-28-2015 10:28 PM
HP Recommended
Hi @PaoloC2,
Thanks for getting back to me.
The HP Software and HP Updates aren't important for resolving issue with being unable to receive faxes.
Did you follow the document I recommended, which was: Cannot Send or Receive Faxes?
- What were the results when you ran fax test report and when you tested the fax functionality with the HP Fax Test Service?
If you need further assistance, please let me know the following information above. Please respond to this post with the results. Good Luck!
Drakster
I work on behalf of HP
If you found this post helpful, you can let others know by clicking the “Accept as Solution” button. You can also show your appreciation, with a kudos, by clicking the “thumbs up" button!
11-26-2015 01:02 AM
HP Recommended
Hi Drakster
I just ran a report Fax printer. You'll send a copy as it is faithfully executed having a copy paste having scanned the printed page.
from what I read, it seems that everything is in line but, on the contrary, only works outgoing and not incoming fax
______________________________________________________________________________________________
Report data Fax Test
__________________________________________________________________________________________
HP Officejet Pro 8610 Series Rapporto test fax per
Paolo Cacciante
0964732287
26 Nov 2015 8:15 ______
Test hardware fax SUPERATO
Fax collegato alla presa telefonica attiva SUPERATO
Cavo telefonico collegato alla porta fax corretta SUPERATO
Cavo telefonico corretto collegato al fax SUPERATO
Rilevamento segnale di linea SUPERATO
Test linea fax SUPERATO
_______________________________________________________________________________________
Test fax superato dal dispositivo HP.
Le impostazioni fax possono influire sulle prestazioni del dispositivo HP.
Verificare le impostazioni fax correnti riportate di seguito.
Lingua Italiano
Paese/Regione Italia
Risposta automatica On
Squilli prima di rispondere 6
Formato fax A4
Selezione a toni o a impulsi Selezione a toni
Volume audio fax Alto
Squillo distintivo Tutti gli squilli
Riseleziona se occupato Riseleziona
Riselezione se nessuna risposta Non riselezionare
Riduzione automatica On
Ricezione con backup fax Off
Modalità correzione errori (ECM) On
Velocità fax Media (14400)
Inoltro fax Off
Riselezione per errore comunicazione Riseleziona
Per ulteriori informazioni sul test e le impostazioni fax, consultare la Guida per l'utente.
__________________________________________________________________________________________
Istruzioni per la riesecuzione del test:
Passo 1. Premere il pulsante "Fax"
Passo 2. Scegliere il menu "Impostazioni"
Passo 3. Scegliere il menu "Impostazione fax"
Passo 4. Scegliere il menu "Strumenti fax"
Passo 5. Scegliere il menu "Esegui test fax"
CN47SC329S
FDP1CN1502AR
11-26-2015 09:19 AM
HP Recommended
Hi @PaoloC2,
Thanks for getting back to me.
The fax test report you posted isn't in English, therefore I cannot read it.
In addition, the troubleshooting document (Cannot Send or Receive Faxes), gives instructions on how to address various issues which cause the printer to not receive faxes.
Here's the troubleshooting flow below, I highly recommend you follow this guide:
The printer can send faxes, but cannot receive faxes
The printer cannot receive faxes, but it can send faxes successfully. All other printing functions work, and printouts are of good quality. Try the following solutions in the order presented to resolve the issue.
Solution one: Print a fax test report
Run a fax test report to determine the faxing status on the printer and whether or not it is configured correctly to send and receive faxes.
- On the printer control panel, swipe the display to scroll to Setup, and then touch the Setup icon ().
- Touch Fax Setup, swipe the display to scroll to Fax Tools, and then touch Fax Tools.
- Touch Run Fax Test. The printer prints a fax test report.
- Review the report.
- If the results of the fax test are All Pass, skip to the Make sure that there are no conflicting telephone services section in this document.
- If the fax test indicates that it does not detect a phone line or dial tone, continue to the next solution.
Solution two: Check the fax connections
Follow these steps to check the physical connections, and then test the fax.
- Disconnect the telephone cord from the printer and the wall jack, and then examine the connector on the end of the cord. Make sure that the cord has only two wires. If you see four wires, replace the cord with one containing only two wires.Figure : Example of a two-wire connector
 Figure : Example of a four-wire connector
- Reconnect the telephone cord to the wall jack, and then reconnect the other end of the telephone cord to the port labeled 1-LINE on the rear of the printer.Figure : Connect the phone cord directly to the wall jack

- Wall jack
- Two-wire phone cord
- Remove the plug from the port labeled 2-EXT on the rear of the printer, and then connect a single-line telephone to this port.Figure : Connect the single-line phone to the 2-EXT port

- Wall jack
- Two-wire phone cord
- Single-line telephone
- If other devices need to use the same wall jack, make sure that they are connected to the 2-EXT port on the rear of the printer.Figure : Connect other devices to the 2-EXT port
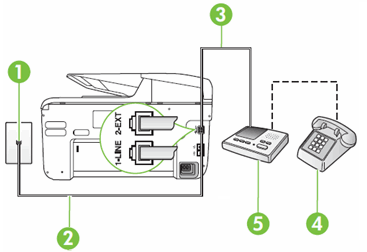
- Wall jack
- Two-wire phone cord
- Two-wire phone cord
- Single-line telephone
- Answering machine
NOTE:
Click here to review detailed setup instructions for other connection configurations. - Pick up the telephone receiver, and then listen for a dial tone. Make sure that you can dial out using the telephone keypad.
- If you hear a dial tone and you can dial out using the telephone, the printer is connected correctly to a working telephone cord and telephone jack.
- If you do not hear a dial tone, check the configuration again and make sure that it is set up correctly.
Step two: Try to receive a fax
Try to receive a fax.
- If these steps resolved the issue, you do not need to continue troubleshooting.
- If the issue persists, continue to the next solution.
Solution three: Make sure that there are no conflicting telephone services
Many telephone companies offer services that are intended to prevent unwanted calls. These services can block incoming faxes. If there are any of these services on the telephone line connected to the printer, contact the telephone service provider for its recommended solution.
- Voice mail
- Privacy block
- Security screen
- Anonymous call rejection
- Privacy manager
- Any other service that screens or intercepts incoming calls
A distinctive ring service, if it is available from the telephone service provider, often resolves this issue.
If you removed or changed a conflicting telephone service, try to receive a fax.
- If these steps resolved the issue, you do not need to continue troubleshooting.
- If the issue persists, continue to the next solution.
Solution four: Use an analog telephone service
The printer is designed, according to international standards, to work with traditional, analog telephone services and might experience some difficulties when connected to phone lines with digital services. Make sure that the printer is connected to an analog telephone service.
To obtain digital services information or support, contact the telephone service provider or system administrator.
If you connect to an analog service, try to receive a fax.
- If these steps resolved the issue, you do not need to continue troubleshooting.
- If the issue persists, continue to the next solution.
Solution five: Change the Distinctive Ring setting
NOTE:Only set a distinctive ring pattern if your phone service features the Distinctive Ring service. For more information, contact your telephone service provider.
- On the printer control panel, swipe the display to scroll to Setup, and then touch the Setup icon ().
- Touch Fax Setup, and then touch Advanced Fax Setup.
- Touch Distinctive Ring, and then touch Yes.
- Touch the fax ring tone pattern assigned by the telephone company.
- If you know the ring pattern that the telephone company assigned to your fax number, touch the matching ring pattern.
- If you do not know the ring pattern assigned by your telephone company, touch Ring Pattern Detection, and then follow the on-screen instructions.
- If these steps resolved the issue, you do not need to continue troubleshooting.
- If the issue persists, continue to the next solution.
Solution six: Make sure that any answering machines are correctly connected
If an answering machine is connected to the same telephone line that the printer is connected to, make sure that it is correctly connected.
Step one: Connect the phone cord
- Connect a two-wire phone cord to the 1-LINE port on the rear of the printer, and then plug the other end of the phone cord to the wall jack.Figure : Connect the phone cord directly to the wall jack
- Wall jack
- Two-wire phone cord
- Remove the plug from the port labeled 2-EXT on the rear of the printer, and then connect a phone cord between the port labeled 2-EXTand your answering machine's input port.
- Connect a phone cord between your telephone and your answering machine's phone port. If your telephone has a built in answering machine, connect your telephone to the port labeled 2-EXT on the rear of the printer.
NOTE:
If you do not connect your answering machine directly to the printer, your answering machine might record fax tones from a sending fax machine, and then the printer might not receive faxes.Figure : Connection setup with telephone answering machine- Wall jack
- Two-wire phone cord
- Two-wire phone cord
- Single-line telephone
- Answering machine
NOTE:When recording the outgoing message on the answering machine, make sure that it is 10 to 20 seconds long with 5 to 7 seconds of silence at the end.
Step two: Turn on Auto Answer
Turn on Auto Answer so that the printer answers fax calls automatically.
- Press the Power button to turn on the printer, if it is not on already.
- On the printer control panel, swipe the display to scroll to Setup, and then touch the Setup icon ().
- Touch Fax Setup, and then touch Basic Fax Setup.
- Touch Auto Answer, and then touch On.
Step three: Change the Rings to Answer setting
Change the Rings to Answer setting to the highest number of rings available.
- On the printer control panel, swipe the display to scroll to Setup, and then touch the Setup icon ().
- Touch Fax Setup, and then touch Basic Fax Setup.
- Touch Rings to Answer, touch 6, and then touch Done.
Step four: Try to receive a fax
Try to receive a fax.
- If these steps resolved the issue, you do not need to continue troubleshooting.
- If the issue persists, continue to the next solution.
Solution seven: Restart the fax
Follow these steps to restart the fax.
- With the printer turned on, disconnect the power cord from the rear of the printer, and then unplug the power cord from the power source or electrical outlet.
- Make sure that the telephone cord is fully inserted into the 1-LINE port on the back of the printer and the other end is fully inserted into the wall jack.
- Reconnect the power cord to the rear of the printer, and then reconnect the other end of the power cord to the power source or electrical outlet.
- When the printer is in the ready state, try to receive a fax.
- If these steps resolved the issue, you do not need to continue troubleshooting.
- If the issue persists, continue to the next solution.
Solution eight: Remove any other devices from the telephone line
Follow these steps to remove any other devices from the telephone line.
- If any other devices, such as a telephone, a telephone answering machine, or a modem, are connected to the telephone line, remove each device.
NOTE:
Remove each device even if the device is in another room connected to another wall jack or connected using a line splitter. - Connect the telephone cord to the wall jack, and then reconnect the other end of the telephone cord to the port labeled 1-LINE on the rear of the printer.Figure : Connect the phone cord directly to the wall jack
- Wall jack
- Two-wire phone cord
- If these steps resolved the issue, you do not need to continue troubleshooting.
- If the issue persists, continue to the next solution.
Solution nine: Configure the menu settings
- On the printer control panel, make sure that the Auto Answer icon (
 ) is on. If the icon is off, follow these steps to turn it on.
- On the printer control panel, swipe the display to scroll to Setup, and then touch the Setup icon ().
- Touch Fax Setup, and then touch Basic Fax Setup.
- Touch Auto Answer, and then touch On.
- Touch the Home icon (
 ) to return to the main screen.
- Reset the fax settings to the settings listed in the table.
- On the printer control panel, swipe the display to scroll to Setup, and then touch the Setup icon ().
- Touch Fax Setup, and then reset the fax settings to the settings listed in this table:Fax MenuFax menu optionSettingBasic Fax SetupRings to Answer2 or 3 (set to 1 or 2 more than the answering machine if one is connected)Basic Fax SetupFax Sound VolumeLoudAdvanced Fax SetupDistinctive RingAll RingsFax ReportsFax Error ReportOn (Send and Receive)
- Try to receive a fax.
- If these steps resolved the issue, you do not need to continue troubleshooting.
- If the issue persists, continue to the next solution.
Solution ten: Reset the fax settings to the default values
Follow these steps to return all fax settings to the default values.
- On the printer control panel, swipe the display to scroll to Setup, and then touch the Setup icon ().
- Touch Fax Setup, and then touch Advanced Fax Setup.
- Swipe the display to scroll to Restore Defaults, and then touch Restore Defaults.
- Try to receive a fax.
- If these steps resolved the issue, you do not need to continue troubleshooting.
- If the issue persists, continue to the next solution.
If you have completed all the solutions listed above and are still experiencing a problem, contact HP.
Contacting HP for service in all countries/regions except Asia Pacific.
First, go to Check your product warranty to check your printer warranty status, and then go to Contact HP Support to find an authorized service dealer or to schedule a repair.
Repair fees might apply for out-of-warranty printers.
What you can do, is use the following link to create yourself a case number, then call and it may help speed up the call process:
Step 1. Open link: www.hp.com/contacthp/
Step 2. Enter Product number or select to auto detect
Step 3. Scroll down to "Still need help? Complete the form to select your contact options"
Step 4. Scroll down and click on: HP contact options - click on Get phone number
Case number and phone number appear.
Please respond to this post with the result of your troubleshooting. I look forward to hearing from you. Good Luck! 🙂
Drakster
I work on behalf of HP
If you found this post helpful, you can let others know by clicking the “Accept as Solution” button. You can also show your appreciation, with a kudos, by clicking the “thumbs up" button!
11-28-2015 02:02 AM
HP Recommended
Dear DraKster,
I answer to your last as well as the technical support that has kindly sent instructions to try to resolve the problems set out above. I must say, though, I do not possess your technical knowledge to these solutions we had already arrived. However, at greater comfort for the next eventual users that potentially should being in my condition totally recommend uninstalling the printer from any system, so then reinstall everything but without updating neither driver nor software at the moment (11/28/2015) as proposed by HP technical support, said update - concerning alignment to the operating system Windows 10 Pro, is not fully functional.
Indeed, after several attempts, just doing as I just described, I managed to solve my problem.
P.S. - Please do not interpret this as a polemic that follows!!! As for your difficulty in interpreting the relationship of testing fax that I sent you because written in Italian having to take into account that the HP brand is also the Italian and not everyone speaks fluent English (I, for example, are one of them) so as to be equipped leaning to a translator Word, because I realize that I must be, I, to adjust me to others, and not the other) even though not occupy positions of "technical support" as in your case.
Hence my advice to use yourself as a translator is not acceptable, the end user is faced with a problem, feel answer: ... I did not understand the test result because you sent me written in Italian and not in English.
It is offensive to those who will read and simplistic for your image.
Best regards, Paolo Cocciante
† The opinions expressed above are the personal opinions of the authors, not of HP. By using this site, you accept the Terms of Use and Rules of Participation.


Didn't find what you were looking for?
Ask the community
† The opinions expressed above are the personal opinions of the authors, not of HP. By using this site, you accept the <a href="https://www8.hp.com/us/en/terms-of-use.html" class="udrlinesmall">Terms of Use</a> and <a href="/t5/custom/page/page-id/hp.rulespage" class="udrlinesmall"> Rules of Participation</a>.