-
×InformationNeed Windows 11 help?Check documents on compatibility, FAQs, upgrade information and available fixes.
Windows 11 Support Center. -
-
×InformationNeed Windows 11 help?Check documents on compatibility, FAQs, upgrade information and available fixes.
Windows 11 Support Center. -
- HP Community
- Archived Topics
- Printers Archive
- My printer is printing white pages !!! ): HELP PLEASE!

Create an account on the HP Community to personalize your profile and ask a question
Your account also allows you to connect with HP support faster, access a personal dashboard to manage all of your devices in one place, view warranty information, case status and more.
09-22-2015 07:28 PM
 HP Recommended
Product: HP Envy 4500
So I tried to print out my essay but only my last page printed correctly. Some pages did not have the fullwords so I was guessing my printer was low on ink. I changed the black cartridge, did the alignment. (the paper came out with blue blocks towards the top and in the bottom it read "Important" with 2 red arrows. I had to scaan it on the glass and it read alignment failed. I retried but nothing worked. I kept printing my essay but only blank pages come out. I alredy printed the PRINTER STATUS REPORT and also the PRINTER QUALITY REPORT and I got a paper with stripes of yellow, pink, and blue. PLEASE HELP ME. Thank you so much!
1 REPLY 1
09-24-2015 02:55 PM
HP Recommended
Hi @Ana1996,
Welcome to the HP Support Forums!
I understand that you're unable to print your school work and the alignment is failing on your HP Envy 4500 Printer. I would be happy to help you and please remember to return to this thread and mark 'Accept as Solution', if I have successfully helped you resolve the issue.
The alignment will not complete if the black cartridge is not printing correctly. You may have a defective ink cartridge or there could be an issue ink delivery system.
I would try the steps within this guide, Printer Prints a Blank Page or Does Not Print Black or Color Ink for the HP ENVY 4500 and Deskjet In....
This document pertains to the ENVY 4500 e-All-in-One and HP Deskjet Ink Advantage 3540 e-All-in-One printers.
The printer is working, but the printed output is missing black or color ink, or the printed page is blank or has very little ink.
To resolve this issue, use only genuine HP cartridges. Additionally, you can remove the black cartridge to print only with the tri-color cartridge, replace any empty or defective cartridges, or clean the printhead.
Solution one: Remove the black cartridge
If you just set up your printer and you notice that black ink is missing or faded on your printouts, follow these steps to remove the black cartridge and print only with the tri-color cartridge. This allows the printer to operate in single-cartridge mode, which creates composite black from the tri-color cartridge.
- Press the Power button to turn on the printer, if it is not already on.
- Locate the slots on the left and right sides of the printer.Figure : Locate the slots on the sides of the printer

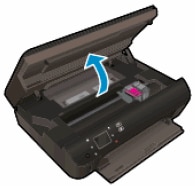
- Slide your fingers into the two slots, and then gently lift up to open the cartridge access door. The carriage moves to the cartridge access area. Wait until the carriage is idle and silent before you continue.Figure : Open the cartridge access door
- To release the cartridge, lift the lid on the cartridge slot, and then gently push the lid back until it stops.
- Pull up on the black cartridge to remove it from the slot.Figure : Remove the cartridge
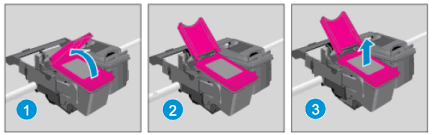
- Lift the lid
- Gently push the lid back
- Pull up on the cartridge
- Set the black cartridge aside, with the nozzles facing up.Figure : Cartridge with nozzles facing up

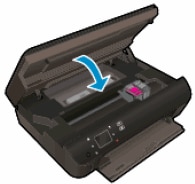
- Close the cartridge access door.Figure : Close the cartridge access door
- Try the print job again.
- If the printer operates correctly in single-cartridge mode, let the black cartridge rest with the nozzles facing up for several hours or overnight, reinstall it, and then try to print again. If you are satisfied with the print quality, you can stop troubleshooting.
- If the printer does not operate correctly in single-cartridge mode or you are not satisfied with the print quality after you reinstall the black cartridge, continue to the next solution.
Visit HP SureSupply to check ink cartridge compatibility or purchase replacement ink cartridges.
- Go to the HP SureSupply website.
- Scroll to the bottom of the page, and then make sure the country/region location is correct.
- Follow the on-screen instructions to order new ink cartridges or check ink cartridge compatibility with your printer.
Genuine HP ink cartridges can also be purchased from other retailers.
HP recommends that you use genuine HP ink cartridges. HP cannot guarantee the quality or reliability of non-HP ink cartridges or refilled HP ink cartridges. If you do not use genuine HP ink cartridges, the steps in this document might not resolve print quality issues.
Solution three: Check the estimated ink levels, and then replace any low or empty cartridges
Follow these steps to check the estimated ink levels, and then replace any low or empty cartridges.
Step one: Check the estimated ink levels
Follow these steps to check the estimated ink levels.
- On the printer control panel, press the Home button (
 ) to open the Home screen.
 - Press the Down Arrow (
 ) to select Ink Levels, and then press OK. The control panel displays the estimated ink levels.Figure : Estimated ink levels
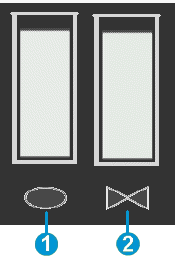
- Color ink level indicator
- Black ink level indicator
NOTE: Ink level warnings and indicators provide estimates for planning purposes only. When an indicator shows low-ink levels, consider having a replacement ink cartridge available to avoid possible printing delays. You do not need to replace ink cartridges until print quality becomes unacceptable.
- If none of the cartridges are low on ink, you do not need to replace them yet. Continue to the next solution.
- If any of the cartridges are low on ink, continue to the next step to replace them.
Step two: Replace any low or empty cartridges
Follow these steps to replace any low or empty cartridges.
- Press the Power button to turn on the printer, if it is not already on.
- Open the scanner lid.
- Open the cartridge access door. The carriage moves to the cartridge access area. Wait until the carriage is idle and silent before you continue.Figure : Open the cartridge access door
- To release the cartridge, lift the lid on the cartridge slot, and then gently push the lid back until it stops.
- Pull up on the cartridge to remove it from the slot.Figure : Remove the cartridge
- Lift the lid
- Gently push the lid back
- Pull up on the cartridge
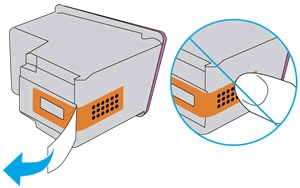
- Remove the new cartridge from its packaging, and then pull the pull tab to remove the plastic tape.Figure : Remove the plastic tape
- Hold the cartridge at a slight upward angle with the cartridge contacts facing the rear of the printer, and then slide the cartridge into the empty slot.
- Close the lid on the cartridge slot to secure the cartridge into place.
NOTE: Insert the color cartridge in the slot on the left. Insert the black cartridge in the slot on the right.
Figure : Insert the cartridge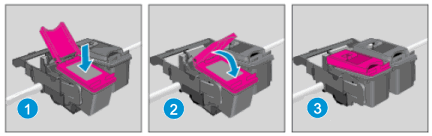
- Insert the cartridge
- Close the lid
- The color cartridge is on the left, and the black cartridge is on the right
- Repeat the previous steps to install the other cartridge, if necessary.
- Close the cartridge access door.Figure : Close the cartridge access door
- Close the scanner lid.
- Follow the instructions on the control panel to start the cartridge alignment. The printer aligns the cartridges and prints an alignment page.
- Alignment page did not print?
Solution four: Use an automated tool to clean the printhead
Follow these steps to run an automated tool to clean the printhead.
NOTE: If the printhead is badly clogged, you might need to clean the printhead several times to restore normal print quality.
- Load letter or A4, unused, plain white paper into the paper tray.
- On the printer control panel, press the Down Arrow () to select Tools, and then press OK.
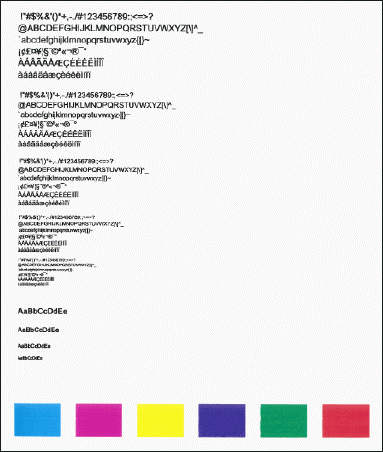
- Press the Down Arrow () to select Clean Printhead, and then press OK. The printer cleans the printhead, and then prints a printhead test page.Figure : Example of the printhead test page without defects
- Review the print quality on the printhead test page.
NOTE: To avoid issues that require cleaning, always turn the printer off with the Power button.
Solution five: Identify, and then replace the problem cartridge
If cleaning the printhead did not resolve the issue, follow these steps to identify and replace the problem cartridge.
Step one: Identify the cartridge to replace
Follow these steps to identify the cartridge to replace.
- Review the test page you printed in the previous solution.
- Check the text and color blocks on the test page.
- If you identify any defects with the black text on the page, the black cartridge is the problem.
- If you identify any defects with the colored blocks on the page, the tri-color cartridge is the problem.
Step two: Replace the problem cartridge
Follow these steps to replace the problem cartridge.
If you have a defective ink cartridge or printhead, it might be under warranty. To check the warranty on your ink supplies, go tohp.com/go/learnaboutsupplies, select your country/region, and then review the limited warranty information for your supplies.
Press the Power button to turn on the printer, if it is not already on.
- Open the scanner lid.
- Open the cartridge access door. The carriage moves to the cartridge access area. Wait until the carriage is idle and silent before you continue.Figure : Open the cartridge access door
- To release the cartridge, lift the lid on the cartridge slot, and then gently push the lid back until it stops.
- Pull up on the cartridge to remove it from the slot.Figure : Remove the cartridge
- Lift the lid
- Gently push the lid back
- Pull up on the cartridge
- Remove the new cartridge from its packaging, and then pull the pull tab to remove the plastic tape.Figure : Remove the plastic tape
- Hold the cartridge at a slight upward angle with the cartridge contacts facing the rear of the printer, and then slide the cartridge into the empty slot.
- Close the lid on the cartridge slot to secure the cartridge into place.
NOTE: Insert the color cartridge in the slot on the left. Insert the black cartridge in the slot on the right.
Figure : Insert the cartridge- Insert the cartridge
- Close the lid
- The color cartridge is on the left, and the black cartridge is on the right
- Repeat the previous steps to install the other cartridge, if necessary.
- Close the cartridge access door.Figure : Close the cartridge access door
- Close the scanner lid.
- Follow the instructions on the control panel to start the cartridge alignment. The printer aligns the cartridges and prints an alignment page.
- Alignment page did not print?
Contacting HP for service in all countries/regions except Asia Pacific.
If you completed all the preceding steps and your product still has an issue, service the product.
First, go to Check your product warranty to check your printer warranty status, and then go to Contact HP Support to find an authorized service dealer or to schedule a repair.
Repair fees might apply for out-of-warranty printers.
NOTE: Keep a print sample that shows the problem. If the ink cartridges, printhead, or printer is replaced under warranty, the support agent will request the print sample. If the printer is returned to HP, the print sample must be returned with the printer. Place the sample in the output tray when you package your printer for shipping.
What you can do, is use the following link to create yourself a case number, then call and it may help speed up the call process:
Step 1. Open link: www.hp.com/contacthp/
Step 2. Enter Product number or select to auto detect
Step 3. Scroll down to "Still need help? Complete the form to select your contact options"
Step 4. Scroll down and click on: HP contact options - click on Get phone number
Case number and phone number appear.
Drakster
I work on behalf of HP
If you found this post helpful, you can let others know by clicking the “Accept as Solution” button. You can also show your appreciation, with a kudos, by clicking the “thumbs up" button!
† The opinions expressed above are the personal opinions of the authors, not of HP. By using this site, you accept the Terms of Use and Rules of Participation.


Didn't find what you were looking for?
Ask the community
† The opinions expressed above are the personal opinions of the authors, not of HP. By using this site, you accept the <a href="https://www8.hp.com/us/en/terms-of-use.html" class="udrlinesmall">Terms of Use</a> and <a href="/t5/custom/page/page-id/hp.rulespage" class="udrlinesmall"> Rules of Participation</a>.