-
×InformationNeed Windows 11 help?Check documents on compatibility, FAQs, upgrade information and available fixes.
Windows 11 Support Center. -
-
×InformationNeed Windows 11 help?Check documents on compatibility, FAQs, upgrade information and available fixes.
Windows 11 Support Center. -
- HP Community
- Archived Topics
- Printers Archive
- OfficeJet Pro 8600 Plus does not print yellow

Create an account on the HP Community to personalize your profile and ask a question
Your account also allows you to connect with HP support faster, access a personal dashboard to manage all of your devices in one place, view warranty information, case status and more.
10-10-2015 11:21 AM
 HP Recommended
Product: OfficeJet Pro 8600 Plus
Operating System: Microsoft Windows 7 (32-bit)
For several weeks the OfficeJet Pro 8600 Plus has not been printing the yellow toner, so I replaced a non-empty yellow cartridge, no change.
I then downloaded HPPS Doctor. At first it thought it was seeing an HP 7200 printer, so I deleted a lot of residue from that machine. It also told me there was a driver conflict. Today I reinstalled the driver from the original 8600 disk for the second time, no change, then downloaded the latest driver from HP (2014), still no change to printing, and the HPPS Doctor still says there is a driver conflict.
I have always connected via USB. Would anyone recommend changing to wireless?
Also I have for two years used generic toner cartridges, and would prefer to stay with that unless anyone is going to tell me confidently that HP cartridges would solve it.
Is this syndrome familiar to anyone? - SuperSat
4 REPLIES 4
10-12-2015 02:01 PM
HP Recommended
Hi @SuperSat,
Welcome to the HP Support Forums!
I see that you're unable to print from the yellow cartridge on your HP Officejet Pro 8600 Plus Printer. I would be happy to help you and please remember to return to this thread and mark 'Accept as Solution', if I have successfully helped you resolve the issue. If you wish to say 'thanks' for my effort to help, click the 'thumbs up' to give me a Kudos.
Here's a document I would recommend that you try, Printer Prints a Blank Page or Does Not Print Black or Color Ink for the HP Officejet Pro 251dw, 276...
This document is for the HP Officejet Pro 251dw, 276dw, and 8600 printers.
The printer is working, but the printed output is missing black or color ink, or the printed page is blank or has very little ink.
In general, low ink levels should not impact print quality. Your printer stops and displays a message when ink levels get too low. However, the printer might still perform a limited amount of printing in 'backup mode' at low ink levels. In backup mode, blacks might not be as dark, or printouts might be in grayscale (shades of gray with no color). Replace any low cartridges if backup mode printing is unacceptable.
Solution one: Check the estimated ink levels, and then replace any low or empty cartridges
Follow these steps to check the estimated ink levels, and then replace any low or empty cartridges.
NOTE: When a message displays that says that a cartridge is empty, it must be replaced before you can continue printing. Some ink from all the cartridges is required to run printhead servicing tasks to prevent ink clogs.
NOTE: Ink level warnings and indicators provide estimates for planning purposes only. When an indicator shows low ink levels, consider having a replacement cartridge available to avoid possible printing delays. You do not need to replace cartridges until you are prompted to.
- On the printer control panel, touch the Ink Level icon (
 ) or (
 ).
).NOTE: The Ink Level icon that displays on your control panel differs depending on your printer model.
A graphic of the estimated ink levels for each cartridge displays on the control panel.Figure : Estimated ink levels displayed on the printer control panel
- Identify any cartridges that are low or empty, and then continue to the next step.
- If none of the cartridges are low on ink, you do not need to replace them yet. Continue to the next solution.
- If any of the cartridges are low on ink, continue to the next step to replace them.
Step two: Replace any low or empty cartridges
Follow these steps to replace any depleted cartridges, and then try printing again.
Video of replacing cartridges
The following video demonstrates how to replace a cartridge.
If you have trouble viewing the video or to view the video in a different size, click here to play the video on YouTube.
HP recommends that you use genuine HP ink cartridges. HP cannot guarantee the quality or reliability of non-HP ink cartridges or refilled HP ink cartridges. If you do not use genuine HP ink cartridges, the steps in this document might not resolve print quality issues.
Visit HP SureSupply to check ink cartridge compatibility or purchase replacement ink cartridges.
- Go to the HP SureSupply website.
- Scroll to the bottom of the page, and then make sure the country/region location is correct.
- Follow the on-screen instructions to order new ink cartridges or check ink cartridge compatibility with your printer.
Genuine HP ink cartridges can also be purchased from other retailers.
- Press the Power button to turn on the printer, if it is not already on.
- Slip your fingers into the slot on the left side of the printer, and then pull forward to open the cartridge access door. The carriage moves to the left side of the printer. Wait until the carriage is idle and silent before you proceed.Figure : Open the cartridge access door

- Slot for opening the cartridge access door
- Push in on the front of the cartridge to release it, and then pull it toward you to remove it from its slot.Figure : Remove the cartridge from its slot
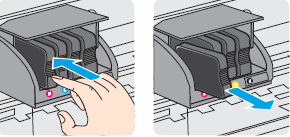
- Remove the new cartridge from its packaging.
- Hold the cartridge so that the cartridge contacts are facing toward the printer.
- Slide the new cartridge into its slot, and then gently push it forward until it clicks into place.
NOTE: Make sure that the colored dot on the cartridge label matches the colored dot on the slot.
Figure : Insert the cartridge into its color-coded slot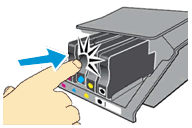
CAUTION: Do not lift the latch handle on the carriage to insert cartridges. Doing so could cause the printhead or cartridges to be incorrectly seated, which could damage the print mechanism and cause printing problems.
- Repeat these steps for other cartridges, if necessary.
- Close the cartridge access door.
- Wait until the warm-up sequence finishes and your printer is quiet before you proceed.
- If these steps resolved the issue, you do not need to continue troubleshooting.
- If the issue persists, continue to the next solution.
Solution two: Use an automated tool to clean the printhead
Follow these steps to clean the printhead.
NOTE: If the printhead is badly clogged, you might need to clean the printhead several times to restore normal print quality.
- Load plain white paper into the tray.
- On the printer control panel, touch the Right Arrow (
 ) to display additional options.
 - Touch Setup (
 ), and then touch Tools.
 - Touch Clean Printhead. The printer cleans the printhead, and then prints a test page.
- Evaluate the test page for print quality.
- If you are satisfied with the print quality on the test page, touch No to return to the current print job.
- If you are not satisfied with the print quality on the test page, touch Yes to continue to the next printhead cleaning stage.
NOTE: There are three printhead cleaning stages. Complete all three stages if necessary. If the printhead is badly clogged, you might need to start another cleaning cycle. If so, wait 30 minutes after the last (third) cleaning stage to start the first stage of the cleaning process over again.
NOTE: Never turn off the printer when ink cartridges are missing. Make sure that you replace any missing ink cartridges as soon as possible to avoid print quality issues and possible extra ink usage or damage to the ink system. To avoid issues that require cleaning the printhead, always turn the printer off with the Power button on the printer itself.
- If these steps resolved the issue, you do not need to continue troubleshooting.
- If the issue persists, continue to the next solution.
Solution three: Replace the printhead
If you have completed all of the troubleshooting steps and are still experiencing a problem, replace the printhead.
CAUTION: Wait until you have a new printhead assembly available before you remove the cartridges. HP recommends that you do not leave the cartridges outside the printer longer than 30 minutes. This could damage both the printer and the cartridges.
If you have a defective ink cartridge or printhead, it might be under warranty. To check the warranty on your ink supplies, go tohp.com/go/learnaboutsupplies, select your country/region, and then review the limited warranty information for your supplies.
If HP replaces your printhead assembly under warranty, you receive a kit with a new printhead assembly, instructions, and a full set of cartridges. You must install the SETUP cartridges that comes with the new printhead, or a cartridge error might occur.
If your printhead assembly is no longer under warranty, you can purchase a new one online.
- If you are in the United States, go to the HP Parts Store website (in English).
- Under Find your part(s), type CR322A in the Search by part number text box.
- Follow the on-screen instructions to order the printhead assembly.
If you are outside of the United States, go to HP How to Buy website to buy supplies.
When you have the replacement printhead, click here for detailed instructions to remove the old printhead and install the new one.
- If these steps resolved the issue, you do not need to continue troubleshooting.
- If the issue persists, continue to the next solution.
Solution four: Service the printer
If you have completed all of the solutions listed above and are still experiencing a problem, service the printer.
NOTE: Keep a print sample that shows the problem. If the ink cartridges, printhead, or printer is replaced under warranty, the support agent will request the print sample. If the printer is returned to HP, the print sample must be returned with the printer. Place the sample in the output tray when you package your printer for shipping.
The printhead could be clogged, if your printer is out of warranty you could always try the solution is this video. Please use at your own discretion.
Video: How to flush out and clean the HP Officejet Pro 8600 or 8100 Print Head
If the issue persists, I would try a new set of genuine HP ink cartridges.
If you completed all the preceding steps and your product still has an issue, service the product.
Contacting HP for service in all countries/regions except Asia Pacific. HP may offer you a discount towards a trade-in on a replacement.
What you can do, is use the following link to create yourself a case number, then call and it may help speed up the call process:
Step 1. Open link: www.hp.com/contacthp/
Step 2. Enter Product number or select to auto detect
Step 3. Scroll down to "Still need help? Complete the form to select your contact options"
Step 4. Scroll down and click on: HP contact options - click on Get phone number
Case number and phone number appear.
Please respond to this post with the result of your troubleshooting. I look forward to hearing from you. Good Luck! 🙂
Drakster
I work on behalf of HP
If you found this post helpful, you can let others know by clicking the “Accept as Solution” button. You can also show your appreciation, with a kudos, by clicking the “thumbs up" button!
10-18-2015 04:20 AM
HP Recommended
Embarrassingly the solution was even easier - I am very new to ink-jet printers, having relied on an HP Laserjet 1200 for fifteen years.
So I did not understand the power of the inbuilt 3-level print-head cleaning process. I did four cycles because I was not convinced it had worked (the yellow was never pure yellow), but there was very little change after the first two cycles, and I am getting good colours now.
For background, I found that in UK no one will sell me the cleaning fluid. My cartridge supplier offered to do a free clean if I brought the machine in, but I was not convinced that I would not end up paying for a new print head. If it came to that, I note that the small ultra-sound cleaner I bought recently advertises itself as cleaning print-heads, and it was less than half the price of a new print-head.
So thanks Drakster, my problem is solved and I know a bit more about ink-jet procedures, so perhaps my experience will help others.
SuperSat
02-29-2016 11:00 AM
HP Recommended
Or so I thought!
In fact I never got pure yellow, it was always ochre, and got worse, even a double round of 3rd level cleaning was not enough, there were pools of black ink on the paper, and when I took the print head out there was black ink dripping off it.
- First I bought a new HP black cartridge hoping for better ink, but no change, the yellow was even blacker.
- My cartridge supplier had offered to do a free printhead clean, but with my new `HP kudos' I wanted to understand more.
- I bought an ultrasound bath, but chickened out of putting the whole print head in.
- So in the end I used a small syringe to push D/I water through just the yellow tube. Eventually it stopped being black, so I syringed air through it till it stopped foaming, and reassembled
- However my lovely Deskjet 8600 told me all my cartridges were empty, even the HP cartridge I had bought last week.
- I replaced the yellow cartridge (almost full), but it still refused the rest.
- I re-installed the driver and software, but no change.
- I reset to factory defaults, but nothing.
- I even told the chip to stop recording cartridge use, but nothing.
- So I have just installed a fresh (HP original) black cartridge, hoping it would let me at least print in monochrome, which it would ordinarily, but not now, it wants a clean sweep of fresh cartridges.
I suspect, right or wrong, that the original generic black cartridge had ink of the wrong viscocity that was making pools on my paper and diffusing into my yellow system. It was installed in July 2015, and it was that month when I first started getting dirty prints which I still have.
Question 1 - I still have the suspect cartridge, but do I have grounds to complain?
Question 2 - Any remedy out there to save my other almost-new cartridges from eternal damnation?
SuperSat
03-03-2016 09:19 AM
HP Recommended
PS - (SuperSat again, but now HP `Top Student'!) - Re- my final bullet point, I discovered that, instead of buying new full colour cartridges, an empty colour cartridge would has released the machine from lock-down so I can at least print monochrome.
So I might ask my cartridge supplier if it could be the chips in the cartridges that are causing the lock-down, and if so, can he replace them for me?
SuperSat
† The opinions expressed above are the personal opinions of the authors, not of HP. By using this site, you accept the Terms of Use and Rules of Participation.


Didn't find what you were looking for?
Ask the community
† The opinions expressed above are the personal opinions of the authors, not of HP. By using this site, you accept the <a href="https://www8.hp.com/us/en/terms-of-use.html" class="udrlinesmall">Terms of Use</a> and <a href="/t5/custom/page/page-id/hp.rulespage" class="udrlinesmall"> Rules of Participation</a>.