-
×InformationNeed Windows 11 help?Check documents on compatibility, FAQs, upgrade information and available fixes.
Windows 11 Support Center. -
-
×InformationNeed Windows 11 help?Check documents on compatibility, FAQs, upgrade information and available fixes.
Windows 11 Support Center. -
- HP Community
- Archived Topics
- Printers Archive
- Prints very light and seemingly only in grey

Create an account on the HP Community to personalize your profile and ask a question
Your account also allows you to connect with HP support faster, access a personal dashboard to manage all of your devices in one place, view warranty information, case status and more.
12-13-2015 11:04 AM
 HP Recommended
Product: Deskjet 1010
Operating System: Microsoft Windows Vista
I use a deskjet 1010 with magnetic ink for printing checks. For some reason, it is only printing in very light gray. I cleaned the print head, that didn't work. I then reinstalled the printer, still didn't work. Please help! Thank you.
Solved! Go to Solution.
1 ACCEPTED SOLUTION
Accepted Solutions
12-15-2015 11:16 AM
HP Recommended
Hi @FedeL,
Welcome to the HP Support Forums!
I understand that you're unable to get magenta printing on your HP Deskjet 1010 Printer. I would be happy to help and please remember to return to this thread and mark 'Accept as Solution' if I have successfully helped you resolve the issue. If you wish to say 'thanks' for my effort to help, click the 'thumbs up' to give me a Kudos.
I see that you have cleaned the printhead, which didn't work. There could be an issue with the ink cartridge, print settings or the ink delivery system.
Check the print settings:
How to print in color, black ink only, or grayscale
Depending on your print job, print in color, black ink only, or grayscale. The following color options might be available for your printer:
- Color: Print using color ink.
- Black & White: Print with multiple shades of gray (grayscale). This setting still uses some color ink.
- High Quality Grayscale: Print with multiple shades of gray. Increases the dots-per-inch (dpi) on the page, allowing for more detailed photos and sharper text.
- Black Ink Only: Print with black ink only (no color ink is used in printouts). This setting is best used when printing text.
- On your computer, open the document or photo you want to print, click File, and then click Print.
- From the print dialog window, click Properties.
NOTE: Depending on your software application, this button might be called Properties, Options, Printer Setup, Printer Properties, Printer, or Preferences.
- Select the Paper/Quality tab.Figure : Paper/Quality tab
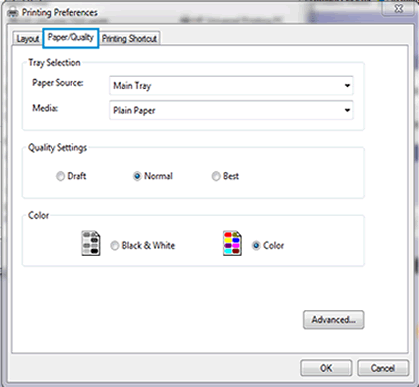
- Select either Black & White or Color, or to print with black ink only or in high quality grayscale, skip to step 5.If you selected Black & White or Color, click OK, and then click Print.
- To print with black ink only or in high quality grayscale, click Advanced.The Advanced Options dialog window opens.Figure : The Advanced Options dialog window opens

- Click Print in Grayscale, click the down arrow, select High Quality Grayscale or Black Ink Only, and then click OK.
- Click OK, and then click Print.
Follow the steps within this guide to determine if the issue is hardware related:
Follow these solutions in the order presented to resolve the issue.
Solution one: Check the estimated ink levels and replace low or empty cartridges
Follow these steps to check the ink levels using the HP software on your computer.
NOTE: Ink level warnings and indicators provide estimates for planning purposes only. When an indicator shows low-ink levels, consider having a replacement ink cartridge available to avoid possible printing delays. You do not need to replace ink cartridges until print quality becomes unacceptable.
- Click the Windows icon (
 ), click All Programs, click HP, click the folder for your HP printer, and then click the icon for your HP printer (
 ). The printer software opens.
NOTE: You can also open the HP printer software from your computer desktop. Double-click the icon for your HP printer (
). - Click the Estimated Ink Levels icon. The HP Toolbox opens.
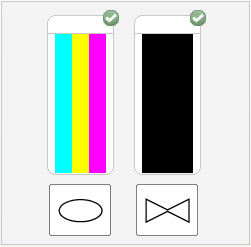
- Click the Estimated Ink Levels tab. The Estimated Ink Levels window opens.Figure : The Estimated Ink Levels window
- If none of the cartridges are low on ink, you do not need to replace them yet. Skip to the next solution in this document.
- If any of the cartridges are low on ink, continue to the next step to replace them.
If you have a defective ink cartridge or printhead, it might be under warranty. To check the warranty on your ink supplies, go tohp.com/go/learnaboutsupplies, select your country/region, and then review the limited warranty information for your supplies.
- Press the Power button to turn on the printer, if it is not on already.
- Lower the output tray, and then open the cartridge access door. The carriage moves to the center of the printer. Wait until the printer is idle and quiet.Figure : Open the cartridge access door

- Place your finger on top of the cartridge you want to replace, and then lightly pull and press down on the cartridge to release it.Figure : Pull and press to remove the cartridges

- The tricolor cartridge (left-hand slot)
- The black cartridge (right-hand slot)
- Remove the new cartridge from its package, and then carefully pull the orange tab to remove the protective plastic tape.
CAUTION: Do not touch the copper-colored contacts or ink nozzles. Also, do not re-tape the cartridges. Doing so can result in clogs, ink failure, and bad electrical connections.
Figure : Remove the protective tape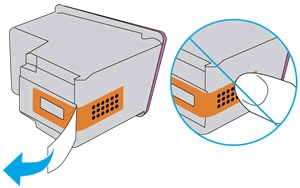
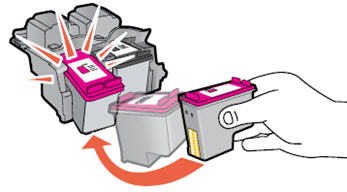
- Hold the cartridge by its sides with the nozzles toward the printer, and then insert the cartridge into its slot. Make sure that the icon on the cartridge matches the icon on the slot.
- The tri-color cartridge (
 ) goes in the slot on the left
 - The black cartridge (
 ) goes in the slot on the right
Figure : Insert the cartridge into its slot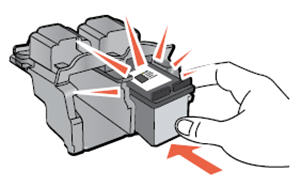
- Push the cartridge forward until it snaps into place.
- Repeat these steps to insert the other cartridge, if necessary.Figure : Install the second cartridge
- Close the cartridge access door.Figure : Close the cartridge access door

Step four: Align the printer
NOTE: Make sure that there is plain white U.S. Letter or A4 sized paper in the input tray.
- Click the Windows icon (), click All Programs, click HP, click the folder for your HP printer, and then click the icon for your HP printer (). The printer software opens.
NOTE: You can also open the HP printer software from your computer desktop: double-click the icon for your HP printer (
). - In the printer software, click Print.
- Click Maintain Your Printer (
 ). The HP Toolbox opens.
 - Click the Device Services tab.
- Click Align Ink Cartridges, and then follow the on-screen instructions to print the alignment page.
- Review the alignment page, follow the on-screen instructions to complete the alignment, and then click Done.
- If these steps resolved the issue, you do not need to continue troubleshooting.
- If the issue persists, continue to the next solution.
Solution two: Clean the cartridges using an automated tool
Follow these steps to run an automated tool to clean the cartridges.
- Click the Windows icon (), click All Programs, click HP, click the folder for your HP printer, and then click the icon for your HP printer (). The printer software opens.
NOTE: You can also open the HP printer software from your computer desktop. Double-click the icon for your HP printer (
). - In the printer software, click Print.
- Click Maintain Your Printer. The HP Toolbox opens.
- Click the Device Services tab.
- Click Clean Ink Cartridges, and then follow the on-screen instructions to clean the cartridges.
- After running the tool, click Print to print a test page. If the print quality is still unacceptable, follow the on-screen instructions to run a Second-level clean.
- If these steps resolved the issue, you do not need to continue troubleshooting.
- If the issue persists, continue to the next solution.
Solution three: Replace the problem cartridge
Follow these steps to replace the problem cartridge if you saw defects on the test page. The problem cartridge is the one that printed the defects on the test page.
If you have a defective ink cartridge or printhead, it might be under warranty. To check the warranty on your ink supplies, go to hp.com/go/learnaboutsupplies, select your country/region, and then review the limited warranty information for your supplies.
- Press the Power button to turn on the printer, if it is not on already.
- Lower the output tray, and then open the cartridge access door. The carriage moves to the center of the printer. Wait until the printer is idle and quiet.Figure : Open the cartridge access door
- Place your finger on top of the cartridge you want to replace, and then lightly pull and press down on the cartridge to release it.Figure : Pull and press to remove the cartridges
- The tricolor cartridge (left-hand slot)
- The black cartridge (right-hand slot)
- Remove the new cartridge from its package, and then carefully pull the orange tab to remove the protective plastic tape.
CAUTION: Do not touch the copper-colored contacts or ink nozzles. Also, do not re-tape the cartridges. Doing so can result in clogs, ink failure, and bad electrical connections.
Figure : Remove the protective tape - Hold the cartridge by its sides with the nozzles toward the printer, and then insert the cartridge into its slot. Make sure that the icon on the cartridge matches the icon on the slot.
- The tri-color cartridge () goes in the slot on the left
- The black cartridge () goes in the slot on the right
Figure : Insert the cartridge into its slot - Push the cartridge forward until it snaps into place.
- Repeat these steps to insert the other cartridge, if necessary.Figure : Install the second cartridge
- Close the cartridge access door.Figure : Close the cartridge access door
Step three: Align the printer
NOTE: Make sure that you have plain white U.S. Letter or A4 sized paper loaded in the input tray.
- Click the Windows icon (), click All Programs, click HP, click the folder for your HP printer, and then click the icon for your HP printer (). The printer software opens.
NOTE: You can also open the HP printer software from your computer desktop: double-click the icon for your HP printer (
). - In the printer software, click Print.
- Click Maintain Your Printer (). The HP Toolbox opens.
- Click the Device Services tab.
- Click Align Ink Cartridges, and then follow the on-screen instructions to print the alignment page.
- Review the alignment page, follow the on-screen instructions to complete the alignment, and then click Done.
- If these steps resolved the issue, you do not need to continue troubleshooting.
- If the issue persists, continue to the next solution.
If you have completed all the steps listed above and are still experiencing a problem, continue to the Service the printer section at the end of this document.
If the test report shows no defects, there could be an issue with the print driver:
- Please download and run the Print and Scan Doctor, it will likely diagnose and resolve the issue you are experiencing. What were the results when you ran the Print and Scan Doctor (did it print or scan, any error messages)?
- HP Printers - Uninstalling the Printer Software (Windows)
- HP Printer Install Wizard
- The HP Printer Install Wizard automatically finds the best available print driver for your HP Printer. Download and run Printer Install Wizard (
 ) a free tool from HP. When this link is clicked, HP Printer Install Wizard is downloaded using your Internet browser's download capabilities.
Please respond to this post with the result of your troubleshooting. I look forward to hearing from you. Good Luck! 
Drakster
I work on behalf of HP
If you found this post helpful, you can let others know by clicking the “Accept as Solution” button. You can also show your appreciation, with a kudos, by clicking the “thumbs up" button!
1 REPLY 1
12-15-2015 11:16 AM
HP Recommended
Hi @FedeL,
Welcome to the HP Support Forums!
I understand that you're unable to get magenta printing on your HP Deskjet 1010 Printer. I would be happy to help and please remember to return to this thread and mark 'Accept as Solution' if I have successfully helped you resolve the issue. If you wish to say 'thanks' for my effort to help, click the 'thumbs up' to give me a Kudos.
I see that you have cleaned the printhead, which didn't work. There could be an issue with the ink cartridge, print settings or the ink delivery system.
Check the print settings:
How to print in color, black ink only, or grayscale
Depending on your print job, print in color, black ink only, or grayscale. The following color options might be available for your printer:
- Color: Print using color ink.
- Black & White: Print with multiple shades of gray (grayscale). This setting still uses some color ink.
- High Quality Grayscale: Print with multiple shades of gray. Increases the dots-per-inch (dpi) on the page, allowing for more detailed photos and sharper text.
- Black Ink Only: Print with black ink only (no color ink is used in printouts). This setting is best used when printing text.
- On your computer, open the document or photo you want to print, click File, and then click Print.
- From the print dialog window, click Properties.
NOTE: Depending on your software application, this button might be called Properties, Options, Printer Setup, Printer Properties, Printer, or Preferences.
- Select the Paper/Quality tab.Figure : Paper/Quality tab
- Select either Black & White or Color, or to print with black ink only or in high quality grayscale, skip to step 5.If you selected Black & White or Color, click OK, and then click Print.
- To print with black ink only or in high quality grayscale, click Advanced.The Advanced Options dialog window opens.Figure : The Advanced Options dialog window opens
- Click Print in Grayscale, click the down arrow, select High Quality Grayscale or Black Ink Only, and then click OK.
- Click OK, and then click Print.
Follow the steps within this guide to determine if the issue is hardware related:
Follow these solutions in the order presented to resolve the issue.
Solution one: Check the estimated ink levels and replace low or empty cartridges
Follow these steps to check the ink levels using the HP software on your computer.
NOTE: Ink level warnings and indicators provide estimates for planning purposes only. When an indicator shows low-ink levels, consider having a replacement ink cartridge available to avoid possible printing delays. You do not need to replace ink cartridges until print quality becomes unacceptable.
- Click the Windows icon (), click All Programs, click HP, click the folder for your HP printer, and then click the icon for your HP printer (). The printer software opens.
NOTE: You can also open the HP printer software from your computer desktop. Double-click the icon for your HP printer (
). - Click the Estimated Ink Levels icon. The HP Toolbox opens.
- Click the Estimated Ink Levels tab. The Estimated Ink Levels window opens.Figure : The Estimated Ink Levels window
- If none of the cartridges are low on ink, you do not need to replace them yet. Skip to the next solution in this document.
- If any of the cartridges are low on ink, continue to the next step to replace them.
If you have a defective ink cartridge or printhead, it might be under warranty. To check the warranty on your ink supplies, go tohp.com/go/learnaboutsupplies, select your country/region, and then review the limited warranty information for your supplies.
- Press the Power button to turn on the printer, if it is not on already.
- Lower the output tray, and then open the cartridge access door. The carriage moves to the center of the printer. Wait until the printer is idle and quiet.Figure : Open the cartridge access door
- Place your finger on top of the cartridge you want to replace, and then lightly pull and press down on the cartridge to release it.Figure : Pull and press to remove the cartridges
- The tricolor cartridge (left-hand slot)
- The black cartridge (right-hand slot)
- Remove the new cartridge from its package, and then carefully pull the orange tab to remove the protective plastic tape.
CAUTION: Do not touch the copper-colored contacts or ink nozzles. Also, do not re-tape the cartridges. Doing so can result in clogs, ink failure, and bad electrical connections.
Figure : Remove the protective tape - Hold the cartridge by its sides with the nozzles toward the printer, and then insert the cartridge into its slot. Make sure that the icon on the cartridge matches the icon on the slot.
- The tri-color cartridge () goes in the slot on the left
- The black cartridge () goes in the slot on the right
Figure : Insert the cartridge into its slot - Push the cartridge forward until it snaps into place.
- Repeat these steps to insert the other cartridge, if necessary.Figure : Install the second cartridge
- Close the cartridge access door.Figure : Close the cartridge access door
Step four: Align the printer
NOTE: Make sure that there is plain white U.S. Letter or A4 sized paper in the input tray.
- Click the Windows icon (), click All Programs, click HP, click the folder for your HP printer, and then click the icon for your HP printer (). The printer software opens.
NOTE: You can also open the HP printer software from your computer desktop: double-click the icon for your HP printer (
). - In the printer software, click Print.
- Click Maintain Your Printer (). The HP Toolbox opens.
- Click the Device Services tab.
- Click Align Ink Cartridges, and then follow the on-screen instructions to print the alignment page.
- Review the alignment page, follow the on-screen instructions to complete the alignment, and then click Done.
- If these steps resolved the issue, you do not need to continue troubleshooting.
- If the issue persists, continue to the next solution.
Solution two: Clean the cartridges using an automated tool
Follow these steps to run an automated tool to clean the cartridges.
- Click the Windows icon (), click All Programs, click HP, click the folder for your HP printer, and then click the icon for your HP printer (). The printer software opens.
NOTE: You can also open the HP printer software from your computer desktop. Double-click the icon for your HP printer (
). - In the printer software, click Print.
- Click Maintain Your Printer. The HP Toolbox opens.
- Click the Device Services tab.
- Click Clean Ink Cartridges, and then follow the on-screen instructions to clean the cartridges.
- After running the tool, click Print to print a test page. If the print quality is still unacceptable, follow the on-screen instructions to run a Second-level clean.
- If these steps resolved the issue, you do not need to continue troubleshooting.
- If the issue persists, continue to the next solution.
Solution three: Replace the problem cartridge
Follow these steps to replace the problem cartridge if you saw defects on the test page. The problem cartridge is the one that printed the defects on the test page.
If you have a defective ink cartridge or printhead, it might be under warranty. To check the warranty on your ink supplies, go to hp.com/go/learnaboutsupplies, select your country/region, and then review the limited warranty information for your supplies.
- Press the Power button to turn on the printer, if it is not on already.
- Lower the output tray, and then open the cartridge access door. The carriage moves to the center of the printer. Wait until the printer is idle and quiet.Figure : Open the cartridge access door
- Place your finger on top of the cartridge you want to replace, and then lightly pull and press down on the cartridge to release it.Figure : Pull and press to remove the cartridges
- The tricolor cartridge (left-hand slot)
- The black cartridge (right-hand slot)
- Remove the new cartridge from its package, and then carefully pull the orange tab to remove the protective plastic tape.
CAUTION: Do not touch the copper-colored contacts or ink nozzles. Also, do not re-tape the cartridges. Doing so can result in clogs, ink failure, and bad electrical connections.
Figure : Remove the protective tape - Hold the cartridge by its sides with the nozzles toward the printer, and then insert the cartridge into its slot. Make sure that the icon on the cartridge matches the icon on the slot.
- The tri-color cartridge () goes in the slot on the left
- The black cartridge () goes in the slot on the right
Figure : Insert the cartridge into its slot - Push the cartridge forward until it snaps into place.
- Repeat these steps to insert the other cartridge, if necessary.Figure : Install the second cartridge
- Close the cartridge access door.Figure : Close the cartridge access door
Step three: Align the printer
NOTE: Make sure that you have plain white U.S. Letter or A4 sized paper loaded in the input tray.
- Click the Windows icon (), click All Programs, click HP, click the folder for your HP printer, and then click the icon for your HP printer (). The printer software opens.
NOTE: You can also open the HP printer software from your computer desktop: double-click the icon for your HP printer (
). - In the printer software, click Print.
- Click Maintain Your Printer (). The HP Toolbox opens.
- Click the Device Services tab.
- Click Align Ink Cartridges, and then follow the on-screen instructions to print the alignment page.
- Review the alignment page, follow the on-screen instructions to complete the alignment, and then click Done.
- If these steps resolved the issue, you do not need to continue troubleshooting.
- If the issue persists, continue to the next solution.
If you have completed all the steps listed above and are still experiencing a problem, continue to the Service the printer section at the end of this document.
If the test report shows no defects, there could be an issue with the print driver:
- Please download and run the Print and Scan Doctor, it will likely diagnose and resolve the issue you are experiencing. What were the results when you ran the Print and Scan Doctor (did it print or scan, any error messages)?
- HP Printers - Uninstalling the Printer Software (Windows)
- HP Printer Install Wizard
- The HP Printer Install Wizard automatically finds the best available print driver for your HP Printer. Download and run Printer Install Wizard () a free tool from HP. When this link is clicked, HP Printer Install Wizard is downloaded using your Internet browser's download capabilities.
Please respond to this post with the result of your troubleshooting. I look forward to hearing from you. Good Luck!
Drakster
I work on behalf of HP
If you found this post helpful, you can let others know by clicking the “Accept as Solution” button. You can also show your appreciation, with a kudos, by clicking the “thumbs up" button!
† The opinions expressed above are the personal opinions of the authors, not of HP. By using this site, you accept the Terms of Use and Rules of Participation.


Didn't find what you were looking for?
Ask the community
† The opinions expressed above are the personal opinions of the authors, not of HP. By using this site, you accept the <a href="https://www8.hp.com/us/en/terms-of-use.html" class="udrlinesmall">Terms of Use</a> and <a href="/t5/custom/page/page-id/hp.rulespage" class="udrlinesmall"> Rules of Participation</a>.