-
×InformationNeed Windows 11 help?Check documents on compatibility, FAQs, upgrade information and available fixes.
Windows 11 Support Center. -
-
×InformationNeed Windows 11 help?Check documents on compatibility, FAQs, upgrade information and available fixes.
Windows 11 Support Center. -
- HP Community
- Archived Topics
- Printers Archive
- deskjet 2540 printing horizontal lines

Create an account on the HP Community to personalize your profile and ask a question
Your account also allows you to connect with HP support faster, access a personal dashboard to manage all of your devices in one place, view warranty information, case status and more.
09-24-2015 05:16 PM
 HP Recommended
Product: Deskjet 2540
Operating System: Mac OS X 10.10 Yosemite
I've tried troubleshooting my printer but it continues to print horizontal lines in the middle of text. I seems to be printing alternating lines. I've tried unplugging it, unstalling the software, verifying the disk utility, then reinstalling the software. Nothing I've done has worked. Please help.
1 REPLY 1
09-25-2015 05:21 PM
HP Recommended
Hi @redbonetasha,
Welcome to the HP Support Forums!
I understand that you're getting horizontal lines on your printouts on the HP Deskjet 2540 Printer. I would be happy to help you and please remember to return to this thread and mark 'Accept as Solution', if I have successfully helped you resolve the issue.
First, we need to determine if you're experiencing a hardware or software issue.
I would try the steps within this guide, Fixing Print Quality Problems for the HP Deskjet 2540 All-in-One Printers.
Mac OS X v10.6, v10.7, and v10.8
Try the following solutions in the order presented to resolve the issue. When one of the solutions resolves the issue, there is no need to continue troubleshooting.
HP recommends that you use genuine HP ink cartridges. HP cannot guarantee the quality or reliability of non-HP ink cartridges or refilled HP ink cartridges. If you do not use genuine HP ink cartridges, the steps in this document might not resolve print quality issues.
Visit HP SureSupply to check ink cartridge compatibility or purchase replacement ink cartridges.
- Go to the HP SureSupply website.
- Scroll to the bottom of the page, and then make sure the country/region location is correct.
- Follow the on-screen instructions to order new ink cartridges or check ink cartridge compatibility with your printer.
Genuine HP ink cartridges can also be purchased from other retailers.
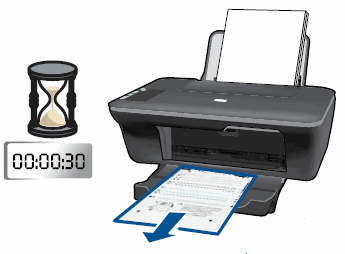
Sometimes, print quality issues can be resolved during a period of inactivity. Consider waiting for about 30 minutes, and then try the print job again.
- If these steps resolved the issue, you do not need to continue troubleshooting.
- If the issue persists, continue to the next solution.
Solution three: Check the paper
Follow these guidelines to make sure that the paper is appropriate for the print job. If it is not, reload the printer with an appropriate paper type.
To purchase paper in the United States and Canada, go to HP Home & Home Office.
- Load the paper print side down in the input tray. Many papers have printing and nonprinting sides, like photo paper and other special media. Usually, the smoother side is the "print side," and sometimes the non-print side has a logo of the paper manufacturer on it.
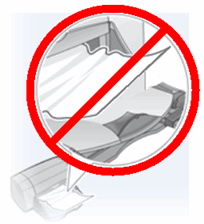
- Do not use wrinkled or curled paper. Load only clean, wrinkle-free paper into the product.Figure : Do not use wrinkled paper
- Use the correct paper type for your project.
- For everyday text documents, plain paper with ColorLok technology works well. Paper with ColorLok technology is industry-standard paper that works well with HP ink.Figure : Plain paper with ColorLok technology is recommended for text printing

- For documents with dense printing, such as high contrast graphics or photographs, use HP Advanced Photo Paper for the best results.
- Some media may not absorb ink as well as others. If your prints smear easily, make sure you are using a recommended paper.
- Store photo paper in its original packaging inside a resealable plastic bag. Store the paper on a flat surface in a cool, dry place. Load 10-20 sheets of photo paper only when you are ready to print, and then put the unused paper back in the packaging.
- Try using a different paper. This will determine if the problem is related to the paper.
NOTE: Inappropriate, damaged, or unsupported paper can cause vertical streaks in printouts.
Examples of horizontal and vertical streaks in a printout | |
Figure : Horizontal streaks in a printout 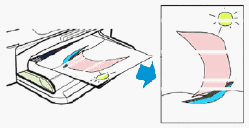 If your printout contains horizontal lines or other print quality issues besides vertical streaks, continue to the next step. | Figure : Vertical streaks in a printout 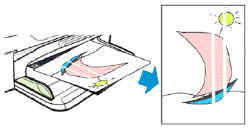 Do not replace cartridges for vertical streaks in a printout. Instead, check the paper as described earlier in this document or search for a document that covers this issue. Vertical streaks in copies can often be fixed by cleaning the scanner glass. |
After trying the preceding guidelines, try to print again.
- If these steps resolved the issue, you do not need to continue troubleshooting.
- If the issue persists, continue to the next solution.
Solution four: Check the print settings
Follow these steps to check the print settings to make sure that they are appropriate for your print job.
- In the program you are trying to print from, click File, and then click Print.
- Review the following options, and then make any necessary changes:
- Paper size: If one of the options matches your paper size exactly, select that option.
- Orientation: Choose the orientation you want to print on.
NOTE: To save these settings for future print jobs, select the Save in the Presets menu, and then name the new preset. If multiple printers are installed, open System Preferences, click Print & Fax (v10.6) or Print & Scan (v10.7 and v10.8), and then set the Default Printer to Last Printer Used.
- Open a document, click File, and then Print.
- Select the Paper Type/Quality menu.
- Click the Color Options pop-up or tab if it displays. If you want color printouts, make sure that Grayscale is not selected. If the option does not display, it is not available for the printer.
NOTE: To save these settings for future print jobs, choose Save in the Presets menu, and then name the new preset. If multiple printers are installed, open System Preferences, and then click Print & Fax or Print & Scan (depending on your Mac OS X version). Set the Default Printer to Last Printer Used.
- If these steps resolved the issue, you do not need to continue troubleshooting.
- If the issue persists, continue to the next solution.
NOTE: Ink level warnings and indicators provide estimates for planning purposes only. When an indicator shows low-ink levels, consider having a replacement ink cartridge available to avoid possible printing delays. You do not need to replace ink cartridges until print quality becomes unacceptable.
Follow the steps in one of the following methods to check the ink levels.
- Load clean, white U.S. Letter or A4 paper in the input tray, if necessary.
- Touch and hold the Power button (
 ), and then press the Cancel button (
 ).
). - Let go of the Cancel button and then the Power button. The test page prints.
- Check the estimated ink level graphics on the test page.Figure : Example of estimated ink levels

- Example of estimated ink levels with more ink
- Example of estimated ink levels with less ink
- If the ink level graphic shows low or empty cartridges, and the quality of your printouts is unsatisfactory, continue to the next step to replace the cartridges.
- If the ink level graphic shows full cartridges, you do not need to replace the cartridges yet. Skip to the next solution.
Solution six: Evaluate the test page and troubleshoot any defects
Refer to the test page you printed earlier to check the estimated ink levels.
In general, if the printer and its cartridges are working correctly, all the color bars should be present, unstreaked, and uniform in color. The black text on the page should not show ink streaks.
Use the following table for examples of defects that can exist on the test page. The following examples are not inclusive, but tend to represent the most common issues.
Examples of defects on the test page | ||
Defect | Example | Description or cause |
Broken lines in grid patterns | 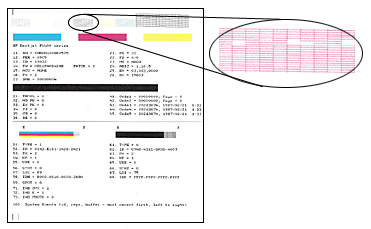 | Problem with the ink nozzles |
Faded or nonuniform colors in the color blocks |  | Depleted cartridges, or ink mixing together |
Track marks or ink smears in the text | 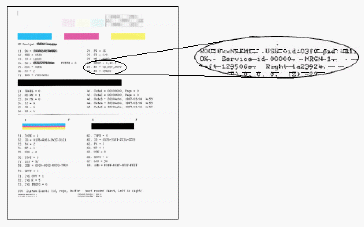 | Fibers or other debris on one or both of the cartridges |
The color blocks are streaked or lined |  | The cartridge might be running out of ink or the nozzles might be clogged |
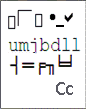
One or more of the colored blocks is missing entirely | 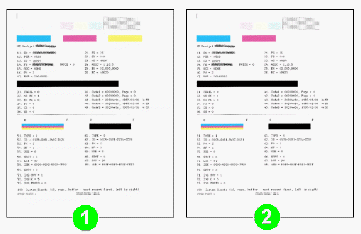
| The cartridge is out of one color of ink or the ink nozzles might be clogged. |
- If you see one or more defects on the print quality diagnostic report, continue to the next steps.
- If there are no defects on the print quality diagnostic report, it indicates that the print mechanism and ink supplies work correctly. Therefore, you do not need to continue the troubleshooting steps in the remainder of this document. However, if printouts are still unsatisfactory, try the following general procedures to improve print quality:
- Make sure that the image you are printing has sufficient resolution. Enlarged images might appear fuzzy or blurry.
- If the issue is confined to a band near the edge of a printout, use the software you installed with the printer or another software program to rotate the image 180 degrees. The problem might not display on the other end of the printout.
- Avoid leaving unprotected cartridges out of the printer for an extended period of time.
- Always use the Power button to turn off the printer. This protects the cartridges from drying out.
 | Windows only: If you are experiencing garbled, jumbled or illogical text, incomplete printouts, or missing text or graphics, go to Continuous Pages of Strange or Garbled Characters Print in Windows. |
Step two: Clean the cartridges using an automated tool
Follow these steps to open the HP Utility and run an automated tool to clean the cartridges if you found defects on the test page.
NOTE: To avoid issues that require cleaning, always turn the printer off with the Power button.
- In the menu bar, click the Apple icon (
 ).
). - Click System Preferences.
- Click Print & Fax or Print & Scan.
- Click the name of your printer, and then click Open Print Queue.
- Click Printer Setup or Settings, click Utility, and then click Open Printer Utility.
- Click Clean Printheads, and then click Clean.
- If these steps resolved the issue, there is no need to continue troubleshooting.
- If the issue persists, see the next step.
NOTE: Make sure that there is plain white U.S. Letter or A4 sized paper in the input tray.
- Open the HP Utility.
- How to open the HP Utility
- In the HP Utility window, click Align.
- Click Align again, and then wait for the printer to print an alignment page.
- Lift the scanner lid.
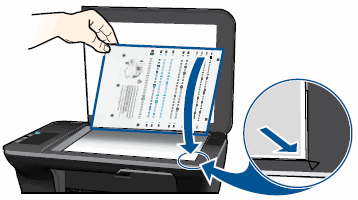
- Place the alignment page with the print side down on the right-front corner of the scanner glass. See the engraved guide next to the scanner glass for help loading the alignment page.Figure : Place the alignment page on the scanner glass
- Close the scanner lid.
- Press the Start Copy Black button (
 ) or the Start Copy Color button (
 ) on the front panel of the printer. The printer aligns the cartridges.
 - Click Done.
- If these steps resolved the issue, there is no need to continue troubleshooting.
- If the issue persists, see the next step.
Step four: Clean the area around the ink nozzles
CAUTION: Do not perform these steps unless the test report specifically shows smeared text or track marks. If the report does not show this defect, continue to the next solution.
- Gather the following materials:
- Dry foam-rubber swabs, lint-free cloth, or any soft material that does not come apart or leave fibers (coffee filters work well)
- Clean sheets of paper
- Distilled, filtered, or bottled water (tap water might contain contaminants that can damage the print cartridges)
CAUTION: Do not use platen cleaners or alcohol to clean the area. These can damage the cartridge or the printer.
- Press the Power button to turn on the printer, if it is not already on.
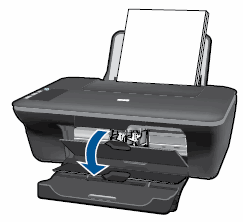
- Open the cartridge access door. The carriage moves to the center of the printer. Wait until the carriage is idle and silent before continuing.Figure : Open the cartridge access door
- Lightly press down on the cartridge to release it, and then pull the cartridge out to remove it from its slot.Figure : Remove the cartridge

CAUTION: Do not touch the copper-colored contacts or the ink nozzles. Touching these parts can result in clogs, ink failure, and bad electrical connections.
Figure : Do not touch the contacts or nozzles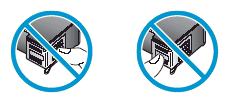
- Place the cartridge on a piece of paper with the ink nozzles facing up.
- Lightly moisten a clean, foam-rubber swab with distilled water.
- Clean the face and edges around the ink nozzle with the swab.
CAUTION: Do not clean the ink nozzle plate.
Figure : Clean the area around the ink nozzle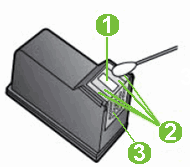
- Nozzle plate - DO NOT CLEAN
- Area surrounding ink nozzle - Do clean
- Cartridge contacts - DO NOT CLEAN
- Either let the cartridge sit for 10 minutes to allow the cleaned area to dry, or use a new swab to dry it.
- Hold the cartridge by its sides with the nozzles toward the printer, and then insert the cartridge into its slot. Make sure that the icon on the cartridge matches the icon on the slot.
- The tri-color cartridge (
 ) goes in the slot on the left.
 - The black cartridge (
 ) goes in the slot on the right.
Figure : Insert the cartridge into the slot
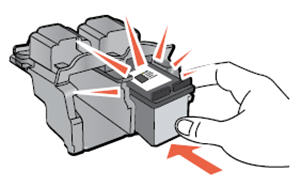
- Push the cartridge forward into its slot until it snaps into place.Figure : Push the cartridge into the slot
- Repeat these steps to clean the area surrounding the ink nozzle on the other cartridge.
- Close the cartridge access door.
NOTE: Make sure that there is plain white U.S. Letter or A4 sized paper in the input tray.
- Open the HP Utility.
- How to open the HP Utility
- In the menu bar, click the Apple icon ().
- Click System Preferences.
- Click Print & Fax or Print & Scan.
- Click the name of your printer, and then click Open Print Queue.
- Click Printer Setup or Settings.
- Click Utility, and then click Open Printer Utility.
- In the HP Utility window, click Align.
- Click Align again, and then wait for the printer to print an alignment page.
- Lift the scanner lid.
- Place the alignment page with the print side down on the right-front corner of the scanner glass. See the engraved guide next to the scanner glass for help loading the alignment page.Figure : Place the alignment page on the scanner glass
- Close the scanner lid.
- Press the Start Copy Black button () or the Start Copy Color button () on the front panel of the printer. The printer aligns the cartridges.
- Click Done.
- If these steps resolved the issue, you do not need to continue troubleshooting.
- If the issue persists, continue to the next solution.
Solution seven: Replace the problem cartridge
Follow these steps to replace a problem cartridge, and then align the printer.
If you have a defective ink cartridge, it might be under warranty. To check the warranty on your ink supplies, go to hp.com/go/learnaboutsupplies, select your country/region, and then review the limited warranty information for your supplies.
- Press the Power button to turn on the printer, if it is not already turned on.
- Load plain white paper into the input tray.
- Open the cartridge access door. The carriage moves to the center of the printer. Wait until the printer is idle and silent before continuing.Figure : Open the cartridge access door
- Lightly press down on the cartridge to release it, and then pull the cartridge out of its slot.Figure : Remove the cartridge
- Remove the new cartridge from its packaging, and then pull the orange tab to remove the plastic tape.
CAUTION: Do not touch the copper-colored contacts or the ink nozzles. Touching these parts can result in clogs, ink failure, and bad electrical connections.
Figure : Remove the plastic tape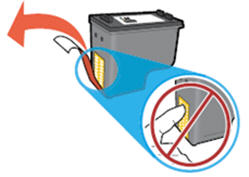
- Hold the cartridge by its sides with the nozzles toward the printer, and then insert the cartridge into its slot. Make sure that the cartridge is inserted in the correct slot.
- The tri-color cartridge () goes in the slot on the left.
- The black cartridge () goes in the slot on the right.
Figure : Insert the cartridge into its slot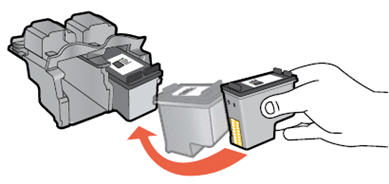
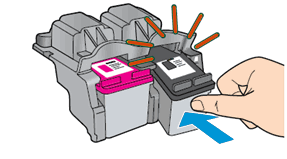
- Push the cartridge forward into its slot until it snaps into place.Figure : Snap the cartridge into place
- Repeat these steps to replace the other cartridge, if necessary.
- Close the cartridge access door.Figure : Close the cartridge access door
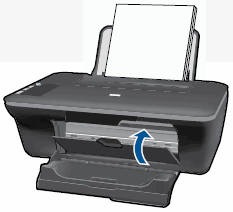
- Follow any prompts on the screen.
- Wait about 30 seconds for the alignment page to automatically print.Figure : The alignment page prints automatically after 30 seconds
NOTE: The printer prints an alignment page automatically only when a new cartridge has been installed.
Step two: Align the printer
NOTE: Make sure that you have plain white U.S. Letter or A4 sized paper loaded in the input tray.
- Lift the scanner lid.
- Place the alignment page with the print side down on the right-front corner of the scanner glass. See the engraved guide next to the scanner glass for help loading the alignment page.Figure : Place the alignment page on the scanner glass
- Close the scanner lid.
- Press the Start Copy Black button () or the Start Copy Color button () on the front panel of the printer. The printer aligns the cartridges.
- If these steps resolved the issue, you do not need to continue troubleshooting.
- If the issue persists, continue to the next solution.
If you have completed all the steps listed above and are still experiencing a problem, continue to the Service the printer section at the end of this document.
Service the printer
If you have completed all of the solutions listed above and are still experiencing a problem, service the printer.
NOTE: Keep a print sample that shows the problem. If the ink cartridges, printhead, or printer is replaced under warranty, the support agent will request the print sample. If the printer is returned to HP, the print sample must be returned with the printer. Place the sample in the output tray when you package your printer for shipping.
What you can do, is use the following link to create yourself a case number, then call and it may help speed up the call process:
Step 1. Open link: www.hp.com/contacthp/
Step 2. Enter Product number or select to auto detect
Step 3. Scroll down to "Still need help? Complete the form to select your contact options"
Step 4. Scroll down and click on: HP contact options - click on Get phone number
Case number and phone number appear.
Please respond to this post with the result of your troubleshooting. I look forward to hearing from you. Good Luck! 🙂
Drakster
I work on behalf of HP
If you found this post helpful, you can let others know by clicking the “Accept as Solution” button. You can also show your appreciation, with a kudos, by clicking the “thumbs up" button!
† The opinions expressed above are the personal opinions of the authors, not of HP. By using this site, you accept the Terms of Use and Rules of Participation.


Didn't find what you were looking for?
Ask the community
† The opinions expressed above are the personal opinions of the authors, not of HP. By using this site, you accept the <a href="https://www8.hp.com/us/en/terms-of-use.html" class="udrlinesmall">Terms of Use</a> and <a href="/t5/custom/page/page-id/hp.rulespage" class="udrlinesmall"> Rules of Participation</a>.