-
×InformationNeed Windows 11 help?Check documents on compatibility, FAQs, upgrade information and available fixes.
Windows 11 Support Center. -
-
×InformationNeed Windows 11 help?Check documents on compatibility, FAQs, upgrade information and available fixes.
Windows 11 Support Center. -
- HP Community
- Archived Topics
- Printers Archive
- Re: do cartridges dry up? Any fix?

Create an account on the HP Community to personalize your profile and ask a question
05-05-2017 12:30 PM
A very warm welcome to the HP community. A very good day to you.
I understand that you have an HP Officejet J4550 All-in-One Printer. I read that you have not used the printer for 4 months and the ink has dried in the cartridges. I'll surely assist you with this.
Usually, if cartridges are left open and unused for more than 2 or 3 months in the printer, the ink will eventually dry out.
Incase you plan not to use the cartridges for such a long time then it is a good idea to preserve the cartridges in an airtight container or an airtight ziplock bag.
However, you may try to clean the cartridges as described below. It might help:
-
Gather the following items to clean the ink cartridge and carriage:
-
Clean distilled water. Use bottled or filtered water if distilled water is not available. Tap water can contain contaminants that damage the ink cartridge.
-
Clean cotton swabs or any soft, lint-free material that will not stick to the ink cartridges (coffee filters work well).
-
Sheets of paper or a paper towel to rest the ink cartridge on during cleaning.
-
-
Open the ink cartridge access door and wait until the carriage is idle and silent.
-
Disconnect the power cord from the back of the printer.
-
Remove the ink cartridge and place it on a piece of paper with the nozzle plate facing up.
NOTE: Do not leave the ink cartridges outside of the printer for more than 30 minutes. If the ink cartridge is outside of the printer for too long, the ink can dry and clog the nozzles.
-
Dip a clean foam-rubber swab or lint-free cloth into distilled water, and then squeeze any excess water from it.
-
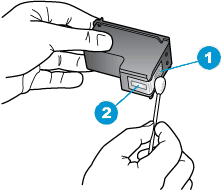
Clean only the copper-colored contacts.
Figure : Cleaning the contact

-
Copper-colored contacts
-
Ink nozzles (do not clean)
-
Repeat these steps for the other ink cartridge.
-
Lightly moisten another cotton swab with distilled water, and then squeeze any excess water from the swab.
-
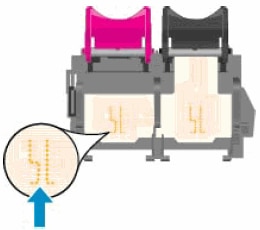
Use the swab to clean the electrical contacts in the carriage, located inside the printer on the carriage slots.
Figure : The electrical contacts in the ink cartridge slots

-
Wait 10 minutes to allow the ink cartridge and carriage electrical contacts to dry.
-
Reinstall the ink cartridges.
-
Close the ink cartridge access door.
-
Reconnect the power cord to the back of the printer.
-
Press the Power button to turn on the printer.
-
Try to print a page.
-
If you are still unable to print, repeat these steps to clean and reseat the ink cartridges. Multiple cleanings might be necessary to restore printing.
I hope this information helps. Please feel free to let me know if you have any further questions. Cheers! 🙂
