-
×InformationNeed Windows 11 help?Check documents on compatibility, FAQs, upgrade information and available fixes.
Windows 11 Support Center. -
-
×InformationNeed Windows 11 help?Check documents on compatibility, FAQs, upgrade information and available fixes.
Windows 11 Support Center. -
- HP Community
- Archived Topics
- Printers Archive
- "Automatic Document Feeder does not contain any pages" Error

Create an account on the HP Community to personalize your profile and ask a question
Your account also allows you to connect with HP support faster, access a personal dashboard to manage all of your devices in one place, view warranty information, case status and more.
10-12-2015 03:09 PM
 HP Recommended
Product: Officejet 6500A E710a-f
Operating System: Microsoft Windows 10 (64-bit)
I have the Officejet 6500A E710a-f with the automatic document feeder (ADF). Normally when you load a document into the automatic document feeder it makes a sound to notify that paper has been loaded into the feeder. I have used this function many times before but recently it has not been working (the printer is bout 3 years old). The ADF does not make any sound when a document is loaded in it.
I have tried gently pushing the small lever on the right of the small cork panel (when the cover to the ADF is opened) but no sound is made (assuming that this is the sensor). When I place a page in the ADF with all the levers pushed down by the pages and try to scan through my computer by opening the scan dialog and selecting automatic document feeder, it gives an error message saying " the scanner Automatic Document Feeder (ADF) does not contain any pages. Insert the pages to be scanned into the ADF and try again"
I do not know if it is a hardware issue fault due to parts in the ADF malfunctioning or a software issue with windows 10 and a bug in the firmware. I have tried uninstalling all the software and drivers and reinstalling them from the HP website. I have cleaned all the rollers and gears in the ADF and tried the print and scan doctor. Nothing so far has worked and I suspect the fault lies within either the printer firmware or a mechanical fault.
It may help that 2 weeks ago the printer was not printing colours so I took out the printhead and throughly cleaned it. During the process though, there was an error message that came up on the printer screen and the printer restarted itself.
Should I do a hard reset and how do I do this? I do not want to damage the printer if possible as everything except the ADF works well.
2 REPLIES 2
10-13-2015 04:56 PM
HP Recommended
Hi @chrishelp100,
Welcome to the HP Support Forums!
I see that you're unable to use the ADF on your HP Officejet 6500A E710 Printer. I would be happy to help you and please remember to return to this thread and mark 'Accept as Solution', if I have successfully helped you resolve the issue. If you wish to say 'thanks' for my effort to help, click the 'thumbs up' to give me a Kudos.
It sounds like you have a pretty good understanding of the printer and how it works. That is the paper sensor and you are correct it should be making a noise when pressed. This is also the reason your computer says " the scanner Automatic Document Feeder (ADF) does not contain any pages. Insert the pages to be scanned into the ADF and try again".
I would try the steps within this guide, HP Officejet 6500 (E709a) and 6500 Wireless (E709n and E709q) All-in-One Printers - Automatic Docume....
Issue
When you scan, copy, or fax from the automatic document feeder (ADF), the product does not pick up any pages at all.
Try the following solutions in the order presented to resolve the issue. When one of the solutions resolves the issue, there is no need to continue troubleshooting.
Solution one: Check the paper in the ADF
Paper feed issues in the ADF might result from dusty, torn, wrinkled, wet, or folded paper in the ADF tray. The quality of the paper can also make a difference. Use only good quality paper that meets product specifications. Follow these steps to check the condition of the paper.
- Remove the stack of paper from the document feeder tray.
- Examine the condition of the paper, and then replace any ripped, dusty, curled, wrinkled, or bent paper.
- Make sure that the original is a supported paper type for the ADF.
NOTE: The ADF does not accept photo paper or carbon paper.
- Make sure that all the paper in the stack is the same size and type. Never load mixed types of paper in the document feeder tray. The product can only process one type of paper at a time.
- Reload the original document print side up in the document feeder tray.
NOTE: Do not load more than 35 pages in the document feeder tray. Larger stacks of paper can lead to pick problems.
- Press OK to continue the current task.
- If these steps resolved the issue, you do not need to continue troubleshooting.
- If the issue persists, continue to the next solution.
Solution two: Clean and inspect the ADF
Follow these steps to clean the ADF.
Step one: Clean the ADF rollers and separator pad
Dust or paper residue on the rollers or separator pad inside the ADF can cause paper feed issues.
- Gather the following materials:
- A clean, lint-free cloth, or any cloth that will not come apart or leave fibers
- Distilled, filtered, or bottled water (tap water might damage the product)
- Remove the stack of paper from the document feeder tray.
- Press the Power button (
 ) to turn off the product.
 - Disconnect the power cord from the rear of the product.
- Lift the cover of the ADF, and then find the rollers and the separator pad.Figure : Location of the ADF rollers and separator pad
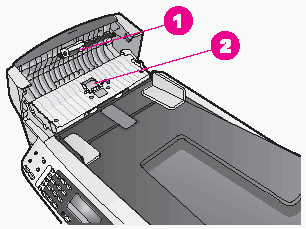
- ADF rollers
- Separator pad
- Lightly dampen a clean, lint-free cloth with filtered or distilled water, and then squeeze any excess liquid from the cloth.
- Use the damp cloth to wipe any residue off of the rollers and the separator pad.Figure : The ADF rollers
 Figure : The separator pad
- Dry the rollers and separator pad with a dry, clean, lint-free cloth.
Step two: Check the ADF rollers and gears
- With the ADF cover raised, press on the roller mechanism to make sure that it moves up and down smoothly and freely.Figure : The ADF rollers and gears

- The rollers
- The gears
- Rotate the ADF rollers and gears to make sure that they turn easily and do not stick.
- Check the gears to make sure that none of the teeth are missing or broken.
- If gears are missing or broken, continue to Solution four.
- Close the ADF cover.
- Reconnect the power cord to the rear of the product.
- Press the Power button () to turn on the product.
- Press OK to continue the current task.
- If these steps resolved the issue, you do not need to continue troubleshooting.
- If the issue persists, continue to the next solution.
Solution three: Perform a partial reset
Perform a partial reset to restore the product settings to the default values.
- Write down any fax numbers and country/region and language settings stored in the product memory.
CAUTION: A partial reset might remove all speed dials and other settings from the product memory.
- Disconnect the power cord from the rear of the product.
- Press and hold the # and 3 buttons at the same time while plugging the power cord into the rear of the product.
- Release the buttons after 30 seconds or when Part NVM Reset displays on the control panel.
- If the product does not turn on automatically, press the Power button () to turn it on.
- Press OK to continue the current task.
- If these steps resolved the issue, you do not need to continue troubleshooting.
- If the issue persists, continue to the next solution.
Contacting HP for service in all countries/regions except Asia Pacific.
If you completed all the preceding steps and your product still has an issue, service the product.
Check your product warranty to determine if your printer is still under warranty, and then Contact HP Support to schedule a repair or replacement.
Repair fees might apply for out-of-warranty printers.
What you can do, is use the following link to create yourself a case number, then call and it may help speed up the call process:
Step 1. Open link: www.hp.com/contacthp/
Step 2. Enter Product number or select to auto detect
Step 3. Scroll down to "Still need help? Complete the form to select your contact options"
Step 4. Scroll down and click on: HP contact options - click on Get phone number
Case number and phone number appea
Workaround: Load pages on the scanner glass manually
Your HP product can operate sufficiently by performing the desired task one sheet at a time. Follow these steps to load the document onto the scanning glass manually.
- Press the Power button () to turn on the product.
- Remove the stack of paper from the document feeder tray.
- Raise the scanner lid.Figure : Raise the scanner lid

- Load one page of your original print side down on the right front corner of the scanner glass.Figure : Load a page on the scanner glass

- Close the scanner lid.
- Press OK to continue the current task.
- When the product scans, copies, or faxes the page, raise the scanner lid, remove the page, and then load another page on the scanner glass.
- Repeat steps 5 through 7 for each page of your document until the task is complete.
If you have access to a computer running Windows 8.1 or earlier, click here to update the printer's firmware.
You could try a factory reset. I can send you that information in a private message.
In the forum beside your handle name just click on the envelope to view it.
Please respond to this post with the result of your troubleshooting. I look forward to hearing from you. Good Luck! 🙂
Drakster
I work on behalf of HP
If you found this post helpful, you can let others know by clicking the “Accept as Solution” button. You can also show your appreciation, with a kudos, by clicking the “thumbs up" button!
10-20-2015 08:02 AM
HP Recommended
Hi Drakster,
I tried all the resets. Thank you for your assistance in resetting the printer. The resets did not work but I have a fair knowledge of computers and have a family friend who was previously in the computer and printer business.
We managed to open up the automatic document feeder (ADF) by opening the cover and unscrewing the screws (the screws most annoyingly require a special screw driver that we managed to find) that keep the ADF sealed. Once we removed the cover of the ADF, it was apparent that the cable that went from the light-senstive component and microchip (under the level) had come loose where it connects to the printer. Thus, when the lever moved, the micro-chip and sensor would trigger that a page was inserted but this signal was not transferred to the printer. This was because the cable/wiring was loose in the top right corner within the ADF component.
It was just a basic hardware problem where the cable was loose in essence. Once we reinserted the cable and closed the ADF then it would detect that paper was inserted and solved the problem.
Thanks again for your help, it is truly appreciated as it helped directed me towards the hardware issue being the most likely problem and subsequent fix.
† The opinions expressed above are the personal opinions of the authors, not of HP. By using this site, you accept the Terms of Use and Rules of Participation.


Didn't find what you were looking for?
Ask the community
† The opinions expressed above are the personal opinions of the authors, not of HP. By using this site, you accept the <a href="https://www8.hp.com/us/en/terms-of-use.html" class="udrlinesmall">Terms of Use</a> and <a href="/t5/custom/page/page-id/hp.rulespage" class="udrlinesmall"> Rules of Participation</a>.