-
1
×InformationNeed Windows 11 help?Check documents on compatibility, FAQs, upgrade information and available fixes.
Windows 11 Support Center. -
-
1
×InformationNeed Windows 11 help?Check documents on compatibility, FAQs, upgrade information and available fixes.
Windows 11 Support Center. -
- HP Community
- Archived Topics
- Printers Archive
- Re: "paper problem" message when trying to print a photo on ...
Guidelines
Ready to level up? Join the Expert Program—
Please log in to submit a nomination.
Thank you
Sorry, there was an error with your nomination, please try again.
Required fields can't be empty, please try again.

Create an account on the HP Community to personalize your profile and ask a question
Your account also allows you to connect with HP support faster, access a personal dashboard to manage all of your devices in one place, view warranty information, case status and more.
03-15-2017 09:48 AM
 HP Recommended
Product: Office Jet Pro 8710
I can print/copy photos on plain paper, but I get the message "paper problem" when I try to print on photo paper. I changed the settings, I put the paper in glossy side up an glossy side down, but just keep getting the same message.
4 REPLIES 4
03-15-2017 05:55 PM
HP Recommended
Hi,
Follow these steps for printing photos from your PC
Step 1: Load photo paper into the main input tray
Load photo paper into the main paper tray. How you load the paper depends on where the tray is and what type of printer you have.
NOTE:If your printer has a separate photo paper tray and want to use it, consult your user guide on how to print from the tray.
- Remove any plain paper from the main paper tray.
- Load the short edge of the photo paper into the tray based on your printer type. If the paper has a perforated tab for handling the photo after it prints, load the paper so the tab faces up or towards you to prevent printing on it.
- Inkjet printers with a rear load tray: Glossy or print side facing up
- Inkjet printers with a front load tray: Glossy or print side facing down
- LaserJet printers with a front load tray: Glossy or print side facing up
Loading photo paper into a rear load input trayLoading photo paper into a front load input tray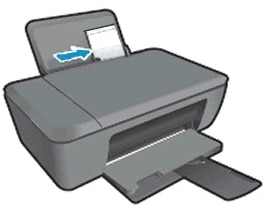
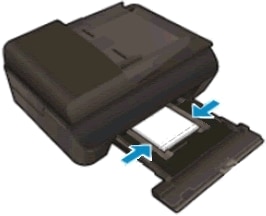
- Adjust the paper width guides so they rest against the edges of the paper.
Step 2: Print the photo
Open the print window and document properties to set up the print job.
- Before printing, edit the photo to improve colors, brightness, contrast and any other appearance settings.
- Right-click the photo you want to print, select Open with, then select Windows Photo Viewer or Paint.
NOTE:
For Windows 10, open the photo with Paint to use these steps. Windows Photo Viewer does not come with Windows 10 and was replaced by the Photos app. - Click Print, or click File or the menu icon
 (Paint), then click Print.The Print or Print Pictures window opens with general print job settings.
 - Open the printer Document Properties window to access more layout, quality, color, and advanced print settings.
- In the Print Pictures window in Windows Photo Viewer, click Options... in the lower right corner of the screen, then click Printer Properties... in the Print Settings window.
- In the Print window in Paint, click Preferences.
Figure : Example of printer Document Properties window with settings tabs and the Advanced settings button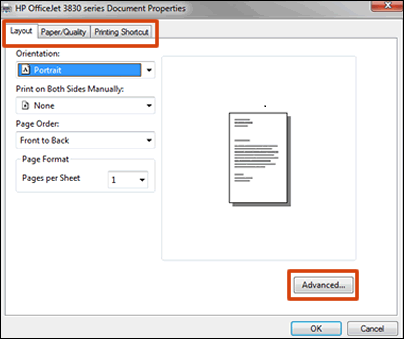
- Use this guide to find and use print job settings for photos in the Document Properties window. Menu names and available print settings vary by printer.
NOTE:
If the Document Properties window has a Printing Shortcut tab, select one of the photo print job shortcuts that has essential settings already selected for you.SettingLocationPortrait or landscape orientationSelect Portrait for vertical prints or Landscape for horizontal prints.Orientation menu on the Layout, Finishing, or Features tabPaper tray or sourceSelect the tray you loaded the photo paper into, if your printer has more than one tray.Source or Paper source menu on the Paper/Quality or Features tabPhoto paper typeSet the paper type you are using, such as HP photo paper, glossy, or matte finish, so the printer properly handles and prints on the paper.Type, Paper Type, or Media menu on the Paper/Quality or Features tabPaper sizeSelect the paper size you loaded in the printer, such as 4 x 6, 5 x 7, or 8 x 10 paper.Size or Paper Size menu in Advanced Options or on the Features tabSome newer printers support more paper options. Go to Creating Custom Paper Sizes for more information.Add or remove a borderAdd a white border around the photo or print to the very edge of the paper, if supported by your printer.Borderless Printing or Paper Size menu in Advanced OptionsThe Printing Shortcut tab might include shortcuts to print with or without a border - Change the following color and quality settings for best photo printing results.SettingLocationQuality: Measured in print resolution dots per inch (DPI). Higher DPI produces clearer and more detailed photos, but slows print speed and may use more ink. See printer specifications for print speeds (measured in pages-per-minute).
- Draft: Lowest DPI typically used when ink cartridge levels are low or when high quality prints are not needed
- Normal: Default quality setting suitable for most print jobs
- Best: Better DPI than Normal
- Max DPI: Highest DPI setting available
Quality Settings or Media menu on the Paper/Quality tabPrint in Max DPI or Output Quality menus are available in Advanced Options, depending on the printerPrinting in color or black and white: The following settings might be available, depending on the printer.- Color: Uses all cartridges to print full color photos
- Black & White, Black Ink Only, or Monochrome: Printer uses the black ink cartridge only; suitable for normal or lower quality black and white prints
- Grayscale: Printer uses ink from all cartridges to produce a wider range of black and grey tones; suitable for high quality black and white prints
There are several places to select color and black and white settings, depending on the printer.Select Color or Black & White on the Paper/Quality tabOn the Color tab, Features tab, or in Advanced Options, click the menu next to Print in Grayscale and select Off for color prints, High Quality Grayscale, or Black Ink Only - Click OK, then click Print.
- After printing, remove any photo paper from the tray and store it in the package it came in or in a plastic bag. If left in the tray for an extended time, the paper might start to curl.
To simply say thanks, please click the "Thumbs Up" button to give me a Kudos to appreciate my efforts to help.
If this helps, please mark this as “Accepted Solution” as it will help several others with the same issue to get it resolved without hassles.
Take care now and have a splendid week ahead.
03-16-2017 07:27 AM
HP Recommended
Thanks for your reply, but my problem seems to be the feeding of the paper. The printer seems to be printing, then the dashboard says printer problem. The printer indicates a paper crumpled inside the tray, when I pull out the tray, the paper looks like it started to go but stopped. There is no paper jam, I checked front and back. It just won't grab the photo paper.
03-17-2017 09:22 AM
HP Recommended
Hi,
Dust, paper fiber, and other debris might accumulate on the paper feed rollers and cause paper jams and paper feed issues. Clean the rollers inside the printer, and then try to print again.
Gather the following materials:
- A lint-free cloth
- Distilled, filtered, or bottled water (tap water might damage the printer)
- Turn off the printer, and then disconnect the power cord and any other cables.
WARNING:
You must disconnect the power cord before reaching inside the printer to avoid risk of injuries or electric shock. - Lift up and push back the cartridge access door.Figure : Opening the ink cartridge access door

- Lightly dampen the swab with the water, and then squeeze any excess liquid from the swab.
- Press the swab against the rollers inside the printer, and then rotate the rollers upwards with your fingers. Apply a moderate amount of pressure to remove any dust or dirt buildup.Figure : Clean the rollers in the cartridge access area
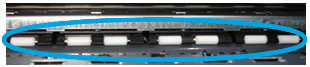
- Allow the rollers to dry completely (approximately 10 minutes).
- Close the ink cartridge access door.
Next step-
Remove ink cartridges from the printer & reinstall them back.
Hard reset the printer.
Check paper settings before you print the photo.
Try to print.
† The opinions expressed above are the personal opinions of the authors, not of HP. By using this site, you accept the Terms of Use and Rules of Participation.


Didn't find what you were looking for?
Ask the community
† The opinions expressed above are the personal opinions of the authors, not of HP. By using this site, you accept the <a href="https://www8.hp.com/us/en/terms-of-use.html" class="udrlinesmall">Terms of Use</a> and <a href="/t5/custom/page/page-id/hp.rulespage" class="udrlinesmall"> Rules of Participation</a>.