-
×InformationNeed Windows 11 help?Check documents on compatibility, FAQs, upgrade information and available fixes.
Windows 11 Support Center. -
-
×InformationNeed Windows 11 help?Check documents on compatibility, FAQs, upgrade information and available fixes.
Windows 11 Support Center. -
- HP Community
- Printers
- Scanning, Faxing, and Copying
- AIO 8710 Scan/Copy issue

Create an account on the HP Community to personalize your profile and ask a question
Your account also allows you to connect with HP support faster, access a personal dashboard to manage all of your devices in one place, view warranty information, case status and more.
Common problems HP Solution Center not working : Adobe Flash Player Error and Unable to scan
We would like to share some of the most frequently asked questions about HP Solution Center not working : Adobe Flash Player Error and Unable to Scan.

It has been a while since anyone has replied. Simply ask a new question if you would like to start the discussion again.
03-10-2017 09:42 AM - edited 03-10-2017 09:43 AM
 HP Recommended
Product: HP Officejet pro 8710
Scan and copy produces image with only lines. I have noticed that there is not a light shining up to the glass when scanning and copying. Could this be why the lines? And how do I fix that?
Solved! Go to Solution.
1 ACCEPTED SOLUTION
Accepted Solutions
03-10-2017 11:37 AM
HP Recommended
Hi@kathymehal
Looks like it could be scanner harware failure .
Please contact HP Support and speak to rep for a replacement OR other options.
Thank you
8 REPLIES 8
03-10-2017 09:57 AM
HP Recommended
Hi@kathymehal
Please follow these steps.
HP Printers - Fixing Copy Quality Issues
This document is for HP multifunction printers.
When you copy from the flatbed or automatic document feeder (ADF), the printout has quality issues, such as vertical or horizontal lines, color bands, or poor resolution.
Figure : Example of a copy with vertical lines

Figure : Example of a copy with color bands

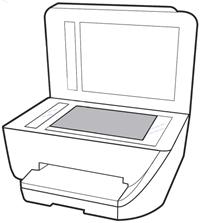
Fingerprints, smudges, dust, or debris on the scanner glass, under the scanner lid, or in the document feed slot can cause lines and color bands. Clean these parts with a soft, lint-free cloth sprayed with glass cleaner.
Read one of the following sections for steps to clean these components, depending on your printer type.
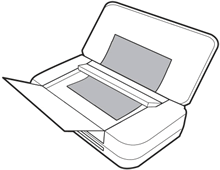
Printer with flatbed scanner glass and lid
Printer with a document scan feeder
Step 2: Clean the ADF rollers
Dust or paper residue on the rollers or separator pad inside the automatic document feeder (ADF) can result in copy quality issues. Open the ADF, and then clean the ADF rollers and separator pad.
NOTE:The location of the ADF rollers might be different depending on your printer, but the following steps still apply.
- Gather the following materials:
- A clean, lint-free cloth, or any cloth that does not come apart or leave fibers
- Distilled, filtered, or bottled water (tap water might damage the printer)
- Remove the original document from the ADF.
- Turn off the printer.
- Disconnect the power cord from the rear of the printer.
- Open the ADF cover.
- Find the paper pick rollers and the separator pad inside the ADF.Figure : Example of the paper pick rollers and separator pad in a LaserJet printer
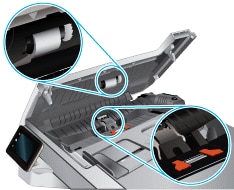 Figure : Example of the paper pick rollers and separator pad in a OfficeJet printer
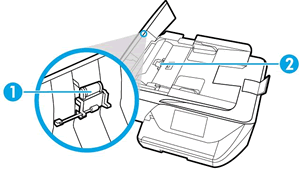
- Lightly dampen a clean, lint-free cloth with filtered or distilled water, and then squeeze any excess liquid from the cloth.
- Use the damp cloth to wipe any residue off the paper pick rollers and the separator pad.
- Leave the ADF cover open for two minutes to allow the paper pick rollers and separator pad to dry.
- Close the ADF cover.
- Reload the original document print side up in the document feeder tray. Gently slide the document into the printer as far as it can go.
- Slide in the paper width guides until they are snug against the paper.Do not push the paper width guides in so far that they bend the paper.
- Reconnect the power cord to the rear of the printer.
- Turn on the printer, and then try to copy.
If the issue persists, continue to the next step.
Step 3: Change the copy settings
Changing the copy settings, if available, might improve copy quality. Not all printers have the option to change copy quality settings, and some printers have more or less quality options. For specific steps, refer to the printer user guide on HP.com.
- On the printer control panel, touch or press the Copy button or icon.
- Touch or press the Settings icon or button
 , if necessary, then navigate to the Quality or Optimization setting.If either setting is not available, skip to the next step.
 - Change any of the following settings to improve copy quality.
- Reduce/Enlarge: Reduce or enlarge the size of the copy.
- Lighter/Darker or Contrast: Adjust the contrast of the text or photo.
NOTE:
On some printers, the Lighter/Darker option is accessed from a separate button on the control panel. - Optimize or Enhancements: Change this setting to optimize for photos, text, or mixed.
- Draft Mode: Turning on Draft Mode speeds up copying, but reduces quality.
- Quality: Change the copy quality to Best, Normal, or Draft.
- Touch or press the Back icon
 or OK.
 - Load the original document or photo, then try to copy.
If the issue persists, continue to the next step.
Step 4: Change the paper settings
Paper type and size in the input tray that do not match the paper type and size settings on the printer control panel can result in copy quality issues.
Check the paper settings on the printer control panel. For specific steps, refer to the printer user guide on HP.com.
- On the printer control panel, touch or press the Setup or Settings button or icon.
- Select Paper Setup, and then select Def. paper size.
- Select the paper size that is in the input tray, and then press the OK button.
- Try to copy again.
If the issue persists, continue to the next step.
Step 5: Reset the printer
Resetting the printer can force some types of scanners to calibrate which might fix the problem.
- Remove any items from the scanner glass and automatic document feeder (ADF), then close the scanner lid.
- With the printer turned on, disconnect the power cord from the printer and from the wall outlet or power strip.
- Wait at least 60 seconds.
- Plug the power cord back into a wall outlet.
NOTE:
HP recommends connecting the printer power cord directly to a wall outlet. - Reconnect the power cord to the printer.
- Load the original document or photo, then try to copy.
To simply say thanks, please click the "Thumbs Up" button to give me a Kudos to appreciate my efforts to help.
If this helps, please mark this as “Accepted Solution” as it will help several others with the same issue to get it resolved without hassles.
Take care now and have a splendid week ahead.


03-10-2017 10:36 AM
HP Recommended
hi@kathymehal
you will have to SEMIFULL RESET the printer .
Turn ON the printer .
Tap the Back Arrow button 4 times ( See in pic - lower left hand corner )
Go to support Menu
Scroll down to Resets menu
Select RESET MENU
This should erase all your printer settings and put it back to factory condition.

Check this you tube video link for easy instructions.
SEMIFULL RESET THE PRINTER WILL GET THE PRINTER BACK TO FACTORY CONDITION ERASING SETTINGS ON YOUR PRINTER
https://www.youtube.com/watch?v=6D6niTkbyMs
let me know what happens
To simply say thanks, please click the "Thumbs Up" button to give me a Kudos to appreciate my efforts to help.
If this helps, please mark this as “Accepted Solution” as it will help several others with the same issue to get it resolved without hassles.
Take care now and have a splendid week ahead.
03-10-2017 11:11 AM
HP Recommended
I did the semi reset, still getting the same issue. Again, no light shining up to the glass when scanning or copying. If there is no light, how can the image be captured? How do I fix the no light problem? Thank you.
Be alert for scammers posting fake support phone numbers and/or email addresses on the community.
If you think you have received a fake HP Support message, please report it to us by clicking on "Flag Post".
† The opinions expressed above are the personal opinions of the authors, not of HP. By using this site, you accept the Terms of Use and Rules of Participation.


Didn't find what you were looking for?
Ask the community
† The opinions expressed above are the personal opinions of the authors, not of HP. By using this site, you accept the <a href="https://www8.hp.com/us/en/terms-of-use.html" class="udrlinesmall">Terms of Use</a> and <a href="/t5/custom/page/page-id/hp.rulespage" class="udrlinesmall"> Rules of Participation</a>.