• ×
    Information
    Need Windows 11 help?
    Check documents on compatibility, FAQs, upgrade information and available fixes.
    Windows 11 Support Center.
  • post a message
  • ×
    Information
    Need Windows 11 help?
    Check documents on compatibility, FAQs, upgrade information and available fixes.
    Windows 11 Support Center.
  • post a message
Guidelines
Join the HP Community Solve‑a‑thon | Help Others & Share Your Solutions | Live on Zoom | 2:30 PM to 2:30 AM IST | Every Wednesday Click here to know more
Common problems HP Solution Center not working : Adobe Flash Player Error and Unable to scan
We would like to share some of the most frequently asked questions about HP Solution Center not working : Adobe Flash Player Error and Unable to Scan.
HP Recommended
Officejet Pro 7740
macOS 10.13 High Sierra

My printer is constantly losing wireless connection with my computer.  I have tried restarting my computer and printer and rebooting the modem.  I have deleted and re-entered the wireless settings.  I have removed the printer and reinstalled it.  I have tried updating the firmware.  I can get it working temporarily but then it will lose connection again.  Also, if one laptop has been using the printer.  Another laptop won't be able to print until they reinstall the printer.


I have HP Smart on my computer.  Right now it shows that the printer is connected but when I try to print a pdf using the app, the app shows it is ready but the printer spool indicates the printer is not connected.


HELP please.


1 ACCEPTED SOLUTION

Accepted Solutions
HP Recommended

Hi @TTinsley


Welcome to the HP Support Community. I'd be happy to assist you with the  "connectivity issue" issue. 


Try the steps below to resolve the issue -


Step1- Add the AirPrint printer to the Mac printer queue


Confirm you are using AirPrint by adding the printer in System Preferences.

  1. Click the Apple menu, click System Preferences, and then click Print & Scan or Printers & Scanners.

    Figure : Example of the Printers & Scanners window

     Example of the Printers & Scanners window
  2. Check if your printer name displays in the Printers list, and then do one of the following steps.

    • If your printer is listed, remove and re-add the printer to confirm it is set up for AirPrint. Click the printer name, click the minus sign  to delete the printer, click the plus sign , click Add Printer or Scanner, click the printer name and then continue to the next step.
    • If your printer is not listed, click the plus sign, click Add Printer or Scanner, click the name of your printer, and then continue to the next step.

    • If your printer is not listed in the Add Printer or Scanner window, go to the Frequently asked questions in this document to resolve connection issues, try to add the printer again, and then continue to the next step.

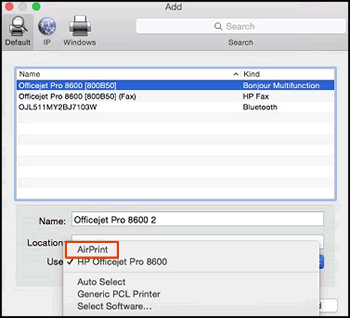
  3. Confirm AirPrint or Secure AirPrint displays in the Use or Print Using menu, and then click Add.

    Figure : AirPrint displays in the Use menu

    Select AirPrint from the Use menu
  4. Open a document or photo, click File, and then click Print.

Step 2-Assign a static IP address to the printer

  1. Obtain the IP address of the printer – You can touch the “wireless” icon on the printer control panel to obtain the IP address.
  2. Type the IP address at the top of your web browser to obtain the printer EWS page on your computer.
  3. If you get any security notification, click on show details/advanced and 'proceed to this website'.
  4. Go to "Network" tab - General - Select "Network protocols" - Select "Enable IPv4 only" (or similar) - Apply the settings.
  5. Go to the “Network” tab – Click on “Wireless (802.11) – Then click on “Network address (IPv4)
  6. Click on the radio button which says “Manual IP” and then click “Suggest a manual IP address” to give a manual IP address to your printer.
  7. Click on the radio button which says “Manual DNS Server” and under manual preferred type 8.8.8.8 and under manual alternate type 8.8.4.4 (This is Google DNS server address)

Note: You may watch this video for a better understanding.


Hope this helps! Keep me posted. 


Please click “Accept as Solution” if you feel my post solved your issue, it will help others find the solution.

Click the “Kudos, Thumbs Up" on the bottom right to say “Thanks” for helping!


Have a great day! 

View solution in original post

1 REPLY 1
HP Recommended

Hi @TTinsley


Welcome to the HP Support Community. I'd be happy to assist you with the  "connectivity issue" issue. 


Try the steps below to resolve the issue -


Step1- Add the AirPrint printer to the Mac printer queue


Confirm you are using AirPrint by adding the printer in System Preferences.

  1. Click the Apple menu, click System Preferences, and then click Print & Scan or Printers & Scanners.

    Figure : Example of the Printers & Scanners window

     Example of the Printers & Scanners window
  2. Check if your printer name displays in the Printers list, and then do one of the following steps.

    • If your printer is listed, remove and re-add the printer to confirm it is set up for AirPrint. Click the printer name, click the minus sign  to delete the printer, click the plus sign , click Add Printer or Scanner, click the printer name and then continue to the next step.

    • If your printer is not listed, click the plus sign, click Add Printer or Scanner, click the name of your printer, and then continue to the next step.

    • If your printer is not listed in the Add Printer or Scanner window, go to the Frequently asked questions in this document to resolve connection issues, try to add the printer again, and then continue to the next step.

  3. Confirm AirPrint or Secure AirPrint displays in the Use or Print Using menu, and then click Add.

    Figure : AirPrint displays in the Use menu

    Select AirPrint from the Use menu
  4. Open a document or photo, click File, and then click Print.

Step 2-Assign a static IP address to the printer

  1. Obtain the IP address of the printer – You can touch the “wireless” icon on the printer control panel to obtain the IP address.
  2. Type the IP address at the top of your web browser to obtain the printer EWS page on your computer.
  3. If you get any security notification, click on show details/advanced and 'proceed to this website'.
  4. Go to "Network" tab - General - Select "Network protocols" - Select "Enable IPv4 only" (or similar) - Apply the settings.
  5. Go to the “Network” tab – Click on “Wireless (802.11) – Then click on “Network address (IPv4)
  6. Click on the radio button which says “Manual IP” and then click “Suggest a manual IP address” to give a manual IP address to your printer.
  7. Click on the radio button which says “Manual DNS Server” and under manual preferred type 8.8.8.8 and under manual alternate type 8.8.4.4 (This is Google DNS server address)

Note: You may watch this video for a better understanding.


Hope this helps! Keep me posted. 


Please click “Accept as Solution” if you feel my post solved your issue, it will help others find the solution.

Click the “Kudos, Thumbs Up" on the bottom right to say “Thanks” for helping!


Have a great day! 

† The opinions expressed above are the personal opinions of the authors, not of HP. By using this site, you accept the <a href="https://www8.hp.com/us/en/terms-of-use.html" class="udrlinesmall">Terms of Use</a> and <a href="/t5/custom/page/page-id/hp.rulespage" class="udrlinesmall"> Rules of Participation</a>.


