• ×
    Information
    Need Windows 11 help?
    Check documents on compatibility, FAQs, upgrade information and available fixes.
    Windows 11 Support Center.
  • post a message
  • ×
    Information
    Need Windows 11 help?
    Check documents on compatibility, FAQs, upgrade information and available fixes.
    Windows 11 Support Center.
  • post a message
Guidelines
Note: From May 1, 2024, the HP Scan and Capture app will no longer be available (retired) in the Microsoft Store and HP will not release any further app updates. Alternatively, you can download HP Smart from the Microsoft Store. For more information on how to set up your printer using the HP Smart app, go to HP printer setup (HP Smart app).
Common problems HP Solution Center not working : Adobe Flash Player Error and Unable to scan
We would like to share some of the most frequently asked questions about HP Solution Center not working : Adobe Flash Player Error and Unable to Scan.
HP Recommended
HP Officejet pro 8600
Microsoft Windows 10 (64-bit)

Get many long vertical streaks when using copy function but they are not there when printing from desktop or scanning documents.  I can unplug and wait a bit and it will clear up but I want to know if there is a permanent fix for this.  I have to unplug each and every time I want to make a copy.

1 REPLY 1
HP Recommended

Hi @thumpermal


Welcome to the HP Support Community. I'd be happy to assist you.


Due to the current global COVID-19 situation, we're seeing an influx of customers coming in for support. We appreciate your patience.


Try the steps below -


Lines or color bands in copies


Vertical or horizontal lines or color bands are typically caused by fingerprints, smudges, or debris on scanner parts, cartridge issues, or there is a power or calibration issue with the scanner mechanism.


Step 1: Clean the scanner parts


Fingerprints, smudges, dust, or debris on the scanner glass, under the scanner lid, or in the document feed slot can cause lines and color bands. Clean these parts with a soft, lint-free cloth sprayed with glass cleaner.


Read one of the following sections for steps to clean these components, depending on your printer type.

  • Printer with flatbed scanner glass and lid
  • Printer with a document scan feeder

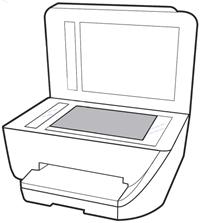
Printer with flatbed scanner glass

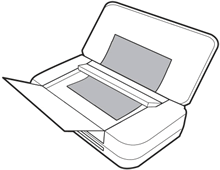
Printer with a document feeder


Printers with a flatbed scanner and lid


Clean the scanner glass and underside of the scanner lid with a soft, lint-free cloth sprayed with glass cleaner.

  1. Turn the printer off, disconnect the power cord, and then lift the scanner lid.

  2. Spray a soft lint-free cloth with glass cleaner.

       CAUTION: 

    To protect interior printer parts, do not spray cleaner directly on the glass or lid.

  3. Wipe the main scanner glass, glass strip, and the white backing and automatic document feeder (ADF) strip under the lid until clean, dry, and streak-free.

    1. White scanner lid backing

    2. White ADF scanner lid strip (if present)

    3. Glass ADF scanner strip (if present)

    4. Main scanner glass

  4. If any debris remains stuck to any parts, use your fingernail to scrape it off, and then wipe the area again.

       CAUTION: 

    Do not use a hard or sharp tool that can scratch the printer parts.

  5. Reconnect the power cord to the printer, and then try making a copy

Step 2: Clean the ADF rollers

If lines in copies persist when using the ADF, clean the rollers or separator pad.

  1. Turn the printer off, disconnect the power cord, and then open the ADF cover.

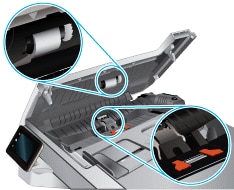
  2. Find any paper pick rollers and the separator pad inside the ADF. These parts have a rubber coating.

    Paper pick rollers and separator pad in the ADF

  3. Lightly dampen a clean, lint-free cloth with distilled or filtered water, squeeze any excess liquid from the cloth, and then wipe any residue off the rollers and separator pad.

  4. Leave the ADF cover open for two minutes to allow the parts to dry, and then close the cover.

  5. Reconnect the power cord to the printer, and then try making a copy.

If the issue persists, continue to the next step.

Step 3: Reset the printer and check the power source

Reset the printer to clear certain error states, and then check the power source to make sure the printer is getting enough power to operate the copier.

  1. With the printer turned on, disconnect the power cord from the printer, disconnect the power cord from the power source, and then wait 30 seconds.

  2. If you are using a power strip or multi-plug adapter, connect the cord directly to a wall outlet to make sure the printer is getting enough power.

  3. Reconnect the power cord to the printer, and then try making a copy.

    • If the issue persists, connect the printer to a different wall outlet to determine if the original outlet is causing the issue.

    • If the issue persists using a different wall outlet

Step 4: Check the ink or toner cartridges


refer to-Resolving Copy Problems


Hope this helps! Keep me posted. 


Please click “Accept as Solution” if you feel my post solved your issue, it will help others find the solution.

Click the “Kudos, Thumbs Up" on the bottom right to say “Thanks” for helping!


Have a great day! 

† The opinions expressed above are the personal opinions of the authors, not of HP. By using this site, you accept the <a href="https://www8.hp.com/us/en/terms-of-use.html" class="udrlinesmall">Terms of Use</a> and <a href="/t5/custom/page/page-id/hp.rulespage" class="udrlinesmall"> Rules of Participation</a>.