-
×InformationNeed Windows 11 help?Check documents on compatibility, FAQs, upgrade information and available fixes.
Windows 11 Support Center. -
-
×InformationNeed Windows 11 help?Check documents on compatibility, FAQs, upgrade information and available fixes.
Windows 11 Support Center. -
- HP Community
- Printers
- Scanning, Faxing, and Copying
- How do I set up Scan to Computer?

Create an account on the HP Community to personalize your profile and ask a question
Your account also allows you to connect with HP support faster, access a personal dashboard to manage all of your devices in one place, view warranty information, case status and more.
Common problems HP Solution Center not working : Adobe Flash Player Error and Unable to scan
We would like to share some of the most frequently asked questions about HP Solution Center not working : Adobe Flash Player Error and Unable to Scan.

It has been a while since anyone has replied. Simply ask a new question if you would like to start the discussion again.
02-10-2020
12:04 PM
- last edited on
05-24-2026
05:42 AM
by
![]() Nal_NR
Nal_NR
 HP Recommended
Product: HP OfficeJet Pro 8720
How/where do I go to I set up Scan to Computer so that my scan folders for each computer appear on my printer console?
Once it's set up, how do I tell it what folder to save to?
I have HP app installed but it only gives the option for Web scan (?)
All other drivers and software are installed. It scans fine when I start the scan from HP app, but I want to start it from my printer.
Solved! Go to Solution.
1 ACCEPTED SOLUTION
Accepted Solutions
02-17-2020
08:27 PM
- last edited on
05-30-2026
08:24 AM
by
![]() Raj_05
Raj_05
HP Recommended
Well, I figured it out on my own. Here is how you set up Scan to Network Folder in Windows 10 with HP App.
1-set up a new separate Windows 10 user profile with a password that is JUST used for scanning.
Log in to the computer you want to scan to as the administrator
Go to,
Settings
Accounts
Family and Other Users
Under Other Uses, Add someone else to this PC
Click "I don't have this person's sign-in information"
Click "Add a user without a Microsoft Account"
Give it a user name (helps to include the word Scan in it so that you will remember that it's only for scanning)
Give it a password
Put something in for security questions and answers
Click Next
You have now added a user for scanning.
2-Make a folder where you want to save your scans on the same computer you just added the user
3-share the folder
Go to the folder
Right click on it and select properties
Click on Sharing tab
3a-Click on Advanced Sharing
Check the box that says "Share this folder"
Click ok
3b-Now, go to Share (still on the Sharing tab)
On the drop down menu, select the special scanning user you just added, and click Add.
Change permission level to "Read/Write"
Click Share at the bottom of the window.
3c-Still on the Sharing tab, write down (or copy) the Network Path (should be something like \\computername\foldername
4-Set up network sharing in HP App
Open HP App
Click Printer Setting box
Click Advanced Settings on the left
Click Scan at the top
Click the + sign next to Scan to Network Folder on the left
Click Network Folder Setup on the left
In the Network Folder Setup area in the center, click the person with a + icon (for New)
Under Network Folder Setup Step 1:,
Enter a name for this folder (it will appear on your printer)
Paste/Enter the network path from 3c above into Network Path
Click Next
Under Step 2,
Select "Always use the following credentials"
Enter the User Name and Password you just set up specifically for scanning.
Security PIN -clear the entries if you don't want to use a pin
Click Next
Enter scan settings or leave defaults
Click Save and Test
Voila-this should do it. You should see this folder on your printer when you select scan to network computer.
Here is the link that helped me figure it out because none of this is obvious or explained anywhere.
https://support.hp.com/us-en/document/c04431534
7 REPLIES 7
02-10-2020
12:20 PM
- last edited on
06-05-2025
07:38 AM
by
![]() Raj_05
Raj_05
HP Recommended
Hello,
In order to use the Scan to Computer feature, please install your printer with the HP OfficeJet Pro 8720 series Full Drivers and Software.
Please go to the How to Scan (Windows) section.
Do not hesitate to contact us in case of need.
Best regards,
I'm not an HP employee. Did this message answer your question? Include it below as an Accept As Solution! Did you find this message useful? Click on the thumbs up set to give a Compliment! Follow us on Facebook Assistance customers HP.

02-15-2020 06:45 PM
HP Recommended
I'm sorry but this did not help at all. I already have all the drivers downloaded and have for a while. The link you included for How to Scan (Windows) has no information whatsoever about setting up scan to computer so that a computer save location can be set up on my printer screen.
02-15-2020 07:05 PM - edited 02-15-2020 07:14 PM
HP Recommended
Thanks for your return,
The location configuration is saved in each scan shortcut in HP Scan.
Use the Destination section in HP Scan to find or change where your scan files are saved.
NOTE:If you are scanning from the printer control panel, use HP Scan to find the default folder your scans are saved to.
- In HP Scan, select a Save as shortcut, and then click More.
- Click the Destination tab.The folder your scans save to displays under Save To Folder.

- To change the default folder, click Browse.
- Navigate to the folder you want to save your scans to, and then click OK.
- To save the new folder as the default location for the shortcut, click the Save icon (
 ) next to the shortcut.
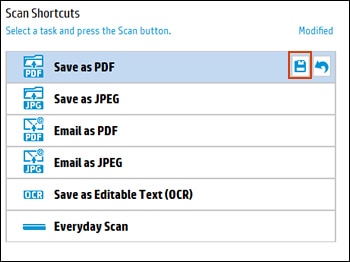
- Repeat these steps for any other Save as shortcuts.
In case of need, please do not hesitate to contact us.
Best regards,🤠
I'm not an HP employee. Did this message answer your question? Include it below as an Accept As Solution! Did you find this message useful? Click on the thumbs up set to give a Compliment! Follow us on Facebook Assistance customers HP.
02-15-2020
07:54 PM
- last edited on
05-24-2026
05:41 AM
by
![]() Nal_NR
Nal_NR
HP Recommended
I am sorry but this still doesn't help. I don't have HP Scan on my computer-only HP app.
This computer is only a month old and I downloaded and loaded all the latest drivers and software, including the one in your original link.
In the system tray, there is now an icon that says Scan to Computer is currently unavailable. I ran the HP Print and Scan Doctor to try and fix it but it can't find a problem.
02-15-2020
08:19 PM
- last edited on
05-30-2026
08:23 AM
by
![]() Raj_05
Raj_05
HP Recommended
Unfortunately, the HP application does not support changing the destination where scans are saved with Scan to Computer, only HP Scan and the full software and drivers allow this.
You need to install your printer with HP OfficeJet Pro 8720 series Full Drivers and Software to be able to choose the registration destination in HP Scan.
- Click the Start menu, then the HP folder, and then HP OfficeJet Pro 8720 series. The HP Printer Assistant window opens.
- Click Print, Scan & Fax tab.
- Click on the Scan section, then click on Scan a Document or Photo. The HP Scan window opens.
The Scan section, in the HP Printer Assistant:
In the HP Scan application, then in the Destination section:


Do not hesitate to contact us in case of need.
Best regards,🤠
I'm not an HP employee. Did this message answer your question? Include it below as an Accept As Solution! Did you find this message useful? Click on the thumbs up set to give a Compliment! Follow us on Facebook Assistance customers HP.
02-16-2020 10:42 AM
HP Recommended
Perhaps i was not clear.
I have downloaded and installed the software from your link. That link brings me through an installation process and registration process. The install is successful but it never brings me to an HP Printer Assistance window.
I also go to the HP folder in Start, I click on HP OfficeJet Pro 8720, and it again brings me through an installation process and registration process. The install is successful but it never brings me to an HP Printer Assistance window.
Either way, there is no HP software anywhere on my computer that brings me to an HP Printer Assistance window.
02-17-2020
08:27 PM
- last edited on
05-30-2026
08:24 AM
by
![]() Raj_05
Raj_05
HP Recommended
Well, I figured it out on my own. Here is how you set up Scan to Network Folder in Windows 10 with HP App.
1-set up a new separate Windows 10 user profile with a password that is JUST used for scanning.
Log in to the computer you want to scan to as the administrator
Go to,
Settings
Accounts
Family and Other Users
Under Other Uses, Add someone else to this PC
Click "I don't have this person's sign-in information"
Click "Add a user without a Microsoft Account"
Give it a user name (helps to include the word Scan in it so that you will remember that it's only for scanning)
Give it a password
Put something in for security questions and answers
Click Next
You have now added a user for scanning.
2-Make a folder where you want to save your scans on the same computer you just added the user
3-share the folder
Go to the folder
Right click on it and select properties
Click on Sharing tab
3a-Click on Advanced Sharing
Check the box that says "Share this folder"
Click ok
3b-Now, go to Share (still on the Sharing tab)
On the drop down menu, select the special scanning user you just added, and click Add.
Change permission level to "Read/Write"
Click Share at the bottom of the window.
3c-Still on the Sharing tab, write down (or copy) the Network Path (should be something like \\computername\foldername
4-Set up network sharing in HP App
Open HP App
Click Printer Setting box
Click Advanced Settings on the left
Click Scan at the top
Click the + sign next to Scan to Network Folder on the left
Click Network Folder Setup on the left
In the Network Folder Setup area in the center, click the person with a + icon (for New)
Under Network Folder Setup Step 1:,
Enter a name for this folder (it will appear on your printer)
Paste/Enter the network path from 3c above into Network Path
Click Next
Under Step 2,
Select "Always use the following credentials"
Enter the User Name and Password you just set up specifically for scanning.
Security PIN -clear the entries if you don't want to use a pin
Click Next
Enter scan settings or leave defaults
Click Save and Test
Voila-this should do it. You should see this folder on your printer when you select scan to network computer.
Here is the link that helped me figure it out because none of this is obvious or explained anywhere.
https://support.hp.com/us-en/document/c04431534
Be alert for scammers posting fake support phone numbers and/or email addresses on the community.
If you think you have received a fake HP Support message, please report it to us by clicking on "Flag Post".
† The opinions expressed above are the personal opinions of the authors, not of HP. By using this site, you accept the Terms of Use and Rules of Participation.


Didn't find what you were looking for?
Ask the community
† The opinions expressed above are the personal opinions of the authors, not of HP. By using this site, you accept the <a href="https://www8.hp.com/us/en/terms-of-use.html" class="udrlinesmall">Terms of Use</a> and <a href="/t5/custom/page/page-id/hp.rulespage" class="udrlinesmall"> Rules of Participation</a>.