• ×
    Information
    Need Windows 11 help?
    Check documents on compatibility, FAQs, upgrade information and available fixes.
    Windows 11 Support Center.
  • post a message
  • ×
    Information
    Need Windows 11 help?
    Check documents on compatibility, FAQs, upgrade information and available fixes.
    Windows 11 Support Center.
  • post a message
Guidelines
Note: From May 1, 2024, the HP Scan and Capture app will no longer be available (retired) in the Microsoft Store and HP will not release any further app updates. Alternatively, you can download HP Smart from the Microsoft Store. For more information on how to set up your printer using the HP Smart app, go to HP printer setup (HP Smart app).
Common problems HP Solution Center not working : Adobe Flash Player Error and Unable to scan
We would like to share some of the most frequently asked questions about HP Solution Center not working : Adobe Flash Player Error and Unable to Scan.
HP Recommended

I just put brand new printer cartridges for my Hp 1350 All In One Psc and it keeps giving me the error message to check the cartridge.  I tried a troubleshooting step from a similar post where I unplugged the USB cable, removed the printer cartridges, unplugged the power source, waited a minute, then plugged the printer back in and replaced the cartridges.  But, the printer still gave me an error message.  Do you have any other suggestions for troubleshooting?

1 REPLY 1
HP Recommended

@FarrShadow 


Welcome to the HP support community.


I understand that you are getting cartridge error, I am glad to assist you.

Remove the cartridges


  • Press the On/Resume button () to turn on the product.
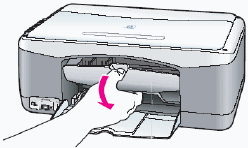
  • Open the cartridge access door. The carriage moves to the center of the product.
  • NOTE:If the carriage does not move into the access area, turn the product off and then on again.
  • Figure : Open the cartridge access door
  • Illustration of opening the cartridge access door
  • Press lightly on the top of the cartridge that you are removing to release it from its slot. Then slide the cartridge out of the carriage.
  • NOTE:The black cartridge belongs in the slot on the right. The color cartridge belongs in the slot on the left.
  • Figure : Remove the cartridge
  • Illustration of removing the cartridge
  • If the cartridge has protective tape covering the nozzles, use the pull tab to remove it.
  • Figure : Remove the protective tape using the pull tab
  • Illustration of removing the protective tape
  • CAUTION:Do not touch the copper-colored electrical contacts or the ink nozzles on the cartridge. Doing so can cause bad electrical connections, clogged ink nozzles, or poor print quality.
  • Figure : Do not touch the copper-colored electrical contacts or the ink nozzles
  • Illustration warning not to touch the copper-colored electrical contacts or the ink nozzles on the cartridge
  • Repeat these steps to remove the other cartridge.


Step two: Reinstall the cartridges


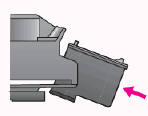
  • To reinsert, hold the cartridge by its sides, and then slide the cartridge forward into its slot at a slightly upward angle.
  • Figure : Reinsert the cartridge
  • Illustration of reinserting the cartridge
  • Firmly push the cartridge in until it snaps into place.
  • Figure : Snap the cartridges into place
  • Illustration of snapping the cartridge into place
  • Repeat these steps to reinsert the other cartridge into its designated slot.
  • Close the cartridge access door.
  • An alignment page prints automatically. If the alignment page does not print automatically, follow these steps to print one manually:
  • If the product is off, press the On/Resume button () to turn on the product.
  • Disconnect the USB cable from the rear of the product.
  • A sequence of buttons on the control panel must now be pressed in the order presented. The sequence must be completed within ten seconds. It might take several tries to complete the sequence within ten seconds.
  • Press and hold the Cancel button ().
  • While holding the Cancel button (), press and hold the On/Resume button ().
  • When the Check Paper and Check Print Cartridge lights begin to blink simultaneously, release both the Cancel button () and the On/Resume button ().
  • Press and release the Cancel button () again.
  • Press and release the Copies button.
  • Press and release the Paper Type button.
  • Press and release the Color Start Copy button.

Keep me posted.

If this helps, please mark the public post as an accepted solution so that it benefits several others.

Cheers.

Sandytechy20
I am an HP Employee

† The opinions expressed above are the personal opinions of the authors, not of HP. By using this site, you accept the <a href="https://www8.hp.com/us/en/terms-of-use.html" class="udrlinesmall">Terms of Use</a> and <a href="/t5/custom/page/page-id/hp.rulespage" class="udrlinesmall"> Rules of Participation</a>.