• ×
    Information
    Need Windows 11 help?
    Check documents on compatibility, FAQs, upgrade information and available fixes.
    Windows 11 Support Center.
  • post a message
  • ×
    Information
    Need Windows 11 help?
    Check documents on compatibility, FAQs, upgrade information and available fixes.
    Windows 11 Support Center.
  • post a message
Guidelines
Note: From May 1, 2024, the HP Scan and Capture app will no longer be available (retired) in the Microsoft Store and HP will not release any further app updates. Alternatively, you can download HP Smart from the Microsoft Store. For more information on how to set up your printer using the HP Smart app, go to HP printer setup (HP Smart app).
Common problems HP Solution Center not working : Adobe Flash Player Error and Unable to scan
We would like to share some of the most frequently asked questions about HP Solution Center not working : Adobe Flash Player Error and Unable to Scan.
HP Recommended
HPSmart TankPlus 651

I posted on May 20 and a very kind person replied on May 21. I just followed their advice and changed the security setting to enable webcam as directed. Unfortunately that did not change scanning from the printer screen. And when I tried to reply to that post, nothing happened. Perhaps I am jinxed. 
Anyway, when I press scan on the printer screen, it asks me where to send it. Desktop J ******or another computer. Tried desk top, screen went from scanning to cancelling and 5 minutes later still says cancelling. Is this a lemon?

does anyone have an actual phone number to talk to a real person at HP? Or a solution to this? 
wishing I had kept my old printer/scanner. 
thanks! Thanks 🙏🏻 

1 REPLY 1
HP Recommended

@LPA655

Thank you for posting on HP Support Community.


Don't worry as I'll be glad to help, I have a few troubleshooting steps we could try to fix the issue:  

Use the Destination section in HP Scan to find or change where your scan files are saved.

NOTE: If you are scanning from the printer control panel, use HP Scan to find the default folder your scans are saved to.
  1. In HP Scan, select a Save as shortcut, and then click More.

  2. Click the Destination tab.

    The folder your scans save to displays under Save To Folder.

    Finding the folder scans are saved to

  3. To change the default folder, click Browse.

  4. Navigate to the folder you want to save your scans to, and then click OK.

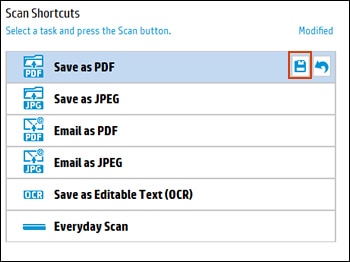
  5. To save the new folder as the default location for the shortcut, click the Save icon  next to the shortcut.

    Saving changes to a scan shortcut

  6. Repeat these steps for any other Save as shortcuts. If the issue persists, follow next steps.

Step 1: Set up scan to email (optional)

Before you can scan to email, you must configure your email with a local email client, such as the Windows Mail app, Microsoft Outlook, Mozilla Thunderbird, or Windows Live Mail. If you already have a local client configured on your computer or do not want to scan to email, skip to the next step.

  • Windows Mail app is pre-installed on all Windows 10 computers. Search Windows for mail, open the app, and then add your email address. If you are using Windows 8, go to How to set up email account in the Mail app in Windows 8.1 (in English).

  • Microsoft Outlook is available for purchase at the Microsoft Store (in English), either individually or as part of the Microsoft Office Suite. Go to How to set up an Internet email account in Outlook 2013 or 2016 (in English) for instructions to add your email.

  • Mozilla Thunderbird is available for download at Mozilla Thunderbird (in English). Follow the on-screen prompts to install Thunderbird and add your email.

  • Windows Live Mail is no longer available to download but still works if you already have it. Make sure the email you want to scan to is added to Live Mail.

Step 2: Install or update HP Scan

Make sure you have the latest version of the printer software, and then make sure your printer is connected to your computer with a USB cable or on a local network.

  1. Go to HP Customer Support - Software and Driver Downloads.

  2. Type your printer model, and then click Download next to the full feature driver under Driver-Product Installation Software.

    Click Download next to the full feature driver

  3. Follow the guided setup instructions to connect the printer.

  4. After the software installs, search Windows for HP, and then select your printer to open HP Printer Assistant.

    NOTE: If HP Printer Assistant does not download with your printer software, go to What other scanning methods or apps are available in Frequently asked questions (FAQs).
  5. On the Scan tab, click Scan a Document or Photo to open HP Scan, and then continue to the next step.

Step 3: Set scan preferences

Change settings in HP Scan before you complete a scan job.

  1. Scan Shortcuts

  2. Show Viewer After Scan check box

  3. Source options

  4. Scan settings

  5. More

  1. Select a Scan Shortcut, such as Save as PDF or Email as JPEG.

    NOTE: To save or email a multi-page scan as a single file, select a PDF option. Multi-page JPEG scans save as separate files.
  2. Select the Show Viewer After Scan check box.

  3. If your printer has both a document feeder and scanner glass, select Flatbed under Source.

  4. Make sure the other settings such as Page Size and Color Mode are correct for your scan job.

  5. Click More to change advanced settings, such as Resolution (ppi), Orientation, Destination, and File Name.

Step 4: Scan and edit

Load your documents, complete the scan, and then edit, if necessary.

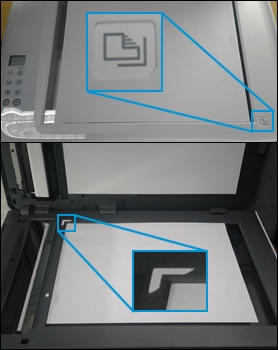
  1. Place the first item you want to scan face-down on the scanner glass, aligning it with the guide at the edge of the glass.

    Aligning a document with the guides at the edges of the scanner glass

  2. In HP Scan, click Scan.

    The printer scans your document or photo, and then HP Scan displays a preview.

  3. To add pages or scan the other side, click the Add pages icon  on the bottom bar, place the next item face-down on the scanner glass, and then click Scan.

  4. Double-click individual pages to rotate, crop, or change brightness and contrast, or click More for advanced options.

  5. When you finish editing your scan, click Save or Send.

Hope this helps! Keep me posted for further assistance.
Please click “
Accept as Solution” if you feel my post solved your issue, it will help others find the solution.

ECHO_LAKE
I am an HP Employee

† The opinions expressed above are the personal opinions of the authors, not of HP. By using this site, you accept the <a href="https://www8.hp.com/us/en/terms-of-use.html" class="udrlinesmall">Terms of Use</a> and <a href="/t5/custom/page/page-id/hp.rulespage" class="udrlinesmall"> Rules of Participation</a>.