-
×InformationNeed Windows 11 help?Check documents on compatibility, FAQs, upgrade information and available fixes.
Windows 11 Support Center. -
-
×InformationNeed Windows 11 help?Check documents on compatibility, FAQs, upgrade information and available fixes.
Windows 11 Support Center. -
- HP Community
- Printers
- Scanning, Faxing, and Copying
- error scanner- - HP Officejet 4500 wireless

Create an account on the HP Community to personalize your profile and ask a question
Your account also allows you to connect with HP support faster, access a personal dashboard to manage all of your devices in one place, view warranty information, case status and more.
Common problems HP Solution Center not working : Adobe Flash Player Error and Unable to scan
We would like to share some of the most frequently asked questions about HP Solution Center not working : Adobe Flash Player Error and Unable to Scan.

It has been a while since anyone has replied. Simply ask a new question if you would like to start the discussion again.
06-10-2017 08:43 AM
 HP Recommended
Product: HP Pavillon
Operating System: Microsoft Windows 10 (64-bit)
Hi, lately when i try to scan a document from the HP Sultion Center, this message appear:
The error, in italian, is: "Periferica di imaging HP non rilevata." (i.e. "peripheral of imaging HP not detected").
I try to make anything possibile as unistall and reinstall printer driver, Hp Doctor, and many more but the result is always the same: when the driver finish to install, the message suddenly appear and i can't scan even with Windows scan.
I have another PC which have no trouble.
I have Windows 10 64-bit.
Can anyone help me to find a solution? Thanks!
Marco
Solved! Go to Solution.
1 ACCEPTED SOLUTION
Accepted Solutions
06-14-2017 12:29 PM
HP Recommended
Thanks for the response.
Need not to worry I will help you to resolve this issue.
Try the below steps to fix this issue.
Check Windows Image Acquisition settings.
-
Search Windows for view local services, and then click the View local services Control panel setting in the list of results.
The Services window opens.
-
Find Windows Image Acquisition (WIA) in the Name column and look at the Status and Startup type values.
-
If the status is 'Started' and the Startup type is 'Automatic', WIA is running correctly. Skip to the next step.
-
If the status is 'Disabled', right-click Windows Image Acquisition (WIA), click Properties, click the General tab, click Start under the Service status, and then select Automatic from the Startup type dropdown menu.
-
-
Try to scan.
Temporarily disable firewall software on the computer.
-
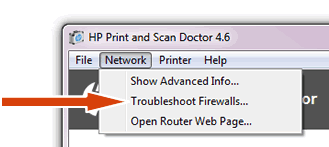
Return to the Print and Scan Doctor, click Network, and then click Troubleshoot Firewalls.
Figure : Troubleshoot Firewalls in the drop-down menu
-
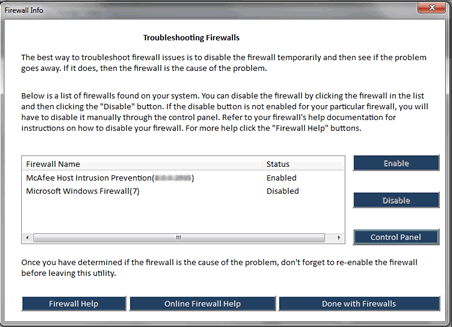
Click the name of any firewall software on your system that has an Enabled status, and then click Disable.
Figure : Example of the Troubleshooting Firewalls window
-
Try to scan.
Click here and refer step 7 and 8 to perform above steps.
Let me know if that helps.
Cheers.
Sandytechy20
I am an HP Employee
7 REPLIES 7
06-11-2017 08:29 AM
HP Recommended
Welcome to the HP Forums. I would be happy to help you with your HP Officejet 4500 printer. I understand that you are getting issues while scanning and you have already done some preliminary troubleshooting.
Don't worry though as I have a few steps to determine the issue and find a solution as well,
Restart devices and check driver scan settings.
-
Turn off the printer.
-
Make sure the printer power cord connects directly to an electrical outlet and not through a surge protector or power strip.
-
Close all running programs on your computer, and then shut down the computer.
-
Turn on the printer.
-
Turn on the computer.
-
Search Windows for your printer model name, and then click the printer name in the list of results.
-
If HP Printer Assistant opens, click Scan a Document or Photo or Manage Scan to Computer, and then make sure the checkbox is selected next to Automatically start Scan to Computer when I log onto Windows.
-
If HP Solution Center opens, click Scan Settings to view scan connection status, settings, and preferences.
-
Try to scan.
Uninstall and reinstall the printer software.
Check Windows Image Acquisition settings.
-
Search Windows for view local services, and then click the View local services Control panel setting in the list of results.
The Services window opens.
-
Find Windows Image Acquisition (WIA) in the Name column and look at the Status and Startup type values.
-
If the status is 'Started' and the Startup type is 'Automatic', WIA is running correctly. Skip to the next step.
-
If the status is 'Disabled', right-click Windows Image Acquisition (WIA), click Properties, click the General tab, click Start under the Service Status, and then select Automatic from the Startup type drop-down menu.
-
-
Try to scan.
Temporarily disable firewall software on the computer.
Click here and refer the document to perform the above steps.
Let me know if that helps.
Cheers.
Sandytechy20
I am an HP Employee
06-12-2017 09:46 AM
HP Recommended
Hi sandytchy20,
thank you for your support. Unfortunately i've tried everything you wrote me but the problem always persist.
When i re-install the printer's driver, in the end of the process a notice appears and it says the The Bing Bar cannot be installed 'cause it's not supported by my Windows 10 version.
Maybe the scan's problem is also related to my Windows 10 version? I have Windows 10, version 1703..maybe it's a problem of compatibiliy?
Thanks!
06-12-2017 01:07 PM
HP Recommended
Thanks for the reply.
I appreciate your time and effort.
Install the printer with the Windows built-in driver to fix this issue.
Open the Windows Device Installation Settings and confirm that your computer is set to automatically download driver software.
-
Search Windows for change device installation, and then click the Change device installation settings Control Panel setting in the list of results.
Device Installation Settings window displays.
-
Select the Yes option, and then click Save Changes.
Figure : Example of selecting the Yes option

Install the print driver with the Add a Printer wizard.
Install the built-in print driver over a wireless or wired (Ethernet) network connection on a computer with Windows 10.
-
Search Windows for devices, and then click Devices and Printers in the list of results.
-
Click Add a printer.
Figure : Clicking Add a printer
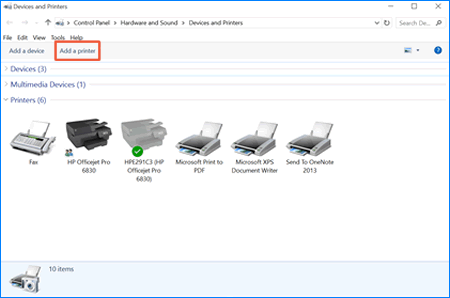
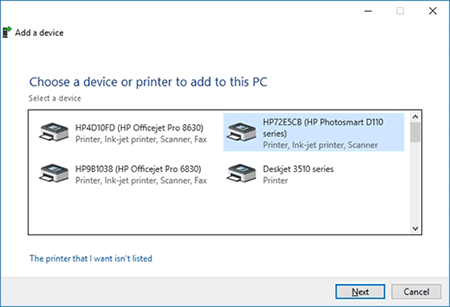
A Choose a device or printer to add to this PC window opens.
Figure : Example of printers found in the Choose a device or printer to this PC window
-
If your printer is in the list, select it, click Next, and then follow the on-screen instructions to install the driver. You can now use your printer.
-
If your printer is not in the list, continue to the next step.
-
-
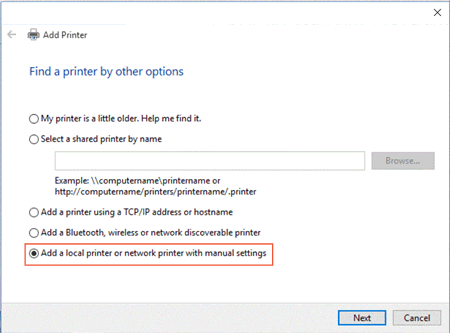
Click The printer I want isn't listed, and then select Add a local printer or network printer with manual settings.
Figure : Selecting Add a printer using local or network printer with manual settings
-
Click Next.
-
Select the port to be used by your printer, such as 'USB001' for a USB connected printer, and then click Next.
-
Click Windows Update, and then wait for the print drivers to update.
-
Click HP, Hewlett-Packard, or Hewlett Packard in the Manufacturer pane, and then click the name of your printer in the Printers pane.
-
If your printer is in the list, select it, click Next, and then follow the on-screen instructions to install the driver. You can now use your printer.
-
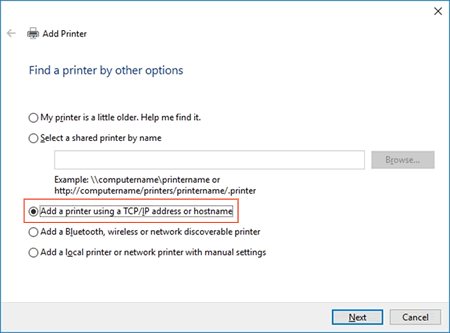
If your printer is not in the list, click the back arrow in the upper left corner of the window two times to return to the Find a printer by other options step, and then continue to the next step.
-
-
Select Add a printer using TCP/IP address or hostname, and then click Next.
Figure : Selecting Add a printer using TCP/IP address or hostname
-
Select Autodetect from the Device type drop-down list.
Figure : Selecting Autodetect

-
Type your printer IP address into the text box, and then click Next.
You can find the IP address by printing either a Wireless Network Test report or a Network Configuration page. For printers with displays, the IP address displays on the printer control panel through the wireless
 icon or button.
 -
Wait for the computer to connect to the printer, and then click Next to install the print driver.
Click here and refer the document to perform the above steps.
Let me know if that helps.
Cheers.
Sandytechy20
I am an HP Employee
06-14-2017 11:28 AM
HP Recommended
Hi,
thank you for the answer.
I installed the printer by the Windows Panel, and it has been corectly installed. But the scan problem hasn't be resolved..when i try to scan using the windows scan, a message appears which tells that the scanner can't be found.
I really think it's a problem related to an incompatibility of the printer with my Windows' version...isn't it?
Thnaks
06-14-2017 12:29 PM
HP Recommended
Thanks for the response.
Need not to worry I will help you to resolve this issue.
Try the below steps to fix this issue.
Check Windows Image Acquisition settings.
-
Search Windows for view local services, and then click the View local services Control panel setting in the list of results.
The Services window opens.
-
Find Windows Image Acquisition (WIA) in the Name column and look at the Status and Startup type values.
-
If the status is 'Started' and the Startup type is 'Automatic', WIA is running correctly. Skip to the next step.
-
If the status is 'Disabled', right-click Windows Image Acquisition (WIA), click Properties, click the General tab, click Start under the Service status, and then select Automatic from the Startup type dropdown menu.
-
-
Try to scan.
Temporarily disable firewall software on the computer.
-
Return to the Print and Scan Doctor, click Network, and then click Troubleshoot Firewalls.
Figure : Troubleshoot Firewalls in the drop-down menu
-
Click the name of any firewall software on your system that has an Enabled status, and then click Disable.
Figure : Example of the Troubleshooting Firewalls window
-
Try to scan.
Click here and refer step 7 and 8 to perform above steps.
Let me know if that helps.
Cheers.
Sandytechy20
I am an HP Employee
06-15-2017 02:57 AM
HP Recommended
Hy Sandytechy!
I was trying to achieve your solutions and when i ran the Print and scan Doctor, I try for the last time to correct the scan problem and i don't know why this time this software find the solution and now the scan function run correctly!
I thank you for your kindness and the time you spent for me!
Ciao!
Be alert for scammers posting fake support phone numbers and/or email addresses on the community.
If you think you have received a fake HP Support message, please report it to us by clicking on "Flag Post".
† The opinions expressed above are the personal opinions of the authors, not of HP. By using this site, you accept the Terms of Use and Rules of Participation.


Didn't find what you were looking for?
Ask the community
† The opinions expressed above are the personal opinions of the authors, not of HP. By using this site, you accept the <a href="https://www8.hp.com/us/en/terms-of-use.html" class="udrlinesmall">Terms of Use</a> and <a href="/t5/custom/page/page-id/hp.rulespage" class="udrlinesmall"> Rules of Participation</a>.