-
×InformationNeed Windows 11 help?Check documents on compatibility, FAQs, upgrade information and available fixes.
Windows 11 Support Center. -
-
×InformationNeed Windows 11 help?Check documents on compatibility, FAQs, upgrade information and available fixes.
Windows 11 Support Center. -
- HP Community
- Printers
- DesignJet, Large Format Printers and Digital Press
- Re: HP Desk Jet 2600 paper feed skewed

Create an account on the HP Community to personalize your profile and ask a question
Your account also allows you to connect with HP support faster, access a personal dashboard to manage all of your devices in one place, view warranty information, case status and more.
Get help with Large Format Printers, with direct access to all Large Format Knowledge Center· Ask anything · Find anything · Share anything at HP LKC

It has been a while since anyone has replied. Simply ask a new question if you would like to start the discussion again.
09-10-2018 01:45 PM
 HP Recommended
Product: HP Desk Jet 2600
I have a HP Desk Jet 2600 which has been working fine but tonight when I went to print something it will not feed the paper properly and seems to be pulling paper in skewed and then comes up paper jam.
I have tried all the things suggested on the help pages but to no avail.
Any advise before I have to get it looked at under my guarantee?
Solved! Go to Solution.
1 ACCEPTED SOLUTION
Accepted Solutions
09-11-2018 04:50 PM
HP Recommended
Thank you for the update,
I appreciate your time and efforts,
I'm glad you found the solution for this concern.
You've been great to work with and it has been a genuine pleasure interacting with you.
I hope both you and your product works great and remain healthy for a long time 😉
To simply say thanks for my efforts to assist you, please click the "Thumbs Up" button to give me a Kudos.
And select Accepted as solution to help others find the same solution as you have.
Take care now and do have a fabulous week ahead. 🙂
Barachiel
I am an HP Employee
3 REPLIES 3
09-11-2018 03:30 PM
HP Recommended
Welcome to HP Forums,
This is a great place to get support, find answers and tips,
Thank you for posting your query, I'll be more than glad to help you out 🙂
Step 1: Look for jammed paper
Paper jams can occur in multiple areas of the printer. If you cannot find the paper jam in one area, continue to the next area until the jam is located.
You need a flashlight to complete some of these steps.
caution:
Remove all paper or objects from the input tray before removing paper or objects from any other areas of the printer. Damage to the printer can occur if the input tray is not cleared first.
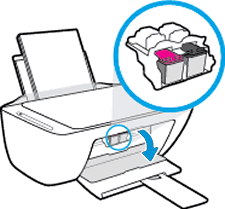
Step 2: Make sure the carriage can move freely
Make sure the carriage moves freely across the width of the printer.
-
Turn on the printer.
-
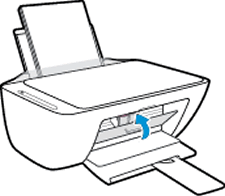
Open the ink cartridge access door.
The carriage moves to the center of the printer.
-
Wait until the carriage is idle and silent before you continue.
-
With the printer turned on, disconnect the power cord from the rear of the printer.
-
Unplug the power cord from the power source or electrical outlet.
warning:
You must unplug the power cord to move the carriage by hand and reset the paper feed mechanism without the risk of electrical shock.
-
Use a flashlight to check for any paper or objects that might be restricting the carriage, and then remove any paper or objects that you find.
caution:
If the paper tears when you remove it from the rollers, check the rollers and wheels for torn pieces of paper that might remain inside the printer. If pieces of paper remain in the printer, more paper jams can occur.
-
Reach inside the printer through the ink cartridge access door, and then manually move the carriage.
-
If the carriage is stuck on the right side of the printer, move the carriage to the left side of the printer.
-
If the carriage is stuck on the left side of the printer, move the carriage to the right side of the printer.
-
If the carriage is stuck in the middle of the printer, move the carriage to the right side of the printer.
-
-
Remove any loose paper or obstructions you find.
-
Make sure the carriage can move freely across the width of the printer. Firmly push the carriage to the left side of the printer, and then to the right side.
-
Close the ink cartridge access door.
-
Plug the power cord back into the power source or electrical outlet.
-
Reconnect the power cord to the rear of the printer, and then turn on the printer.
Try to print. If the error persists, continue to the next step.
Step 3: Use an automated tool to clean the paper rollers
Clean the printer's paper rollers with an automated tool.
-
Turn on the printer.
-
Remove any paper from the input tray.
-
Press and hold the Power button, press the Cancel button
 three times, press the Start Copy Color button
  seven times, and then release the Power button.
The printer makes some noise for approximately one minute. Wait until the printer stops making noises before you proceed.
Try to print. If the error persists, continue to the next step.
Step 4: Use an automated tool to clean ink smears
Cleaning ink smears can help clear paper jams and optimize print quality.
-
Turn on the printer.
-
Load paper into the input tray.
-
Press and hold the Power button, press the Cancel button
three times, press the Start Copy Color button eight times, and then release the Power button.The printer feeds one page slowly. The printer might make some noise for approximately one minute. Wait until the page is out of the printer before you remove it.
Try to print. If the error persists, continue to the next step.
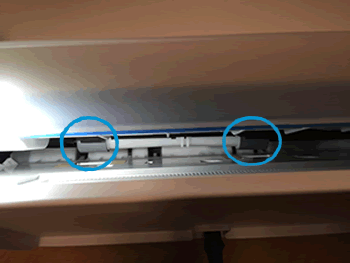
Step 5: Manually clean the paper rollers inside the printer
Dust, paper fiber, and other debris might accumulate on the paper feed rollers and cause paper jams and paper feed issues. Clean the rollers inside the printer, and then try to print again.
-
Turn off the printer, and then disconnect the power cord and any other cables.
warning:
You must unplug the power cord to move the carriage by hand and reset the paper feed mechanism without the risk of electrical shock.
-
Raise the input tray.

-
Lift and hold the input tray shield.
-
Look down through the open input tray and find the gray paper pick rollers. You might need a flashlight to illuminate the area.
-
Lightly dampen a cotton swab with water, and then squeeze any excess liquid from the swab.
-
Press the swab against the rollers, and then rotate them upward with your fingers. Apply a moderate amount of pressure to remove dust or dirt buildup.
-
Lower the input tray shield.
-
Allow the rollers to dry completely (approximately 10 minutes).
-
Reconnect the power cord and any other cables, and then turn on the printer.
Try to print. If the error persists, continue to the next step.
Step 6: Reset the printer
Sometimes a paper jam error persists even though there is no jammed paper (false paper jam). Reset the printer, which might clear a false paper jam error, and then try to print again.
-
Turn the printer on, if it is not already on.
-
Wait until the printer is idle and silent before you continue.
-
With the printer turned on, disconnect the power cord from the rear of the printer.
-
Unplug the power cord from the wall outlet.
-
Wait at least 60 seconds.
-
Plug the power cord back into the wall outlet.
note:
HP recommends connecting the printer power cord directly to the wall outlet.
-
Reconnect the power cord to the rear of the printer.
-
Turn on the printer, if it does not automatically turn on.
-
Wait until the printer is idle and silent before you proceed.
Try to print.
You may also follow this link for further assistance.
Let me know how that pans out,
I hope you have a good day ahead,
And Feel free to ask any other queries as well,
Considering, this forum has some of the best people in the world available and ready to help. 🙂
Barachiel
I am an HP Employee
09-11-2018 04:25 PM
HP Recommended
Ah thank you. I tried all that last night but unfortunately none of it helped but I called up this morning and spoke to a lovely helpful gentleman who has arranged for a replacement printer to be sent out to me.
09-11-2018 04:50 PM
HP Recommended
Thank you for the update,
I appreciate your time and efforts,
I'm glad you found the solution for this concern.
You've been great to work with and it has been a genuine pleasure interacting with you.
I hope both you and your product works great and remain healthy for a long time 😉
To simply say thanks for my efforts to assist you, please click the "Thumbs Up" button to give me a Kudos.
And select Accepted as solution to help others find the same solution as you have.
Take care now and do have a fabulous week ahead. 🙂
Barachiel
I am an HP Employee
Be alert for scammers posting fake support phone numbers and/or email addresses on the community.
If you think you have received a fake HP Support message, please report it to us by clicking on "Flag Post".
† The opinions expressed above are the personal opinions of the authors, not of HP. By using this site, you accept the Terms of Use and Rules of Participation.


Didn't find what you were looking for?
Ask the community
† The opinions expressed above are the personal opinions of the authors, not of HP. By using this site, you accept the <a href="https://www8.hp.com/us/en/terms-of-use.html" class="udrlinesmall">Terms of Use</a> and <a href="/t5/custom/page/page-id/hp.rulespage" class="udrlinesmall"> Rules of Participation</a>.