• ×
    Information
    Need Windows 11 help?
    Check documents on compatibility, FAQs, upgrade information and available fixes.
    Windows 11 Support Center.
  • post a message
  • ×
    Information
    Need Windows 11 help?
    Check documents on compatibility, FAQs, upgrade information and available fixes.
    Windows 11 Support Center.
  • post a message
Guidelines
Join the HP Community Solve‑a‑thon | Help Others & Share Your Solutions | Live on Zoom | 2:30 PM to 2:30 AM IST | Every Wednesday Click here to know more
Check some of the most frequent questions about Instant Ink: HP INSTANT INK, HP+ PLANS: INK AND TONER.


Check out our Black or Color Ink Not Printing, Other Print Quality Issues info about: Print quality and Cartridge Issues.
HP Recommended
Officejet Pro 8610
Microsoft Windows XP (64-bit)

Just change my blue and yellow cartridges and keeps saying "The indicated cartridges are not intended for use in this printer" im using the 951 models

1 REPLY 1
HP Recommended

@Yayito01


Welcome to HP support community.


Clean the ink cartridge contacts

  1. Find a clean, lint-free cloth (eyeglass wipes or coffee filters work well) that you can use to clean the ink cartridge contacts.

  2. Press the Power button to turn on the printer, if it is not already on.

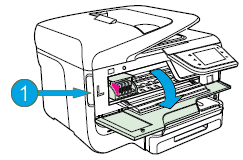
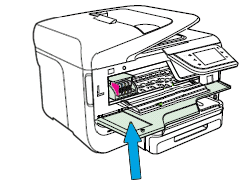
  3. Place your fingers into the slot on the left side of the printer, and then pull to open the ink cartridge access door. The carriage moves to the left side of the printer. Wait until the carriage is idle and silent before you proceed.

    Figure : Open the ink cartridge access door

    1.  

      Open the ink cartridge access door.

      Slot for opening the ink cartridge access door
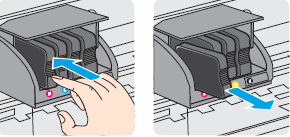
  4. Push in on the front of the problem ink cartridge to release it, and then pull the ink cartridge toward you to remove it from its slot.

    Figure : Remove the problem ink cartridge from its slot

    Remove the ink cartridge from its slot.
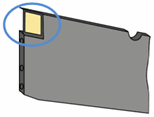
  5. With a clean, lint-free cloth (eyeglass wipes or coffee filters work well), wipe the copper-colored contact on the ink cartridge.

    Figure : Copper-colored contact on the ink cartridge

    Copper-colored contact on the ink cartridge.
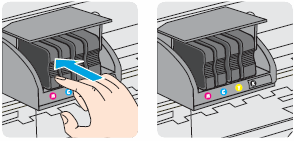
  6. Carefully reinsert the ink cartridge into its slot, and then push the ink cartridge forward until it clicks into place.

    NOTE: 

    Make sure that the colored dot on the ink cartridge label matches the colored dot on the carriage slot.

    Figure : Insert the ink cartridge into its color-coded slot

    Insert the ink cartridge into its color-coded slot.
  7. Repeat these steps for the other ink cartridges, if necessary.

  8. Close the ink cartridge access door.

    Figure : Close the ink cartridge access door

    Close the ink cartridge access door.

You can refer this HP document for more assistance:- Click here


Let me know how it goes.

To thank me for my efforts to help you, please mark my post as an accepted solution so that it benefits several others.

Cheers.

Sandytechy20
I am an HP Employee

† The opinions expressed above are the personal opinions of the authors, not of HP. By using this site, you accept the <a href="https://www8.hp.com/us/en/terms-of-use.html" class="udrlinesmall">Terms of Use</a> and <a href="/t5/custom/page/page-id/hp.rulespage" class="udrlinesmall"> Rules of Participation</a>.