-
×InformationNeed Windows 11 help?Check documents on compatibility, FAQs, upgrade information and available fixes.
Windows 11 Support Center. -
-
×InformationNeed Windows 11 help?Check documents on compatibility, FAQs, upgrade information and available fixes.
Windows 11 Support Center. -
- HP Community
- Printers
- LaserJet Printing
- Photosmart Install Error: HPZSETUP.EXE Missing

Create an account on the HP Community to personalize your profile and ask a question
Your account also allows you to connect with HP support faster, access a personal dashboard to manage all of your devices in one place, view warranty information, case status and more.

It has been a while since anyone has replied. Simply ask a new question if you would like to start the discussion again.
09-11-2013 06:42 AM
 HP Recommended
Hi josemarteld,
Follow the steps below to update the software to the latest version.
Step one: Clear temp directory
1. Type %temp% in the run or search for programs and files field
2. Highlight all the files in this folder, and then press the delete key to delete. If you get a message that the file is in use you will need to skip this file(s).
3. Turn computer off, and then restart it.
4. Open Add/Remove programs in Control Panel to make sure there is no listing for the printer.
5. Delete any previously downloaded software
6. Continue with Step 2 below
Step two: Downloaded and extracted to your system:
1. Download the full feature software and drivers
2. Once the download is finished double click on the file to extract the software.
3. When the installation window opens press the cancel button to stop the installation
4. Type %temp% in the run or search for programs and files field
5. Look for, and open the folder starting with 7z (Example: 7zS2356)
6. Right click on the folder, and select Copy
7. Close that window, and all your open windows, and then in the middle of the desktop right click your mouse, and select Paste. This will move the 7z folder to your desktop.
8. Open the 7z folder you just copied to your desktop
9. Open folder Util
10. Open folder CCC
11. Run the uninstall_L4
12. When the uninstall has completed restart the computer
13. Run Disk cleanup from Accessories\ System Tools folder under all programs
14. Download and install the latest version of Adobe flash player
http://www.adobe.com/support/flashplayer/downloads.html
15. Open the 7z folder, and then double click on the Setup.exe file which will be toward the bottom of the open window. Follow the on screen instructions to reinstall your printer.
Let me know what you find out?
I am an HP employee.
Say Thanks by clicking the Kudos Star in the post that helped you.
Please mark the post that solves your problem as "Accepted Solution"
Say Thanks by clicking the Kudos Star in the post that helped you.
Please mark the post that solves your problem as "Accepted Solution"
09-12-2013 06:37 AM
HP Recommended
Hi josemarteld,
Follow the steps below, and let me know if you experience the same issue on new admin account.
Windows 7 and Windows Vista allows you to have multiple users sharing the same computer under their own individual accounts. This allows each individual user to have their own location on the computer where they can store their personal documents, pictures, videos, saved games, and other personal data. This also allows the owner of the computer to assign certain accounts the ability to perform administrative tasks like installing software, while limiting other user's abilities.
This tutorial will walk you through creating a new account in Windows 7 and Windows Vista.
- Click on the Start button. This is the small round button in the lower left corner of your screen that has a Windows flag on it.
- Click on the Control Panel menu option.
- When the control panel opens you will see a screen similar to Figure 1 below.
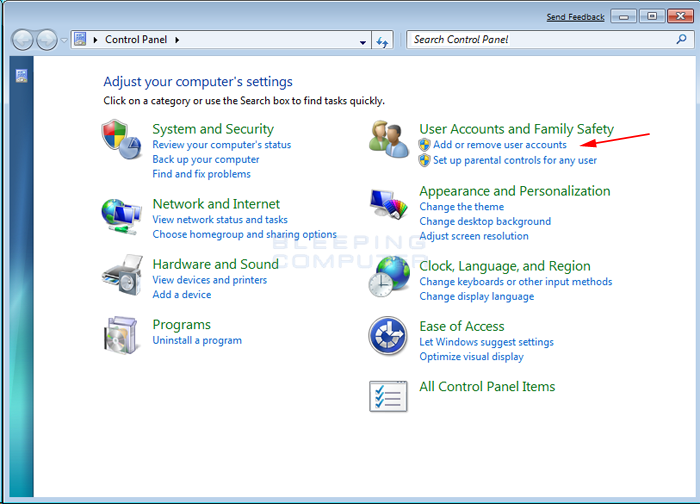 Figure 1. Windows 7 Control Panel
- Click on the Add or remove user accounts control panel option as shown by the red arrow in figure 1.
- You will now be in the Manage Accounts control panel as shown in Figure 2 below.
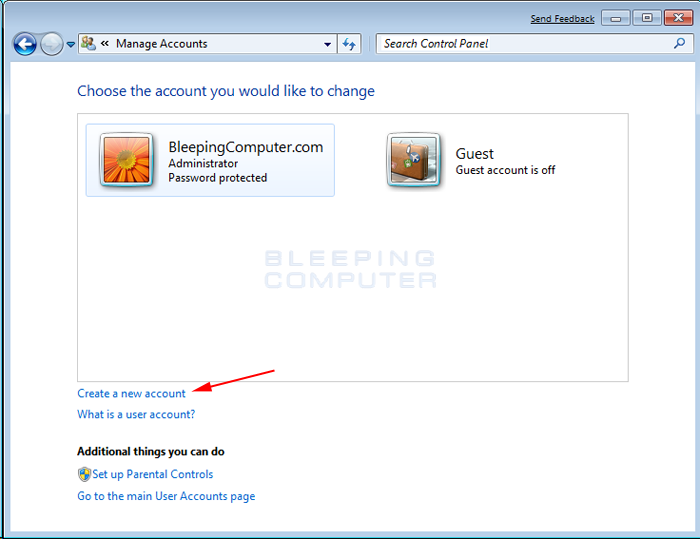 Figure 2. Manage Accounts screen in Windows 7
This screen shows all the accounts currently on your computer. To create a new account, click on the Create a new account option as shown by the red arrow above.
- You will now be at the Create New Account screen.
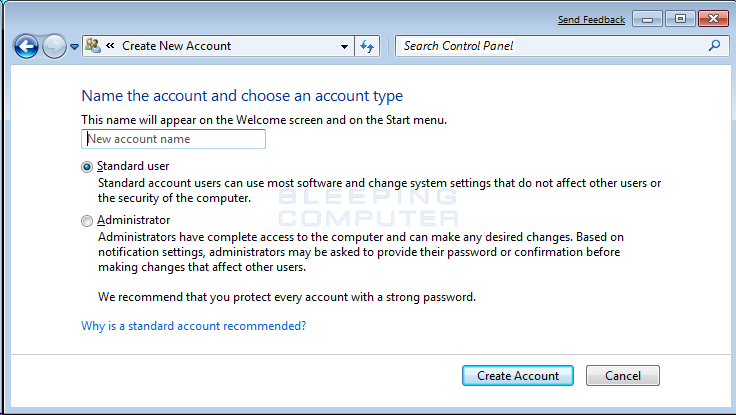 Figure 3. Create New Account screen
In the New account name field enter the name of the new account that you would like to create. This could be a person's first name, full name, or whatever other designation you would like to give. You then need to decide which of the two types of accounts you would like to create. An Administrator account has full access to the computer and can make all changes, install software, and create and delete accounts. The other type of account is Standard user and has limited privileges as to what settings and changes it can make to the computer. It is suggested that for all users, you set them as a Standard User account and have one administrator account that you can logon to as needed. This will protect your computer from malware and other harmful activities.
When you have finished selecting a name and the type of account you wish to setup, you should click on the Create Accountbutton.
- Your new account will have been created and you will see it listed in the Manage Accounts screen.
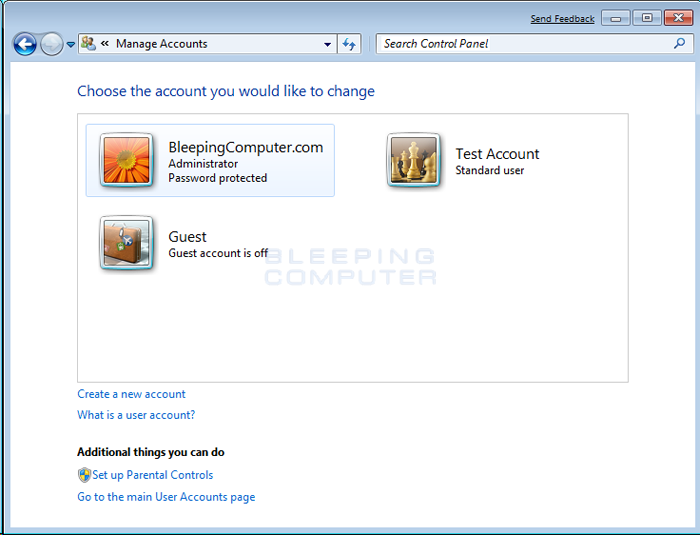 Figure 4. New user has been created
As you can see our new user, named Test Account, has been created. Now when you start Windows 7 or Vista, you will see the additional account listed in the logon screen. That user can then select their login name and login into their profile so they can access their private data.
Install the printer on the newly created user account, and let me know if you experience the same issues?
I am an HP employee.
Say Thanks by clicking the Kudos Star in the post that helped you.
Please mark the post that solves your problem as "Accepted Solution"
Say Thanks by clicking the Kudos Star in the post that helped you.
Please mark the post that solves your problem as "Accepted Solution"
01-26-2015 06:02 AM
HP Recommended
Provost, Is there a way we can contact you directly because I keep having the same problem. I can not get my j5780 to install correctly. I can download and extract but when I click setup or Zsetup, nothing happens.
06-07-2015 11:27 AM
HP Recommended
I have a C6280 with Windows 7 Home Premium. I was having problems with my printer and tried unistalling and reinstalling the software. The reinstallation failed every time in different ways. I called HP support and they took remote control of my machine. They couldn't make it work and finally threw up their hands and said "my machine was obsolete and no longer supported." Then I found this post. It worked like a charm. Thanks very much!!
- « Previous
- Next »
Be alert for scammers posting fake support phone numbers and/or email addresses on the community.
If you think you have received a fake HP Support message, please report it to us by clicking on "Flag Post".
† The opinions expressed above are the personal opinions of the authors, not of HP. By using this site, you accept the Terms of Use and Rules of Participation.


Didn't find what you were looking for?
Ask the community
† The opinions expressed above are the personal opinions of the authors, not of HP. By using this site, you accept the <a href="https://www8.hp.com/us/en/terms-of-use.html" class="udrlinesmall">Terms of Use</a> and <a href="/t5/custom/page/page-id/hp.rulespage" class="udrlinesmall"> Rules of Participation</a>.