-
×InformationNeed Windows 11 help?Check documents on compatibility, FAQs, upgrade information and available fixes.
Windows 11 Support Center. -
-
×InformationNeed Windows 11 help?Check documents on compatibility, FAQs, upgrade information and available fixes.
Windows 11 Support Center. -
- HP Community
- Printers
- Mobile Printing & Cloud Printing
- DNS Gateway error

Create an account on the HP Community to personalize your profile and ask a question
Your account also allows you to connect with HP support faster, access a personal dashboard to manage all of your devices in one place, view warranty information, case status and more.
Check some of the most frequent questions about Instant Ink: HP INSTANT INK, HP+ PLANS: INK AND TONER.
Check out our WINDOWS 11 Support Center info about: OPTIMIZATION, KNOWN ISSUES, FAQs AND MORE.

It has been a while since anyone has replied. Simply ask a new question if you would like to start the discussion again.
07-21-2018 04:46 AM
 HP Recommended
Product: ENVY 5640
Operating System: Microsoft Windows 10 (64-bit)
I have been getting the DNS Gateway error for a while and now the printer has been disconnected from Web Services and can no longer print anything - I have tried running setup again but to no avail. I have run the HP Print and Scan Doctor but this hasnt helped
Can someone assist
11 REPLIES 11
07-22-2018 02:49 PM
HP Recommended
Welcome to HP Forums,
This is a great place to get support, find answers and tips,
Thank you for posting your query, I'll be more than glad to help you out 🙂
As I understand, your printer is giving an error message "DNS Gateway error message"
Don't worry as I'll be glad to help, however, to provide an accurate resolution, I need a few more details:
When was the last time it worked fine?
Were there any hardware/software changes made?
Have you tried reconnecting the printer network? to
Let's try these steps to resolve the issue:
Restore network defaults:
1. From the printer control panel, touch Setup and then touch Network Setup.
2. Touch Restore network defaults
Once completed, reconnect the printer to network:
-
Press the Power button to turn on the printer, if it is not already turned on.
-
On the printer control panel, touch the Wireless icon (
 ). The Wireless Summary screen displays.
 -
Touch the Settings icon (
 ), and then touch Wireless Settings.
 -
Touch Wireless Setup Wizard, and then follow the instructions on the control panel to connect the printer to your wireless network.
Also, enable web services
To set up Web Services using the printer control panel
1. From the printer control panel display, touch Setup.
2. Touch Web Services Setup.
3. Touch Accept to accept the Web Services terms of use and enable Web Services.
Let me know how this goes,
Cheers 🙂
07-22-2018 03:22 PM
HP Recommended
Many thanks for your response
it last worked a few days ago there has been no hardware changes and I have tried many times unsuccessfully to reconnect to web services
i have followed all your instructions and I have had the following two errors
DNS/Gateway Problem - The printer could not connect to the server. Contact your administrator or the person who set up the printer
Set Up Unsuccessful- Web Services could not be set up. Note: HP Instant Ink will not work properly u less Web Services is set up
Your assistance is much appreciated
07-23-2018 01:32 PM
HP Recommended
Thanks for keeping us posted
It looks like you were interacting with Flower_Bud, but she is out for the day. I'm KrazyToad & I'm at your service.
I suggest we attempt a Semi-Full Reset and this should take care of it
Since these are crucial steps, I'm sending the instructions in a Private Message
Please check your private message icon on the upper right corner of your HP Forums profile.
Next to your profile Name, you should see a little blue envelope
Thank you and have a Great day 😀
If the information I've provided was helpful, give us some reinforcement by clicking the "Solution Accepted" and this will also help other community members with similar issue.
KrazyToad
I Am An HP Employee
07-24-2018 03:27 PM
HP Recommended
It looks like you've already discussed this with @KrazyToad & @Flower_Bud, since they are both out, I, the Riddle_Decipher am at your service (Like a Genie without magic powers) 😉
I reviewed your concern and the entire conversation, did some research and here's what I recommend:
- On the printer click on the wireless icon that looks like a radio tower.
- Note the IP Address.
- In your browser's address bar type in the IP Address as it appears on the printer.
- Click on the Network tab along the top.
- Click on Networking on the left.
- On the right side you should see an option to select Manual IP Address.
- Enter the IP Address in the boxes as it appears on the printer. For example, if the IP Address on the printer is 192.168.1.5 then enter 192 168 1 5 in the boxes.
- In the Subnet Mask enter 255 255 255 0.
- In the Default Gateway enter the first three parts of the IP Address. The fourth part will be 1. Using the above example you would enter 192 168 1 1.
- Below that select Manual DNS Settings.
- In the first row of boxes enter 8 8 8 8.
- In the second row of boxes enter 8 8 4 4.
- Click on Apply.
- Click on Network Protocols on the left.
- On the right side click on Enable IPv4 only.
- Click on Apply.
- Turn the printer off and on again and enable Web Services.
Please let me know if this allows you to enable web services or if you have any other questions. Otherwise, have a great weekend!
(We shall troubleshoot as a team, fight till the end and emerge victorious)
If you would like to thank us for our efforts to help you,
feel free to give us a virtual high-five by clicking the 'Thumbs Up' icon below,
Followed by clicking on the "Accept as solution" button.
Have a great day!
Riddle_Decipher
I am an HP Employee
Learning is a journey, not a destination.
Let's keep asking questions and growing together.
07-25-2018 02:29 PM
HP Recommended
Thank you for responding,
This is the Riddle_Decipher, again!
It's great to have you back 😉
I have a few more steps, and this time we should hit the nail on its head:
Update the printer firmware for printers connected to a computer with Windows.
-
Make sure the printer is on and connected to the computer, either through your local network or a USB cable.
-
If a Let's identify your product to get started page displays, click Printer, type your printer model number, and then click Submit.
The software results page for your printer displays with the default operating system selected.
-
If you need to change the version of Windows, click Change, select your version, and then click Change.
-
Click Firmware, and then click Download.
If a Firmware section is not listed, an update is not currently available for your printer.
-
Save the file to your computer.
-
Locate and then open the file to start the installation process.
-
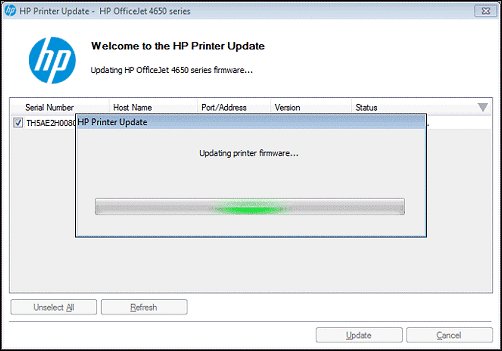
When the HP Printer Update window opens, see if the printer serial number displays.
-
If the serial number displays, select the checkbox next to it, and then click Update.
-
If the serial number displays but the status is 'not applicable' (grayed out), you do not need to complete the firmware update. Click Cancel.
-
If the serial number does not display and your printer uses a network connection, connect a USB cable to the printer and computer, wait 20 seconds, and then click Refresh. When the serial number displays, select the checkbox next to it, and then click Update.
-
-
When the update completes, click OK.
-
If you connected a USB cable to update your network printer, remove the USB driver installed by Windows.
-
Search Windows for Devices and Printers, and then click Devices and Printers in the list of results.
-
Right-click the USB printer device that matches your printer model, and then select Remove Device.
-
Disconnect the USB cable from the printer and the computer, and then restart the computer.
-
For networks that use proxy servers, update the Web Services settings in the printer EWS with the proxy information.
-
Locate the Internet proxy settings.
-
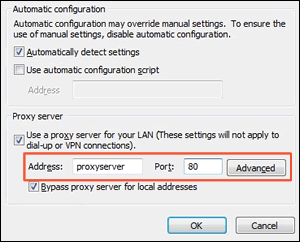
Windows: Search Windows for Internet, and then click Internet Options in the list of results. On the Internet Properties window, click the Connections tab, select your network, if necessary, and then click Settings.
The network settings menu displays with the proxy settings.
Figure : Example of proxy settings in Windows
-
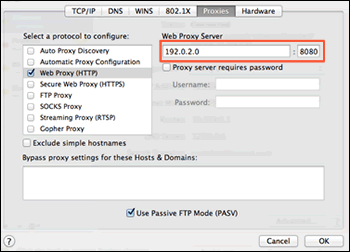
Mac: Open System Preferences, and then click Network. On the Network window, click Advanced, click the Proxies tab, and then select your proxy, if necessary.
Figure : Example of proxy settings in Mac
-
-
Write down the Address and Port values for your proxy server connection.
-
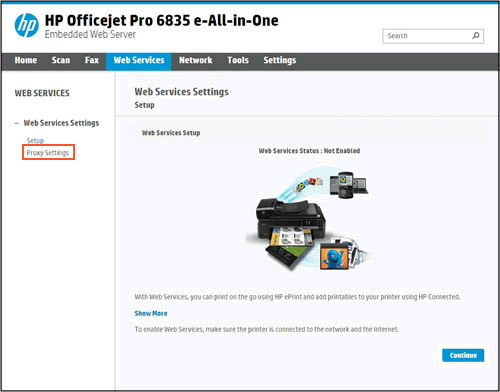
From the EWS, click the Web Services tab, and then click Proxy Settings.
Figure : Clicking Proxy Settings
-
Type the Address and Port values for your proxy server connection, and then click Apply.
-
Try to turn on Web Services.
If the issue persists, continue to the next step.
FOR DETAILS & FURTHER INSTRUCTIONS, USE THIS LINK: CLICK HERE & SKIP TO STEP 7
(By the end of this article all the issues should be resolved)
Keep us posted,
If you would like to thank us for our efforts to help you,
feel free to give us a virtual high-five by clicking the 'Thumbs Up' icon below,
Followed by clicking on the "Accept as solution" button.
Have a great day!
Riddle_Decipher
I am an HP Employee
Learning is a journey, not a destination.
Let's keep asking questions and growing together.
07-26-2018 10:42 AM
HP Recommended
Thanks for trying possible steps,
I will send you a private message to assist you with the next course of action. Please check your forum private message box next to the bell notification icon on the upper right-hand corner for a private message from me for further assistance.
Be alert for scammers posting fake support phone numbers and/or email addresses on the community.
If you think you have received a fake HP Support message, please report it to us by clicking on "Flag Post".
† The opinions expressed above are the personal opinions of the authors, not of HP. By using this site, you accept the Terms of Use and Rules of Participation.


Didn't find what you were looking for?
Ask the community
† The opinions expressed above are the personal opinions of the authors, not of HP. By using this site, you accept the <a href="https://www8.hp.com/us/en/terms-of-use.html" class="udrlinesmall">Terms of Use</a> and <a href="/t5/custom/page/page-id/hp.rulespage" class="udrlinesmall"> Rules of Participation</a>.