-
×InformationNeed Windows 11 help?Check documents on compatibility, FAQs, upgrade information and available fixes.
Windows 11 Support Center. -
-
×InformationNeed Windows 11 help?Check documents on compatibility, FAQs, upgrade information and available fixes.
Windows 11 Support Center. -
- HP Community
- Printers
- Mobile Printing & Cloud Printing
- ERROR CODE 0X011A17FF DOT11_PRIVATE

Create an account on the HP Community to personalize your profile and ask a question
09-26-2019 03:54 AM
ERROR CODE 0X011A17FF DOT11_PRIVATE. ALl the forums say to remove ink cartridge but the ink cartridge is stuck to the left and DOESN't MOVE when the code is present!
09-28-2019 12:49 PM
Welcome to HP support community.
Perform a power reset
- Turn on the printer, if it is not already on.
- Wait until the printer is idle and silent before you continue.
- With the printer turned on, disconnect the power cord from the rear of the printer.
- Wait at least 30 seconds.
- Plug back the power cable straight to a wall outlet without any surge protector and printer.
- Turn on the printer.
Clear any jammed paper from the ink cartridge access area
-
On the printer control panel, press OK on the paper jam screen.
The printer tries to clear the jam automatically.
If the paper jam error persists, continue these steps to manually clear the jam.
-
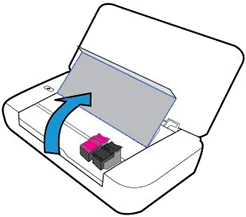
Open the ink cartridge access door.
Figure : Opening the ink cartridge access door

-
Wait until the carriage is idle and silent before you continue.
-
Disconnect any cords connected to the printer, such as the power cord and USB cable.
WARNING:
To avoid the risk of electrical shock, disconnect any cords from the printer before reaching inside.
-
If installed, remove the battery.
-
Remove the battery cover. Push the battery cover tab to the right, and then pull the cover toward you.
Figure : Removing the battery cover

-
Push up on the battery latch, and then slide the battery out of its slot.
Figure : Removing the battery

-
-
Use a flashlight to check for any paper or objects that might be restricting the carriage, and then remove any paper or objects that you find.
CAUTION:
If pieces of paper remain in the printer, more paper jams can occur.
Figure : Example of torn or crumpled paper in ink cartridge access area

-
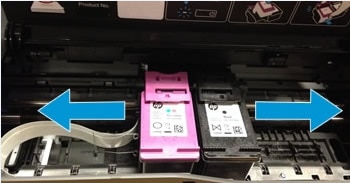
Firmly push the carriage to the left side of the printer, and then push it to the right side.
Figure : Moving the carriage from side to side

-
Remove any loose paper or obstructions found.
-
Reconnect the power cord to the printer, and then install the battery, if necessary.
-
Turn on the printer.
You can refer this HP support community for more assistance:-Click here
I hope that helps.
To thank me for my efforts to help you, please mark my post as an accepted solution so that it benefits several others.
Cheers.
Sandytechy20
I am an HP Employee
