-
×InformationNeed Windows 11 help?Check documents on compatibility, FAQs, upgrade information and available fixes.
Windows 11 Support Center. -
-
×InformationNeed Windows 11 help?Check documents on compatibility, FAQs, upgrade information and available fixes.
Windows 11 Support Center. -
- HP Community
- Printers
- Mobile Printing & Cloud Printing
- HP ENVY 4520 MOBILE NOT SHOWING UP

Create an account on the HP Community to personalize your profile and ask a question
07-31-2020 10:11 AM
Let me start off by saying, first off, I would like to request yoy update the "Operating System" options. We are on Android 10/One UI v2.1
Now to my issue:
I have a Nighthawk R6400.
I have a HP ENVY 4520.
I have no computer, just my android phone (note 10+) and a chromebook.
Every time I try to set this printer up (as of late) it says it's connected to the router on the printer..... And when I go to the router page, it says it's connected to the printer. So both say we are good to go!
Go to print? Nothing. No printer shows up.
Both show the correct ip addresses also and everything is on the same wifi networks.
The only work around I have figured out is:
-to go into the router, assign a static ip address to the printer
-reboot router
-factory default reset on the printer
-reconnect to the router
Then it will show up immediately to use, but then after some time of no use of the printer goes by..... The same thing happens. It's not able to be used and the process has to start all over.
Please help me figure this out!!! I shouldn't have to have work around on a printer that's only a year or so old! 😭😭😭😭😭❤️❤️❤️❤️❤️
08-03-2020 03:56 AM
Hi @Drkstarinthesky,
I read your post and understand that the printer you're unable to print even though the printer is online.
Try printing using Print service plugin-
Step 1: Install the HP Print Service Plugin
Install the HP Print Service Plugin on your Android OS 5.0 or later, and then turn on the plugin.
NOTE:Menus, icons, and the location of the print settings vary by Android version and device manufacturer.
-
Confirm your Android device is connected to the same network as your printer, or that Wi-Fi Direct on your printer and Android device is enabled.
-
On your Android device, install or update the HP Print Service Plugin (in English).
-
Once the installation or update is complete, choose your Android device to turn on the plugin:
-
Android 7 (Nougat) and later devices: The HP Print Service Plugin turns on automatically after installation. Continue with these steps.
-
Android 6 (Marshmallow) and earlier devices: Tap Settings, search for and open HP Print Service, and then tap On.
-
-
Turn off any other print service plugins, if necessary.
Your Android device is now ready to print using the HP Print Service Plugin.
Step 2: Print with the HP Print Service Plugin
Print photos, documents, emails, or webpages from Android apps that provide a Print option on their menu.
-
Open the item you want to print, tap the menu icon
 , and then tap Print.
A print preview screen displays.
-
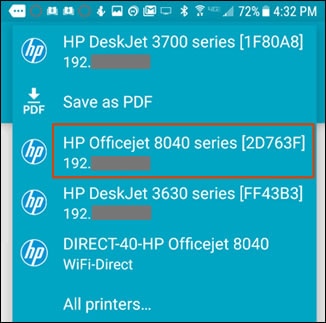
Tap the down arrow
 to view the printer list, and then select HP [your printer model name] to print over the network, or DIRECT-xx-HP [your printer model name] to print with Wi-Fi Direct.
-
Tap the down arrow
 to change any print settings, and then tap the Print
  icon.
icon.
To print from Chromebook-
Step 1: Print from the Chromebook
Print photos, documents, webpages, and emails through the Chrome browser and supported apps.
-
Open the item you want to print.
-
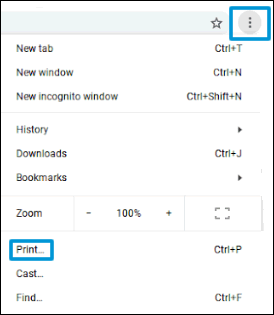
Click the Chrome browser settings icon
 , and then select Print.
-
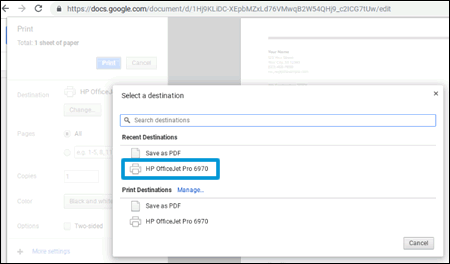
Next to Destination, click Change, and then select your printer.
If your printer is not listed, skip to the next step to add the printer manually.

-
Change any print settings, and then click Print.
Step 2: Add the printer to the Chromebook
Connect the printer to your Chromebook with a wireless or USB cable connection to complete the setup. No drivers or apps are required to set up your printer.
-
Update the Chromebook to the most current version of Chrome OS.
-
Make sure the printer is turned on, ink cartridges are installed, and plain paper is loaded in the main tray.
-
Connect the printer USB cable to the Chromebook, or for wireless printing, place the printer close to the Chromebook and within range of the Wi-Fi router, and then do the following to connect the printer to the local Wi-Fi network.
-
Printers with a touchscreen control panel: On the printer, select the Setup, Network, or Wireless menu, select Wireless Setup Wizard, and then follow the instructions to connect the printer to your network.
NOTE:
If you need your network name (SSID) and password, go to Find Your Wireless Password.
-
Printers without a touchscreen control panel: Press and hold the Wireless
 button for five seconds. For Tango printers, press and hold the Wireless button and the Power button on the rear of the printer for five seconds. Within two minutes, press and hold the WPS button (Wi-Fi Protected Setup) on the router until the connection process begins. The Wireless light or blue bar on the printer stops flashing when the connection completes.
-
-
On the Chromebook, click the clock in the bottom right corner, and then click the Settings icon
 .
. -
Scroll to the bottom of the screen and click Advanced.
-
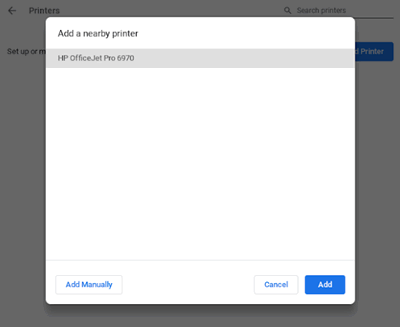
Scroll to the Printing section, click Printers, and then click Add Printer.
-
If your printer displays, click it, and then click Add.
-
If your printer does not display, click Add Manually, and then follow the instructions to add the printer. Go to Chromebook Help - Set up your printer (in English) for more information.

-
HP Print for Chrome app: Supports printing through the Chrome browser to USB and network-connected printers. Go to Printing with the HP Print for Chrome App for more information.
Also,
To set a manual IP and try the steps below:
--->Touch on the wifi icon ((i)) on the printer, and take down the IP address
--->Open a web browser (ex Chrome or Mozilla) and type in the printer's IP
--->then go to network ---> general ---> network protocols ---> select IPV4 only-->apply
--->go to wireless ---> wireless 802.11---> select manual ip ---> apply
--->Enter 8.8.8.8 for the first DNS and 8.8.4.4 for the second DNS.
--->then go to settings on the main ews page --> power management ---> select sleep mode to max 15min
Hope this helps! Keep me posted.
And, Welcome to the HP Support Community.
Please click “Accept as Solution” if you feel my post solved your issue, it will help others find the solution.
Click the “Kudos, Thumbs Up" on the bottom right to say “Thanks” for helping
