• ×
    Information
    Need Windows 11 help?
    Check documents on compatibility, FAQs, upgrade information and available fixes.
    Windows 11 Support Center.
  • post a message
  • ×
    Information
    Need Windows 11 help?
    Check documents on compatibility, FAQs, upgrade information and available fixes.
    Windows 11 Support Center.
  • post a message
Guidelines
We have new content about printers, Click here to check it out!
Check some of the most frequent questions about Instant Ink: HP INSTANT INK, HP+ PLANS: INK AND TONER.


Check out our WINDOWS 11 Support Center info about: OPTIMIZATION, KNOWN ISSUES, FAQs AND MORE.
HP Recommended
HP desk jet 2540 printer

Have connected my new BT Internet hub and have changed all wifi passwords on Tv, phones, and iPads. Now printer won't print and have tried everything. Turned browser, iPad and printer off 3 times but still won't find the printer on my iPad.

can you help?

i don't know what the printer password is.

chris

1 REPLY 1
HP Recommended

@Chris2395


Thank you for joining HP Forums. 
This is a great place to get support, find answers to your technical queries.


I understand that after connecting the new hub the printer is not printing.


HP printer does not support 5ghz make sure the printer is connected to 2.4ghz to communicate with the router.


Let's restore network settings to default settings.


Press the Wireless button and the Cancel button from the printer control panel at the same time, and then hold them for 5 seconds.


Then, I recommend you delete the driver at the root level and retry, follow the steps below:


1.) In Windows, search for and open Programs and features 
2.) Select your HP Printer 
3.) Select Uninstall 
4.) In Windows, search for and open Devices and printers 
5.) In the Devices and Printers windows look for your HP printer. If you see it listed right-click on it and choose `Delete' or `Remove Device' 
6.) Open up the run command with the "Windows key + R" key combo. 
7.) Type printui.exe /s and click Ok. (Note: there is a space in between "printui.exe" and "/s") 
8.) Click on the "Drivers" tab 
9.) Look for HP Printer driver. If you see it Click on it and click Remove at the bottom 
10.) Select Ok
11.) Select Apply and Ok on the Print Server Properties windows 
12.) Close Devices and Printers


Follow the below steps to connect the printer.


Step 1: Set up and turn on the printer

The printer must be powered on with paper loaded and ink cartridges installed before setting up the wireless connection.

Skip this step if your printer hardware has already been set up.

  1. If you are setting up a new printer from the box, remove all protective tape and packaging material from the outside and inside of the printer.

  2. Place the printer on a flat, level surface, connect the power cord to the rear of the printer and to an electrical outlet, then turn on the printer.

  3. Open the paper input tray, load a stack of 10 to 20 sheets of paper, then slide the paper guides inward until they rest against the edges of the paper.

  4. Remove the new cartridge from its packaging and pull the orange tab to remove the protective tape, open the cartridge access door, then install the ink cartridges into their respective slots.

  5. Close the cartridge access door and wait for an alignment page to print.

  6. Place the alignment page with the print side down on the right-front corner of the scanner glass, then press the Start Copy Black button to align the cartridges.

   NOTE:

If you have trouble setting up the hardware, refer to the setup poster in the box or go to HP Deskjet 1510 and 2540 Printers - Setting Up the Printer Hardware.

Your printer hardware is now set up and prepared for the wireless setup.

Step 2: Start the software installation

On the computer you want to print from, start the HP full feature print driver and software installation. It contains the wireless print drivers as well as HP Printer Assistant software for scanning and other printer management functions.

  1. Use one of the following options to start the software installation:

    • If you have an installation disc that supports the Windows version on your computer, insert it into the computer disc drive and follow the steps to begin the installation.

    • Go to 123.hp.com/DJ2540 and click Download. The full feature installation process begins automatically after the software downloads.

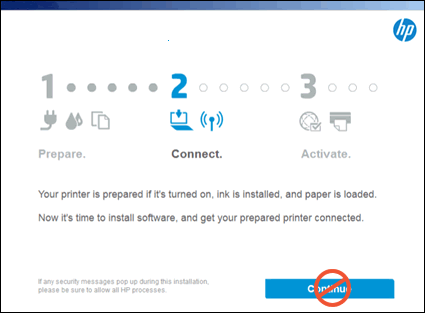
  2. The software installation window progresses until a Connect window opens. STOP at the Connect window! Do not click Continue at this point.

    Figure : Example of the Connect screen. Do not click Continue at this point

    Example of the Connect screen. Do not click Continue at this point

Step 4: Restore default wireless settings on the printer

Press a series of buttons on the printer to reset the wireless settings to ensure that the connection completes successfully.

  1. Make sure the printer is turned on.

  2. If the wireless light is blinking, skip to the next step to continue installing the software.

  3. Press and hold the printer power button .

  4. While holding down the power button, press the Start Copy Black button  two times, then press the cancel button  three times.

  5. Release the power button. The wireless light next to the wireless button should blink. Repeat these steps if the wireless light does not blink.

  6. Immediately continue to the next step to install the software. You have approximately 20 minutes to complete the software setup using HP’s auto wireless connect feature.

Step 4: Continue the software installation

Install the software to finish setting up your HP printer and connect it to your wireless network.

  1. Return to the HP installation Connect screen on your computer, and click Continue.

  2. Read and respond to each software installation screen until a Connection Options screen opens.

  3. Make sure the power button light on the printer is fully lit and the wireless light is blinking. If the power button light is dim (indicating power save mode), press it once until it becomes bright.

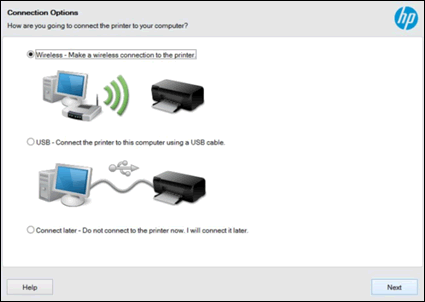
  4. On the Connection Options screen, select Wireless - make a wireless connection to the printer, then click Next.

    Figure : Example of the Wireless - make a wireless connection to the printer

    Example of the Wireless - make a wireless connection to the printer
  5. After the installation checks your network configuration, one of the following screens display to provide you with the best available method to complete the wireless setup.

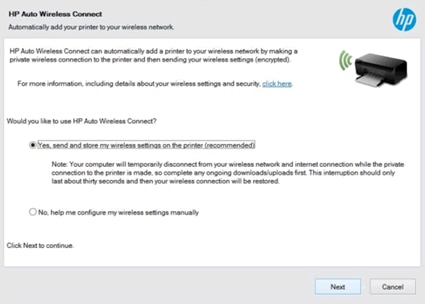
    • HP Auto Wireless Connect: Network check automatically gathers your network connection information. Click Yes, then click Next.

      Figure : Example of the HP Auto Wireless Connect screen

      Example of the HP Auto Wireless Connect screen
    • Wireless Setup Using a USB Connection: Network check could not gather your network settings. Connect a USB cable from your computer to the printer and click Next. The USB connection is only temporary and you are prompted to disconnect the USB cable after the setup completes.

      Figure : Example of the Wireless Setup Using a USB Connection screen

      Example of the Wireless Setup Using a USB Connection screen
  6. Read and respond to each of the setup screens until an Activate window opens. Your printer is set up and you can now print or scan.

Hope this helps you, keep me posted.


Have a great day!


Cheers:)

Raj1788
I am an HP Employee 

† The opinions expressed above are the personal opinions of the authors, not of HP. By using this site, you accept the <a href="https://www8.hp.com/us/en/terms-of-use.html" class="udrlinesmall">Terms of Use</a> and <a href="/t5/custom/page/page-id/hp.rulespage" class="udrlinesmall"> Rules of Participation</a>.