-
×InformationNeed Windows 11 help?Check documents on compatibility, FAQs, upgrade information and available fixes.
Windows 11 Support Center. -
-
×InformationNeed Windows 11 help?Check documents on compatibility, FAQs, upgrade information and available fixes.
Windows 11 Support Center. -
- HP Community
- Printers
- Mobile Printing & Cloud Printing
- My hp officejet pro 6835 (costco) scanned blurry images and ...

Create an account on the HP Community to personalize your profile and ask a question
Your account also allows you to connect with HP support faster, access a personal dashboard to manage all of your devices in one place, view warranty information, case status and more.
Check some of the most frequent questions about Instant Ink: HP INSTANT INK, HP+ PLANS: INK AND TONER.
Check out our WINDOWS 11 Support Center info about: OPTIMIZATION, KNOWN ISSUES, FAQs AND MORE.

It has been a while since anyone has replied. Simply ask a new question if you would like to start the discussion again.
03-10-2018 01:05 PM
 HP Recommended
Product: officejet pro 6835
Operating System: Microsoft Windows 8.1 (64-bit)
My hp officejet pro 6835 (costco) scanned blurry images and shown some dark spots . It happenned from both scanning it from the glass screen and from the computer wireless remote order.
It is a wireless connection from my hp pavillion with touch screen, microsoft windows 8.1 of 64 bit
how do I fix it?
Solved! Go to Solution.
1 ACCEPTED SOLUTION
Accepted Solutions
03-11-2018 01:17 PM
HP Recommended
Hi @Nitsupang
Welcome to HP Forums. This is a great place to get support, find answers and tips.
I understand that you are facing Scan quality issues on your HP Officejet Pro 6835
I'd like to help.
Do you face the same issue when scanning from the Automatic Document Feeder?
Let's start with a Printer Reset
(1) Turn the printer on, if it is not already on.
(2) Wait until the printer is idle and silent before you continue.
(3) With the printer turned on, disconnect the power cord from the rear of the printer.
(4) Unplug the power cord from the wall outlet.
(5) Wait at least 60 seconds.
(6) Plug the power cord back into the wall outlet.
NOTE: HP recommends connecting the printer power cord directly to the wall outlet.
(7) Reconnect the power cord to the rear of the printer.
(8) Turn on the printer, if it does not automatically turn on.
The printer might go through a warm-up period. The printer lights might flash, and the carriage might move.
Wait until the warm-up period finishes and your printer is idle and silent before you proceed.
Next clean the Scanner Glass and also the ADF
Steps to clean the ADF Rollers
-
Gather the following materials:
-
A clean, lint-free cloth, or any cloth that does not come apart or leave fibers
-
Distilled, filtered, or bottled water (tap water might damage the printer)
-
-
Remove the original document from the ADF.
-
Turn off the printer.
-
Disconnect the power cord from the rear of the printer.
-
Open the ADF cover.
-
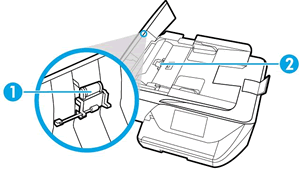
Find the paper pick rollers and the separator pad inside the ADF.
Figure : Example of the paper pick rollers and separator pad in a LaserJet printer
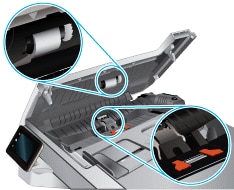
Figure : Example of the paper pick rollers and separator pad in a OfficeJet printer
-
Lightly dampen a clean, lint-free cloth with filtered or distilled water, then squeeze any excess liquid from the cloth.
-
Use the damp cloth to wipe any residue off the paper pick rollers and the separator pad.
-
Leave the ADF cover open for two minutes to allow the paper pick rollers and separator pad to dry.
-
Close the ADF cover.
-
Reload the original document print side up in the document feeder tray. Gently slide the document into the printer as far as it can go.
-
Slide in the paper width guides until they are snug against the paper.
Do not push the paper width guides in so far that they bend the paper.
-
Reconnect the power cord to the rear of the printer.
-
Turn on the printer
You can also refer to this Link.
If the issue persists, please contact our Phone Support for Service Options
Step 1. Open link: www.hp.com/contacthp/
Step 2. Enter Product number or select to auto detect
Step 3. Scroll down to "Still need help? Complete the form to select your contact options"
Step 4. Scroll down and click: HP contact options - click on Get phone number and phone number appear.
Thank you 🙂
If the information I've provided was helpful, give us some reinforcement by clicking the "Solution Accepted"
KrazyToad
I Am An HP Employee
3 REPLIES 3
03-11-2018 01:17 PM
HP Recommended
Hi @Nitsupang
Welcome to HP Forums. This is a great place to get support, find answers and tips.
I understand that you are facing Scan quality issues on your HP Officejet Pro 6835
I'd like to help.
Do you face the same issue when scanning from the Automatic Document Feeder?
Let's start with a Printer Reset
(1) Turn the printer on, if it is not already on.
(2) Wait until the printer is idle and silent before you continue.
(3) With the printer turned on, disconnect the power cord from the rear of the printer.
(4) Unplug the power cord from the wall outlet.
(5) Wait at least 60 seconds.
(6) Plug the power cord back into the wall outlet.
NOTE: HP recommends connecting the printer power cord directly to the wall outlet.
(7) Reconnect the power cord to the rear of the printer.
(8) Turn on the printer, if it does not automatically turn on.
The printer might go through a warm-up period. The printer lights might flash, and the carriage might move.
Wait until the warm-up period finishes and your printer is idle and silent before you proceed.
Next clean the Scanner Glass and also the ADF
Steps to clean the ADF Rollers
-
Gather the following materials:
-
A clean, lint-free cloth, or any cloth that does not come apart or leave fibers
-
Distilled, filtered, or bottled water (tap water might damage the printer)
-
-
Remove the original document from the ADF.
-
Turn off the printer.
-
Disconnect the power cord from the rear of the printer.
-
Open the ADF cover.
-
Find the paper pick rollers and the separator pad inside the ADF.
Figure : Example of the paper pick rollers and separator pad in a LaserJet printer
Figure : Example of the paper pick rollers and separator pad in a OfficeJet printer
-
Lightly dampen a clean, lint-free cloth with filtered or distilled water, then squeeze any excess liquid from the cloth.
-
Use the damp cloth to wipe any residue off the paper pick rollers and the separator pad.
-
Leave the ADF cover open for two minutes to allow the paper pick rollers and separator pad to dry.
-
Close the ADF cover.
-
Reload the original document print side up in the document feeder tray. Gently slide the document into the printer as far as it can go.
-
Slide in the paper width guides until they are snug against the paper.
Do not push the paper width guides in so far that they bend the paper.
-
Reconnect the power cord to the rear of the printer.
-
Turn on the printer
You can also refer to this Link.
If the issue persists, please contact our Phone Support for Service Options
Step 1. Open link: www.hp.com/contacthp/
Step 2. Enter Product number or select to auto detect
Step 3. Scroll down to "Still need help? Complete the form to select your contact options"
Step 4. Scroll down and click: HP contact options - click on Get phone number and phone number appear.
Thank you 🙂
If the information I've provided was helpful, give us some reinforcement by clicking the "Solution Accepted"
KrazyToad
I Am An HP Employee
03-12-2018 08:47 AM
HP Recommended
Hi @Nitsupang
I'm glad the scanning is getting better. Please repeat those steps few more times and that should fix it.
Thank you 🙂
KrazyToad
I Am An HP Employee
Be alert for scammers posting fake support phone numbers and/or email addresses on the community.
If you think you have received a fake HP Support message, please report it to us by clicking on "Flag Post".
† The opinions expressed above are the personal opinions of the authors, not of HP. By using this site, you accept the Terms of Use and Rules of Participation.


Didn't find what you were looking for?
Ask the community
† The opinions expressed above are the personal opinions of the authors, not of HP. By using this site, you accept the <a href="https://www8.hp.com/us/en/terms-of-use.html" class="udrlinesmall">Terms of Use</a> and <a href="/t5/custom/page/page-id/hp.rulespage" class="udrlinesmall"> Rules of Participation</a>.