-
×InformationNeed Windows 11 help?Check documents on compatibility, FAQs, upgrade information and available fixes.
Windows 11 Support Center. -
-
×InformationNeed Windows 11 help?Check documents on compatibility, FAQs, upgrade information and available fixes.
Windows 11 Support Center. -
- HP Community
- Printers
- Mobile Printing & Cloud Printing
- Poor print quality, how to fix via mobile app as I have no P...

Create an account on the HP Community to personalize your profile and ask a question
06-11-2020 08:00 AM
Welcome to HP support community.
Manually clean the area around the ink nozzles
-
Gather the following materials:
-
Dry foam-rubber swabs, lint-free cloth, or any soft material that does not come apart or leave fibers (coffee filters work well)
-
Distilled, filtered, or bottled water (tap water might contain contaminants that can damage the ink cartridges)
CAUTION:
Do not use platen cleaners or alcohol to clean the ink cartridge contacts. These can damage the ink cartridge or the printer.
-
-
Press the Power button to turn on the printer, if it is not already on.
-
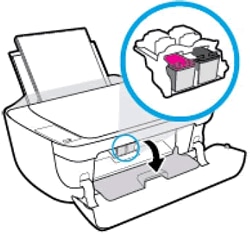
Open the exterior door, and then grasp the handle and lower the ink cartridge access door to open it.
The carriage moves to the center of the printer.
Figure : Open the ink cartridge access door
-
Wait until the carriage is idle and silent before you continue.
-
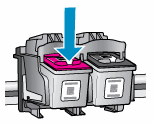
Lightly press down on one of the ink cartridges to release it, and then pull the ink cartridge toward you out of its slot.
Figure : Press down to remove the ink cartridge
CAUTION:
Do not remove both ink cartridges at the same time. Remove and clean each ink cartridge one at a time. Do not leave an ink cartridge outside the printer for more than 30 minutes.
-
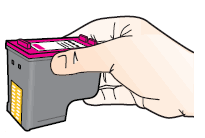
Hold the ink cartridge by its sides.
Figure : Hold the ink cartridge by its sides
-
Inspect the ink cartridge contacts for ink and debris buildup.
CAUTION:
Do not touch the copper-colored contacts or the ink nozzles. Touching these parts can result in clogs, ink failure, and bad electrical connections.
Figure : Do not touch the contacts or nozzles

-
Lightly moisten a foam-rubber swab or lint-free cloth with distilled water, and then squeeze any excess water from it.
-
Clean the face and edges around the ink nozzle with the swab.
CAUTION:
Do not clean the ink nozzle plate.
Figure : Clean the area around the ink nozzle
-
-
Nozzle plate - Do not clean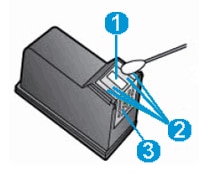
-
Area surrounding ink nozzle - Do clean
-
Ink cartridge contacts - Do not clean
-
-
Either let the ink cartridge sit for 10 minutes to allow the cleaned area to dry, or use a new swab to dry it.
-
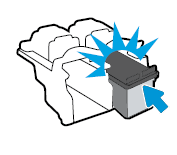
Slide each ink cartridge at a slight upward angle into the empty slot, and then gently push up on each ink cartridge until it locks into place.
Figure : Push the ink cartridge into its slot
-
Repeat these steps to clean around the nozzles on the other ink cartridge.
-
Close the ink cartridge access door.
-
Reconnect the power cord to the rear of the printer.
-
Press the Power button to turn on the printer, if it does not turn on automatically.
You can refer this HP document to fix the issue:- Click here
I hope that helps.
To thank me for my efforts to help you, please mark my post as an accepted solution so that it benefits several others.
Cheers.
Sandytechy20
I am an HP Employee
