-
×InformationNeed Windows 11 help?Check documents on compatibility, FAQs, upgrade information and available fixes.
Windows 11 Support Center. -
-
×InformationNeed Windows 11 help?Check documents on compatibility, FAQs, upgrade information and available fixes.
Windows 11 Support Center. -
- HP Community
- Printers
- Mobile Printing & Cloud Printing
- Print legal Documents 6455e

Create an account on the HP Community to personalize your profile and ask a question
09-25-2021 09:28 AM
Hi@adagarciamedina,
Welcome to the HP Support Community!
Don't worry I'll try to help you out.
Choose advanced print settings on Mac
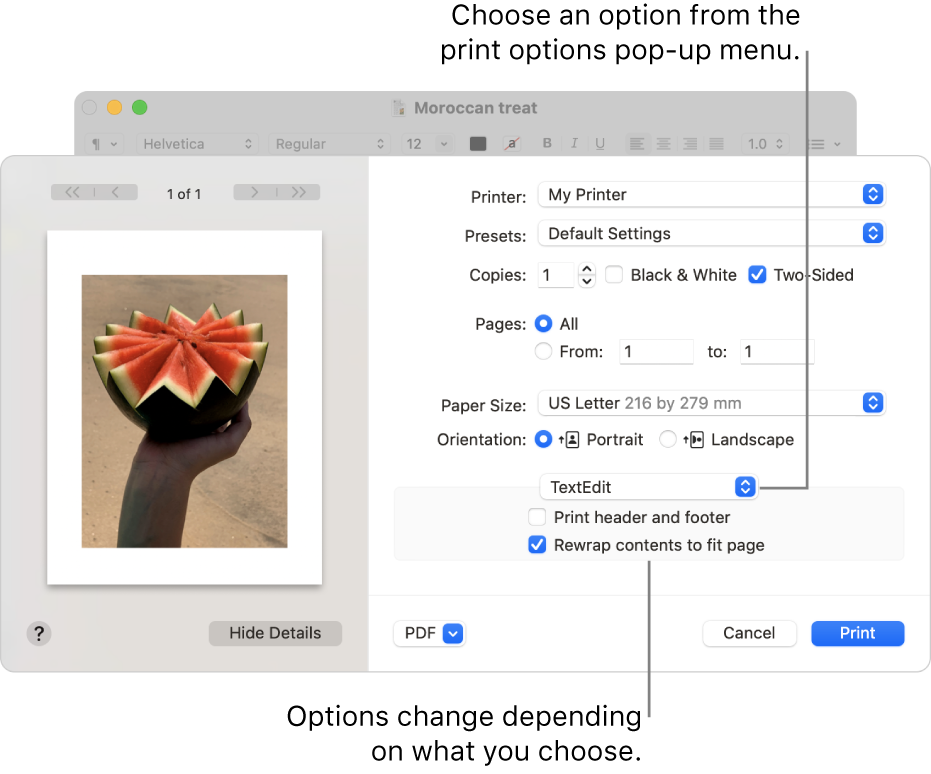
When you print a document, you use the Print dialogue to select your print settings. To see advanced print settings, click Show Details at the bottom of the dialogue. (If you see a Hide Details button at the bottom, you’re already viewing advanced settings.)
Some apps may not have all the options described below; see the documentation for your app for more information.

Change a document’s paper size
You can specify the paper size when you print.
-
With a document open on your Mac, choose File > Print.
-
If you see a Show Details button, click it.
-
If the Print dialogue has a Paper Size menu, choose a size.
In apps such as Pages or Microsoft Word, you can also specify a page size for a document as you’re working on it. When you print, the document is already formatted to fit the paper size you selected. However, you can choose to scale the document to fit your printer’s paper. To set the document’s page size, choose File > Page Setup, then click the Paper Size menu and choose a size.
In most apps, the Paper Size menu has a Manage Custom Sizes option. If you choose this option, see Create a custom paper size for printing.
Change the default paper size for your printer
If you usually print on a particular size of paper, you can set it as the default paper size, so it’s used whenever you print. (You can still change the paper size in the Print dialogue if you need to.)
The default size is also used as the page size whenever you create a new document in an app, such as Pages. Changing the default size affects only new documents; it doesn’t change previously created documents.
-
On your Mac, choose Apple menu
 > System Preferences, then click Printers & Scanners.
-
Click the “Default paper size” pop-up menu, then choose a paper size.
Manually feed paper when you print
You can choose to manually feed paper when you print instead of using the printer’s default paper tray (if your printer supports this capability). For example, you might print on envelopes by manually feeding them into the printer.
-
With a document open on your Mac, choose File > Print.
-
If you see a Show Details button, click it.
-
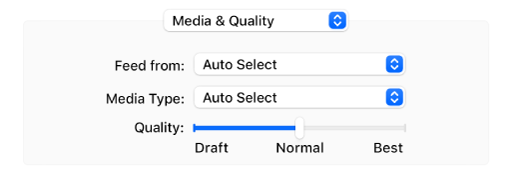
Click the print options pop-up menu (at the top of the light grey box), then choose Media & Quality.

-
Click the Feed from pop-up menu, then choose Manual Feed.
You may need to set your printer to display this feature when you set up the printer.
Reduce or enlarge a printed document
You can specify a percentage of a document’s original size to reduce or enlarge the printed document.
-
With a document open on your Mac, do one of the following:
-
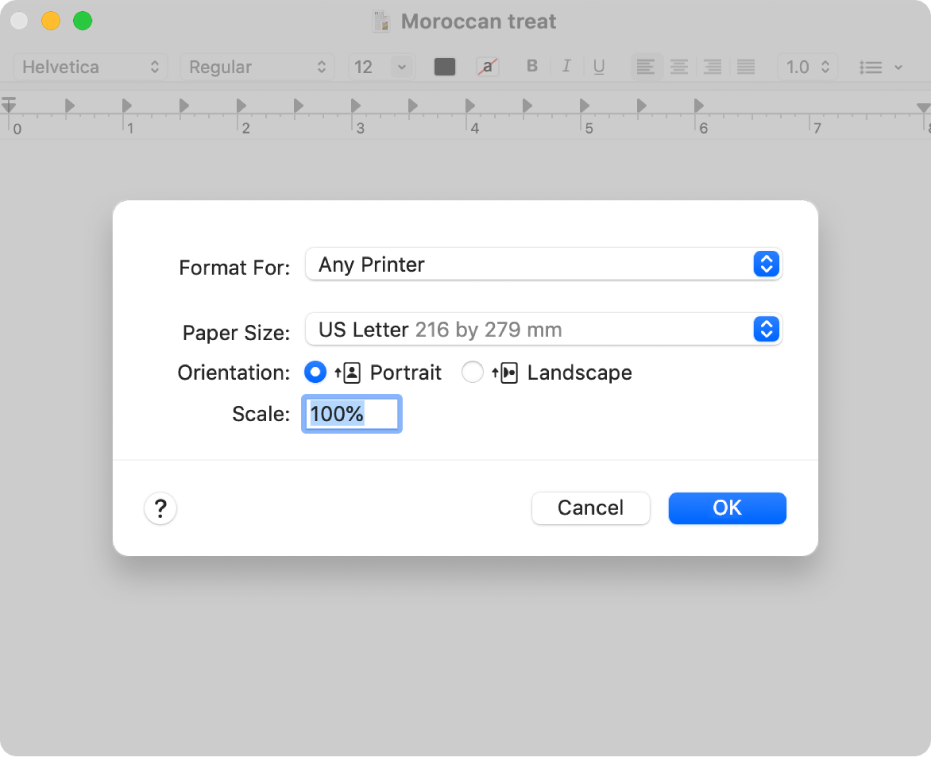
Choose File > Page Setup. Click the Settings pop-up menu and choose Page Attributes, click the Format For pop-up menu and choose Any Printer. This sets the document’s scale for all documents you print from this app.
-
Choose File > Print. If you see a Show Details button, click it to show all available options.
-
-
Type a percentage in the Scale box.

If you can’t see the Scale option in the Print dialogue, choose the app name in the print options pop-up menu (in the light grey box).
-
If you want the document to print larger than the original size, enter a value greater than 100.
-
To print the document smaller than its original size, enter a value less than 100.
-
If you scale a document, it’s a good idea to preview the document before you print it. See Print documents from your Mac.
Scale a document to fit your printer’s paper
You can scale a document to fit the paper in your printer. For example, if you have an A4 document, you can scale it to fit on 8.5x11-inch paper.
-
With a document open on your Mac, choose File > Print.
-
If you see a Show Details button, click it.
-
Click the print options pop-up menu (at the top of the light grey box), then choose Paper Handling.
-
Select “Scale to fit paper size”, click the Destination Paper Size pop-up menu, then choose your printer’s paper size.
If you want to scale the document only because it’s too big for the printer’s paper, select “Scale down only”. (If this option is selected but the document isn’t too big for the paper you have, the document is printed at its original size.)
The Print dialogue also lets you create a PDF or PostScript document. See Save a document as a PDF and Save a document in PostScript format.
Hope this helps! Keep me posted.
Please click “Accept as Solution” if you feel my post solved your issue, it will help others find the solution.
Click the “Kudos, Thumbs Up" on the bottom right to say “Thanks” for helping!
Have a great day!
