-
×InformationNeed Windows 11 help?Check documents on compatibility, FAQs, upgrade information and available fixes.
Windows 11 Support Center. -
-
×InformationNeed Windows 11 help?Check documents on compatibility, FAQs, upgrade information and available fixes.
Windows 11 Support Center. -
- HP Community
- Printers
- Mobile Printing & Cloud Printing
- Printer is cutting off the tops of some letters on some line...

Create an account on the HP Community to personalize your profile and ask a question
12-14-2017 11:29 AM
My printer is printing partial letters on somes lines ie the top half of the words of an entire line are not printed. It is also not printing words in some areas. I checked the ink level and it shows to be at 50%. I tranferred the same document to another printer and it printed perfectly. Help! Thanks!!
12-15-2017 02:22 PM
Hi @Mel33,
Thank you for joining HP Forums.
This is a great place to get support, find answers
As I understand you are facing a print quality issue.
No worries, I'll be glad to help you.
Alignment is automatic after new cartridge installation. Alignment can also help later, in cases of blurred or jagged lines.
Replace any low or empty ink cartridges, and then try to print again.
-
Turn on the printer.
-
Make sure to load the printer with plain, white paper.
-
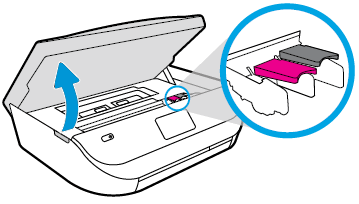
Gently grasp the handles on either side of the printer, then raise the ink cartridge access door until it locks into place.
The carriage moves to the center of the printer.
Figure : Opening the ink cartridge access door

-
Wait until the carriage is idle and silent before you proceed.
-
To release the ink cartridge, lift the lid on the ink cartridge slot, then gently push the lid back until it stops.
-
Pull up on the ink cartridge to remove it from the slot.
Figure : Removing the ink cartridge
-
Lift the lid
-
Gently push the lid back
-
Pull up on the ink cartridge
-
-
Remove one of the new ink cartridges from its package. Be careful to only touch the black plastic on the ink cartridge.
-
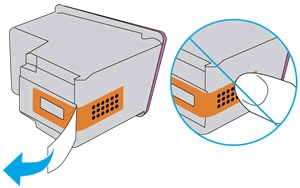
Remove the plastic tape from the ink cartridge.
Figure : Removing the plastic tape

-
Hold the ink cartridge by its sides with the nozzles toward the printer, then slide the ink cartridge forward into the slot.
-
Close the lid on the ink cartridge slot to secure the ink cartridge into place.
Figure : Inserting the ink cartridges
-
Insert the ink cartridge
-
Close the lid
-
The color ink cartridge is on the left, and the black ink cartridge is on the right
-
-
Repeat the previous steps to install the other ink cartridge, if needed.
-
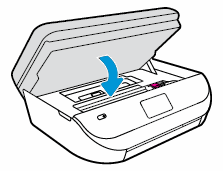
Close the ink cartridge access door.
After you install new ink cartridges, the printer automatically prints an alignment page.
Figure : Closing the ink cartridge access door.

-
Wait for the alignment page to fully eject from the printer.
NOTE:
Before a print job, the printer automatically extends the output tray extender. Do not push in the output tray extender until the print job is complete.
-
Lift the scanner lid.
-
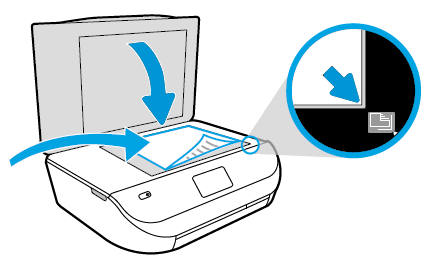
Place the alignment page with the print side down on the scanner glass. Position it according to the engraved guides around the glass.
Figure : Placing the alignment page on the scanner glass

-
Close the scanner lid, then touch OK.
The printer aligns the ink cartridges.
If the issue persists, click here for more troubleshooting steps.
Keep me posted, how it goes!
If the information I've provided was helpful.
Give us some reinforcement by clicking the solution and kudos buttons, that'll help us and others see that we've got the answers!
Good Luck.
Raj1788
I am an HP Employee
06-18-2018 02:19 PM
The reply by an HP employee involved replacing the ink cartridges. That is NOT a cure-all since I have new ink and it still has the same problem. Try some suggestions other than simply spending more money on ink please. Is there a way to actually CLEAN the print heads, for instance?
04-03-2023 11:00 AM
Hi,
Follow the link below for more tips on how to solve your problem:
https://support.hp.com/in-en/document/c03047229
Regards,
SofiaML
