• ×
    Information
    Need Windows 11 help?
    Check documents on compatibility, FAQs, upgrade information and available fixes.
    Windows 11 Support Center.
  • post a message
  • ×
    Information
    Need Windows 11 help?
    Check documents on compatibility, FAQs, upgrade information and available fixes.
    Windows 11 Support Center.
  • post a message
Guidelines
We have new content about printers, Click here to check it out!
Check some of the most frequent questions about Instant Ink: HP INSTANT INK, HP+ PLANS: INK AND TONER.


Check out our WINDOWS 11 Support Center info about: OPTIMIZATION, KNOWN ISSUES, FAQs AND MORE.
HP Recommended
HP 7134
macOS 10.15 Catalina

my HP Envy 7134 printer could not connect to the web services for wireless printing to my MAC OS

1 REPLY 1
HP Recommended

Hi @immaxx1


Welcome to the HP Support Community. I'd be happy to assist you with the  "Webservice" issue. 


Try the below steps to resolve the issue-


Step 1- Check the network and printer connection status


Make sure your wired (Ethernet) or wireless network is working correctly and the printer is connected.

  1. Make sure the printer is not connect with a USB cable.

    NOTE: 

    When a USB cable is connected to the printer, the printer cannot connect to Web Services.

  2. If you are using a wireless router, check your router’s documentation or support website to make sure it meets the following requirements:

    • Check the router band: Many routers can operate in both 2.4 GHz and 5.0 GHz frequency bands, but not all HP printers support both bands. Make sure the 2.4 GHz router band is enabled and broadcasting. If the router broadcasts separate network names (SSIDs) for each band, connect the printer to the 2.4 GHz band SSID. If the printer supports 5.0 GHz, connect it to the 5.0 GHz band SSID.

    • Bonjour support (Mac only): HP recommends routers that support Bonjour, Apple's network discovery software. Connecting with Bonjour is the best way to find the printer and support wireless printing.

  3. Make sure your printer is not connected to a guest or host network, such as those networks found in schools, hotels, or home networks that allow guest logins. For more information see Can't Print on a Guest or Host Network.

  4. Confirm the printer is connected to the network.

    • Wireless network connection: On the printer, open the Wireless Network or Settings menu to verify the wireless feature is turned on, and then make sure the Wireless icon  light is solid and blue.

      If the wireless light is blue and blinks, move the computer and printer closer to the router, position the devices away from large metal objects such as bookcases, and move the printer away from devices that emit radio signals such as microwaves and cordless phones. Reconnect the printer to your network, and then make sure the wireless light is blue and solid. If your printer frequently drops the wireless connection, go to Printer Does Not Maintain Wireless Connection for detailed troubleshooting steps.

    • Wired (Ethernet) network connection: Check that the cable is connected to the printer Ethernet port  and to an available port on the router. The green link light should be steady, and the orange activity light should blink when the cable is connected.

      Figure : Connect the cable to the printer and to the router

      Connect the Ethernet cable to the printer and to the router
  5. On your computer, click the network icon  or  in the menu bar to view the network name and status of the connection.

    • If the selected network is not yours (for instance, if you connected to a neighbor's or a guest network), you must reconnect to your own network before turning on Web Services.

    • If the network signal strength is weak, move the computer and printer closer to the router, position the devices away from large metal objects such as bookcases, and move the printer away from devices that emit radio signals such as microwaves and cordless phones.

    • If the network status is not connected, confirm your network is working correctly, and then check the status again. Make sure a check mark or connected status displays next to the network name.

  6. Try to turn on Web Services.

If the issue persists, continue to the next step.


Step 2: Restart the computer, printer, and router

To resolve many connectivity issues, restart the computer, printer, and router.

NOTE: 

The following steps temporarily disconnect network and Internet connections, and require restarting your computer. Complete any tasks or downloads in progress before you continue.

  1. Turn off the router by pressing the power button or disconnecting the power cord.

  2. Turn off the printer.

  3. Close all running programs on your computer, and then shut down the computer.

  4. Press the power button or reconnect the power cord to the router, and then wait for the Internet activity light to display a normal connected status.

  5. Turn on the printer.

  6. Turn on the computer.

  7. Try to turn on Web Services.

If the issue persists, continue to the next step.


Step 3: Turn on Web Services from the Embedded Web Server (EWS)

Using the printer EWS to turn on Web Service might resolve any communication issues with the printer control panel.

  1. Print a Network Configuration Page.

    • Printers with LCD and text-based control panels: Print the page from the Wireless, Network Settings or Setup menu.

    • Printers with basic control panels (buttons only): Print the page using the button combinations on the printer control panel. For some printers, press the Wireless  and Information  buttons simultaneously, or press the Wireless and Start Copy Black  buttons at the same time.

    For detailed instructions to print a Network Configuration Page, go to HP Customer Support, type your printer model, and then search for the document to 'print a self-test page.'

  2. On the Network Configuration Page, locate the URL(s) for Embedded Web Server address.

    NOTE: 

    If the URL for the EWS is http://0.0.0.0, the printer is not connected to a network. Reconnect your printer to the network, and then continue troubleshooting.

    Figure : Locating the URL(s) for Embedded Web Server address

    Locating the URL(s) for Embedded Web Server address
  3. On your computer, open an Internet browser.

  4. Type the URL address for the EWS in the browser address bar, and then press Enter.

    NOTE: 

    Make sure to type the IP address into the Internet browser's address box. If typed into a toolbar search box or search engine, the EWS does not open.

  5. If a website security certificate displays in the Internet browser, click Continue.

    The EWS webpage for the printer opens, which confirms that the printer is on the same network as the computer.

  6. On the EWS webpage, click the Web Services tab.

  7. On the Web Services Setup page, click Continue, Turn On, or Enable, and then follow the on-screen instructions

    Figure : Example of clicking Continue

    Example of clicking Continue.

If the issue persists, continue to the next step.


Step 4: Check the Internet proxy server settings

For networks that use proxy servers, update the Web Services settings in the printer EWS with the proxy information.

  1. Locate the Internet proxy settings.

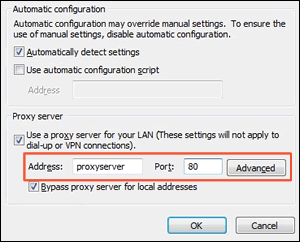
    • Windows: Search Windows for Internet, and then click Internet Options in the list of results. On the Internet Properties window, click the Connections tab, select your network, if necessary, and then click Settings.

      The network settings menu displays with the proxy settings.

      Figure : Example of proxy settings in Windows

      Example of proxy settings in Windows
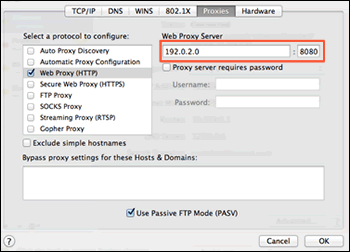
    • Mac: Open System Preferences, and then click Network. On the Network window, click Advanced, click the Proxies tab, and then select your proxy, if necessary.

      Figure : Example of proxy settings in Mac

      Example of proxy settings in Mac
  2. Write down the Address and Port values for your proxy server connection.

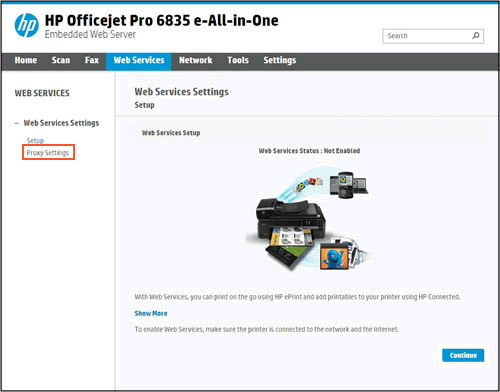
  3. From the EWS, click the Web Services tab, and then click Proxy Settings.

    Figure : Clicking Proxy Settings

    Clicking Proxy Settings
  4. Type the Address and Port values for your proxy server connection, and then click Apply.

  5. Try to turn on Web Services.

Step 5- try updating the printer's firmware - HP Printers - Updating or Upgrading Printer Firmware 


Hope this helps! Keep me posted. 


Please click “Accept as Solution” if you feel my post solved your issue, it will help others find the solution.

Click the “Kudos, Thumbs Up" on the bottom right to say “Thanks” for helping!


Have a great day! 

† The opinions expressed above are the personal opinions of the authors, not of HP. By using this site, you accept the <a href="https://www8.hp.com/us/en/terms-of-use.html" class="udrlinesmall">Terms of Use</a> and <a href="/t5/custom/page/page-id/hp.rulespage" class="udrlinesmall"> Rules of Participation</a>.