-
×InformationNeed Windows 11 help?Check documents on compatibility, FAQs, upgrade information and available fixes.
Windows 11 Support Center. -
-
×InformationNeed Windows 11 help?Check documents on compatibility, FAQs, upgrade information and available fixes.
Windows 11 Support Center. -
- HP Community
- Notebooks
- Notebook Video, Display and Touch
- Re: Cannot set the video player software on my laptop to run...

Create an account on the HP Community to personalize your profile and ask a question
Your account also allows you to connect with HP support faster, access a personal dashboard to manage all of your devices in one place, view warranty information, case status and more.

It has been a while since anyone has replied. Simply ask a new question if you would like to start the discussion again.
02-21-2020 12:03 PM
 HP Recommended
Product: HP Pavilion - 15-bc202nq
Operating System: Microsoft Windows 10 (64-bit)
My laptop comes with a dual GPU, an integrated and a dedicated one. I'd like to force all my video player software (Media Player Classic, VLC) to run on the dedicated GPU, but the nVidia control panel does not allow me to do that. I don't understand why.
The reason why i want to always use the dedicated GPU is because i suspect that the integrated one is not powerful enough to sustain long, full HD videos. After about an hour and a half, i start noticing the video and audio going out of sync. I want to run the video on the dedicated GPU to see if that effect also occurs after the switch.
Can you please help me out?
Solved! Go to Solution.
1 ACCEPTED SOLUTION
Accepted Solutions
02-25-2020 12:10 PM
HP Recommended
I managed to find an alternative, i can set the dedicated GPU directly in Windows 10, as instructed here: https://www.howtogeek.com/351522/how-to-choose-which-gpu-a-game-uses-on-windows-10/
4 REPLIES 4
02-24-2020 04:59 PM
HP Recommended
Welcome to the HP Support Community!
I reviewed your post and I understand that you want to run all the video players on the dedicated graphics card.
Don’t worry, I assure you I will try my best to get this sorted.
I recommend you follow the below steps and check if it helps.
-
Ensure that your computer is connected to the Internet.
-
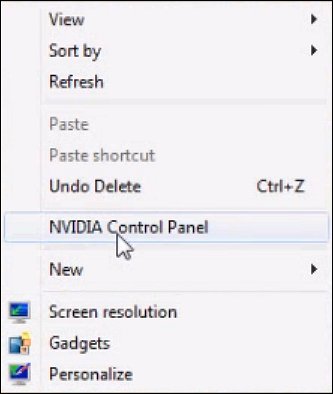
Right-click the Windows desktop background (not the Start screen) and select NVIDIA Control Panel.
Figure : NVIDIA Control Panel selection
-
From the left menu, select Manage 3D settings, and then click Manage updates.
Figure : Manage updates

-
Click Get updates to ensure that your computer has all of the latest software and game profiles. When finished, click the close button to close this Window.
-
Click the Program Settings tab.
-
Click the drop down selection under "1. Select a program to customize:" and select the name of software in the list of profiles.
NOTE:
If the name of software is not in the list, click Add and browse to the software application's executable file (exe) to add the program to the list. Most software exe files can be find at the path C:\Program Files (x86) or C:\Program Files. Look for a directory that shares the same name as the software or software company at this path.
-
Once a software program is selected, select the preferred graphics processor setting that you would like to use (setting number 2).
-
Select High-Performance if you want to maximize the visual appearance and speed for that software program at the cost of using more battery power.
-
Select Integrated graphics if you want to use less battery power while using the software program, at the cost of an improved graphics experience.
-
Select Use Global Setting if you want to let NVIDIA manage the power and display settings - to get the most out of both battery and visual effects.
NOTE:
Some settings may not be available for a software program. If a setting is not available, the NVIDIA Optimus technology does not support the software program for that setting.
Figure : Program Settings

-
-
Click Apply and close the Control Panel window when finished.
Let me know how it goes and you have a great day!
If you wish to show appreciation for my efforts, mark my post as Accept as Solution. Your feedback counts!
Cheers!
The_Fossette
I am an HP Employee
02-25-2020 11:58 AM
HP Recommended
Hello @The_Fossette,
Thank you for taking the time to look into my issue.
Unfortunately, my version of nVidia Control Panel (8.1.940.0), which seems to be the latest available, does not allow me to set the dedicated GPU for my media player, the dropdown is disabled. I don't know whether it's due to the software or due to the laptop hardware. I am attaching a screenshot below:

Can you please advise on what else i should try?
Regards,
Gabriel
02-25-2020 12:10 PM
HP Recommended
I managed to find an alternative, i can set the dedicated GPU directly in Windows 10, as instructed here: https://www.howtogeek.com/351522/how-to-choose-which-gpu-a-game-uses-on-windows-10/
02-26-2020 09:47 AM
HP Recommended
Perfect! I am glad to hear that.
If any other questions arise, please feel free to write back to me.
Cheers!
The_Fossette
I am an HP Employee
Be alert for scammers posting fake support phone numbers and/or email addresses on the community.
If you think you have received a fake HP Support message, please report it to us by clicking on "Flag Post".
† The opinions expressed above are the personal opinions of the authors, not of HP. By using this site, you accept the Terms of Use and Rules of Participation.


Didn't find what you were looking for?
Ask the community
† The opinions expressed above are the personal opinions of the authors, not of HP. By using this site, you accept the <a href="https://www8.hp.com/us/en/terms-of-use.html" class="udrlinesmall">Terms of Use</a> and <a href="/t5/custom/page/page-id/hp.rulespage" class="udrlinesmall"> Rules of Participation</a>.