-
×InformationNeed Windows 11 help?Check documents on compatibility, FAQs, upgrade information and available fixes.
Windows 11 Support Center. -
-
×InformationNeed Windows 11 help?Check documents on compatibility, FAQs, upgrade information and available fixes.
Windows 11 Support Center. -
- HP Community
- Notebooks
- Notebook Wireless and Networking
- WiFi Icon and settings disappeared from laptop

Create an account on the HP Community to personalize your profile and ask a question
Your account also allows you to connect with HP support faster, access a personal dashboard to manage all of your devices in one place, view warranty information, case status and more.
Check out our WINDOWS 11 Support Center info about: OPTIMIZATION, KNOWN ISSUES, FAQs, VIDEOS AND MORE.

It has been a while since anyone has replied. Simply ask a new question if you would like to start the discussion again.
1 REPLY 1
09-24-2021 08:43 AM
 HP Recommended
Hi@breslin, Welcome to the HP Support Community!
As I understand, Wi-Fi is disappeared,
,
No worries, as I'll be glad to help you, that said, I'll need a few more details to dissect your concern & provide an accurate solution:
When was the last time it worked fine?
Were there any hardware/software changes made?
Have you tried any troubleshooting steps?
Let's try these steps to resolve the issue:
Change your wireless environment
Environment greatly impacts the effectiveness of wireless networks. Review and consider the following actions to help resolve the wireless network issue.
- Proximity: If you have a mobile computer, try to move it closer to your router so the signal strength is strong. The farther the computer is from the router, the weaker the broadcast signal. Use the wireless icon in the notification area to check the strength of the signal.
Weak signal:
or
Strong signal:
or
- Interference: If possible, remove metal objects that are near or between the router and computer. They can interfere with the network signal and cause poor connectivity. Move the computer or router to a location where there are fewer solid object between the two and check if signal strength/connection improves.
Other devices operating on similar frequencies, such as cordless phones, microwaves, analog security devices, etc. can cause interference as well. Relocate or turn off these devices for testing.
- Limit the Too many devices on the same network can cause performance drops. Temporarily have another device log off the network and see if the wireless issue is resolved. amount of devices:
- Try connecting to a different network: If possible try to connect to another known nearby wireless network to see if the wireless issue is resolved. Too many devices on the same network can cause performance drops.
Try connecting to the Internet again. If you cannot optimize the environment, for example, your computer must be used at a specific place, consider purchasing a wireless repeater to extend the network range.
Check for bandwidth consuming apps or services then test connection speeds
Devices such as smart TVs, wireless TV receivers, laptops, tablets, and phones might be consuming bandwidth and making your Internet service slower. Likewise, applications running on your computer might be using bandwidth in the background.
To isolate this further:
- Try turning off or temporarily disconnecting any other devices that are using the same Internet connection.
- Close all other applications on your computer, and then test the connection speed again.
- Check to see if the problem occurs within a specific application. If it is program-specific, here is a list of items that could help isolate this issue further.
- Check the developer’s website for updates or fixes.
- Try uninstalling and reinstalling the application.
- Try using another similar application.
If the wireless connection speed is still slow, test the network performance with a different device. If the same behavior exhibits, please contact your internet service provider (ISP) as this may be an issue with your internet connection or associated hardware.
If the problem doesn’t show on the other device or if another device is not available to test with, continue to the next step.
Temporarily disable the firewall software
Temporarily disable the firewall software on your computer to see if it is interfering with the Internet connection speed.
- Right-click the taskbar icon associated with your firewall software and select Disable firewall or similar.
- After disabling the firewall, test Internet connection performance. If there is still a problem continue to the next step.
- If the connection is still slow, then the firewall is not part of the problem.
- If the connection is faster, then adjust the firewall settings or use a different firewall.
CAUTION: Remember to re-enable the firewall after testing.
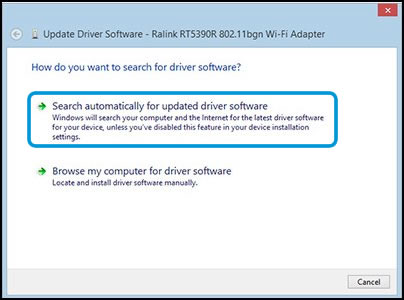
Update network adapter drivers through Device Manager
Installing the latest wireless LAN adapter driver can resolve common issues with the wireless Internet connection. Use Device Manager to find the latest WLAN driver.
- In Windows, search for and open Device Manager.
- Double-click Network adapters, right-click the name of the Wireless Adapter, then select Update Driver Software.
- Click Search automatically for updated driver software.
- If an updated driver is found, follow the instructions to install it.
Try connecting to the Internet again. If there is still a problem continue to the next step.
Update the BIOS (notebook PCs): Follow the steps from the link: https://support.hp.com/in-en/document/c00042629.
Step 1: Make sure the wireless key or button is enabled
Most notebook computers have a button or keyboard key to turn the wireless signal on and off. Check the button or key status to confirm if the wireless signal is on.
-
Locate the wireless key or button. This could be an image of an airplane or a wireless signal.
Button or key
Description

A standalone button with an airplane. This enables or disables “airplane mode” and turns off wireless and Bluetooth on the device.

F12 key with an airplane. This enables or disables “airplane mode” and turns off wireless and Bluetooth on the device.

F12 key with wireless icon and LED. This enables or disables "wireless mode." The LED illuminates in white or blue if active, and amber if wireless is turned off.

A standalone wireless button. This is typically located above or near the keyboard.
-
Press the button once, wait 10 seconds, and then observe any changes to the wireless connection icon in the notification area and to the LED light on the wireless button or key.
-
If the button or key does not have a light, hover your mouse over the wireless connection icon in the notification area of the taskbar to see the current connection status.
-
If the wireless signal is turned on, try connecting to the Internet again.
-
If the wireless signal is turned off, press the button or key again to turn it back on, and then try connecting to the Internet again.
If the issue persists, continue to the next step.
-
Step 2: Update the wireless driver through Device Manager
Downloading and installing the latest wireless LAN adapter driver can resolve common issues with the wireless Internet connection. Use Device Manager to find the latest WLAN driver.
Updating the Wireless Network Adapter Driver with Windows Device Manager | HP Computers | HP
Learn how to update the wireless network adapter driver with Windows Device Manager. Updating the adapter driver can help resolve common issues with your wireless Internet connection.
-
In Windows, search for and open Device Manager.
-
In the Device Manager window, double-click Network adapters, right-click the name of the wireless adapter, and then select Update driver.

-
Click Search automatically for updated driver software.
-
If the tool finds an updated driver is found, follow any on--screen instructions to install it.
-
Try to connect to the Internet.
If the problem persists, continue to the next step.
Step 3: Use automatic troubleshooting
Automatically test and fix a variety of wireless conditions using tools by HP and Microsoft.
NOTE:For computers running Windows 10 in S mode: HP Support Assistant is not available in Windows 10 in S mode; instead use Windows Network and Internet Troubleshooter to test and fix the wireless connection. For more information, see Frequently Asked Questions about Windows 10 in S Mode.
Use HP Support Assistant network diagnostics
HP Support Assistant is a software support diagnosis and troubleshooting tool from HP that can resolve many types of network and Internet connection issues.
NOTE:If your computer cannot connect to the Internet, see the next section to use Windows Network and Internet Troubleshooter.
-
Go to HP Support Assistant to download and install the HP Support Assistant software, if it is not already installed on your computer.
-
In Windows, search for and open HP Support Assistant.
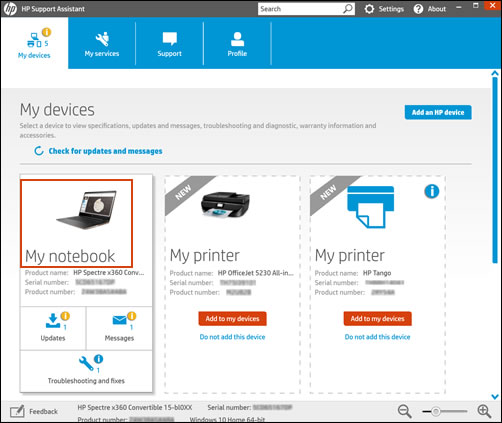
-
On the My Devices tab, select the device you are using, and then click Troubleshooting and fixes. On Troubleshooting and Fixes, click HP Network Check.
If a User Account Control message displays, click Yes.

-
On the HP Network Check Welcome screen, click Next to run the network diagnostic.
-
If the diagnostic test finds no issues, close the window, and skip to the next section for Using Windows Network and Internet Troubleshooter.
-
If the diagnostic test finds one or more issues, continue using these steps.
-
-
Expand Possible Root Causes, if necessary.

-
Click one of the listed possible causes, click one of the tool icons for the steps to resolve the issue, and then follow the on-screen instructions.

-
After completing the instructions, click Re-check.
HP Support Assistant checks the network connectivity.
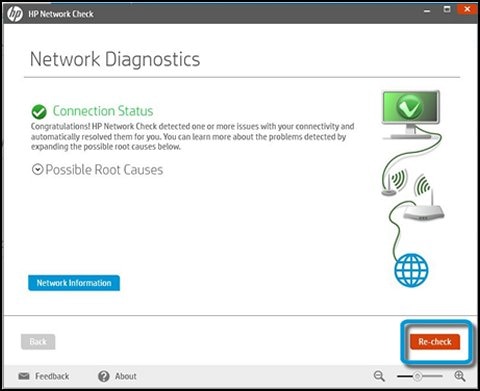
-
If necessary, repeat these steps until the network connectivity issue is resolved or all possible root causes and repairs have completed.
-
Try to connect to the Internet.
If the problem persists, continue to the next step.
Use Windows Network and Internet Troubleshooter
The Windows Network and Internet Troubleshooter tests the network for problems and attempts automatic repairs for any issues found. Use this Windows tool to test and repair the connection.
-
In Windows, right-click the network connection icon
 in the system tray, and then select Troubleshoot problems.
The Windows Network Diagnostic window opens and the troubleshooting process begins.

-
If prompted, select the type of network problem, and then follow the on-screen instructions to resolve the issue.
-
After automated troubleshooting completes, read the information on the screen. This information might describe problems found, what was fixed, or actions you can take to resolve the problems.
-
If problems were found with suggested actions, perform the suggested actions. Try connecting to the Internet again. If the connection fails, continue to the next step.
-
If the issue persists, close the troubleshooting window and continue to the next step.
-
Step 4: Check and reset hardware
Resetting the hardware on your wireless network in the proper sequence can resolve a variety of connection and performance problems.
-
Turn off your computer.
-
If your network includes a wireless router, wireless gateway, or wireless modem/router combination, disconnect the power cord from the router.

-
If your network includes a separate broadband modem, disconnect the power cord from the broadband modem.
-
Wait at least 5 seconds, and then connect the power cord to the wireless router (and the broadband modem, if separate).
-
Wait until all the lights come on and reflect normal Internet and PC activity. If the lights on the broadband modem indicate a problem, review the following list of options for help.
-
If all lights are off after reconnecting the power, check the power source by plugging the power cord into another power outlet. Service or replace your broadband modem if it cannot be turned on.
-
If only the power light is on and the remaining activity lights are off or show no activity, a network connection is not being detected. Make sure the cable carrying the Internet signal is connected to the broadband device. Make sure Internet cables coming into your residence have not been damaged or disconnected. You might need to contact your Internet service provider if other people in your area are also experiencing Internet outages.
-
If the Internet or Online light consistently blinks and does not indicate an online connection is available, the problem likely resides with your Internet service provider. Either wait until service is restored or contact your Internet service provider for further assistance.
-
-
Turn on your computer and wait until Windows opens. If you are using a notebook computer, follow the steps in How to Power Reset your Laptop, and then continue with these steps.
-
Wait until Windows automatically connects to your wireless Internet network.
-
If Windows does not automatically connect, click the wireless connection icon
in the notification area on the taskbar, and then select the name of your wireless network, and then click Connect.A window might open prompting you for a password or push button connect actions depending on the type of security you are using.
Advanced Wi-Fi troubleshooting
If your computer still does not connect to the wireless network after using the steps in this document, refer to the advanced troubleshooting steps in HP PCs – Advanced Wireless Network and Internet Troubleshooting (Windows 10).
Hope this helps! Keep me posted.
Please click “Accept as Solution” if you feel my post solved your issue, it will help others find the solution.
Click the “Kudos, Thumbs Up" on the bottom right to say “Thanks” for helping!
Have a great day!
Be alert for scammers posting fake support phone numbers and/or email addresses on the community.
If you think you have received a fake HP Support message, please report it to us by clicking on "Flag Post".
† The opinions expressed above are the personal opinions of the authors, not of HP. By using this site, you accept the Terms of Use and Rules of Participation.


Didn't find what you were looking for?
Ask the community
† The opinions expressed above are the personal opinions of the authors, not of HP. By using this site, you accept the <a href="https://www8.hp.com/us/en/terms-of-use.html" class="udrlinesmall">Terms of Use</a> and <a href="/t5/custom/page/page-id/hp.rulespage" class="udrlinesmall"> Rules of Participation</a>.